
What are the five parts of the lathe machine?
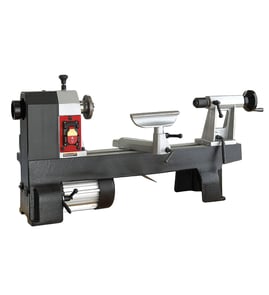
A metal turning lathe like the Craftsman 10127440 is commonly described by five main assemblies: the bed, headstock, tailstock, carriage, and feed system (lead screw/feed rod). These are the core structures that support, rotate, and move the work and cutting tool.
The 5 main parts (what each one does)
- Bed: The rigid base that keeps everything aligned; the headstock, tailstock, and carriage ride on it.
- Headstock: Houses the drive components and supports the spindle; this is where rotation starts.
- Tailstock: Supports the free end of long workpieces and holds tools like drill chucks for drilling.
- Carriage: Moves the cutting tool along the bed; typically includes the saddle, cross slide, and tool post.
- Feed system: Mechanically advances the carriage for turning and threading (often via a lead screw and gearing).
Quick reference table
| Lathe part | Primary job | What you use it for most |
|---|---|---|
| Bed | Alignment and rigidity | Accuracy, vibration control |
| Headstock | Spins the spindle/work | Turning, facing |
| Tailstock | Supports/holds tools | Drilling, supporting long stock |
| Carriage | Positions the cutter | Cutting, facing, boring |
| Feed system | Controlled movement | Consistent cuts, threading |
Why it matters
Knowing these five assemblies helps you troubleshoot faster. For example, chatter often points to bed rigidity or setup, taper can point to tailstock alignment, and poor thread quality can point to the feed system (lead screw, half-nuts, or gears).
Helpful tips when identifying parts on your lathe
- Start at the headstock end; find the spindle and chuck area first.
- Follow the ways on the bed to locate the carriage and its handwheels.
- Slide to the opposite end to find the tailstock and its quill.
- Look for the lead screw running parallel to the bed for the feed system.
- Use the model number to match diagrams and parts lists when ordering.
For help confirming the exact model number format and where to find it on the machine, use how to find your appliance model number (and what it means for parts).
Last updated: February 2026
What is a chip pan in a lathe machine?
A chip pan on a lathe is the tray under the work area that catches metal chips (swarf), cutting fluid, and debris created during turning. On the Craftsman 10127440 metal turning lathe, it helps keep the bed, lead screw, and shop floor cleaner and safer.
What the chip pan does (and does not do)
- Collects chips and small offcuts as they fall from the tool and workpiece
- Helps contain coolant or cutting oil drips and splatter
- Makes cleanup faster so chips do not get tracked around the shop
- Reduces the chance of chips piling up near moving parts
- Does not replace guarding; chips can still eject toward the operator
Where it sits and what it looks like
Most chip pans are a shallow formed-metal tray mounted below the lathe bed and ways, often spanning between the stand rails or cabinet top.
| Item | Typical location | Main benefit |
|---|---|---|
| Chip pan | Under the bed/ways | Captures chips and fluid |
| Splash guard (if equipped) | Behind the work zone | Helps block thrown chips |
| Drip tray/liner (optional) | Inside the pan | Easier disposal |
Why it matters
Loose chips can scratch precision surfaces, jam slides, and create slip hazards. Using the chip pan as intended helps protect accuracy-critical areas like the carriage travel surfaces and keeps routine maintenance (wipe-down, lubrication, inspection) more consistent.
Practical use and cleanup tips
- Brush chips into the pan frequently; do not use bare hands around sharp swarf
- Avoid compressed air for cleanup; it can drive chips into bearings and ways
- Empty the pan before chips overflow into the stand or onto the floor
- Wipe up cutting oil so it does not hold abrasive grit against metal surfaces
- If you suspect electrical issues from contamination, use a meter to check safely (see how to use a multimeter to test electrical parts video)
Last updated: February 2026
What are the parts of the carriage in a lathe machine?
On a Craftsman metal turning lathe like model 10127440, the carriage is the assembly that supports and moves the cutting tool along the bed and across the work. It’s typically made up of the saddle, apron, cross slide, compound rest, and the controls that drive those movements.
Main carriage assemblies (what each does)
- Saddle: rides on the lathe bed ways and carries the rest of the carriage.
- Apron: hangs on the front of the saddle; contains feed gears, clutches, and levers.
- Cross slide: moves the tool in and out (perpendicular to the spindle axis).
- Compound rest (top slide): provides angled travel for tapers and fine tool positioning.
- Toolpost: clamps the cutting tool holder to the compound.
Common carriage controls and sub-parts
These are the parts you usually operate while turning, facing, or threading:
- Carriage handwheel: manual travel along the bed.
- Cross slide handwheel: manual in-and-out travel.
- Compound handwheel: manual travel on the compound.
- Half-nut lever: engages the lead screw for threading.
- Power feed clutch / feed engagement lever: starts and stops powered carriage travel.
- Feed direction/select control: selects longitudinal feed vs cross feed (design varies by lathe).
Quick reference table
| Carriage part | Primary motion | Most used for |
|---|---|---|
| Saddle | Along the bed | General tool positioning |
| Cross slide | In and out | Facing, diameter changes |
| Compound rest | Angled/short travel | Tapers, fine adjustments |
| Apron | Controls feed/threading | Power feed, half-nuts |
Why it matters
Knowing which carriage component does what helps you set up safer cuts, choose the right feed method (manual vs power), and avoid common threading mistakes (like engaging the half-nuts at the wrong time).
For diagrams and part naming consistency when you’re ordering, we recommend using the model number 10127440 when searching on Sears PartsDirect.
Last updated: February 2026