 Owner’s manual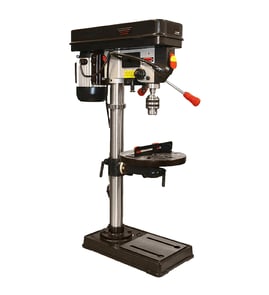


Who made Craftsman drill presses?
Craftsman drill presses were built by different manufacturers over the years because Craftsman is a brand name used on tools made by multiple suppliers. For your Craftsman drill press model 12434983, the operator’s documentation is branded Craftsman and issued by Sears Brands Management Corporation; see the 12434983 owner's manual.
How to identify the maker for a specific Craftsman drill press
The most reliable way is to use the identification information on the tool itself (not just “Craftsman” on the badge).
- Check the model number and any prefix on the ID label (often on the head, column, or base)
- Look for a data plate that lists the manufacturer, factory code, or electrical ratings
- Compare the label details to the parts list and diagrams in the manual
- Match the motor plate information (HP, volts, amps) to the drill press label
- Keep the serial number handy when ordering parts or troubleshooting
Common manufacturers you may see on older Craftsman drill presses
Over the decades, several companies produced Craftsman drill presses. These are commonly associated with classic-era machines:
| What you see on the label | Commonly associated maker | Typical era (approx.) |
|---|---|---|
| 103.xxxxxx | King-Seeley | Mid-1900s |
| 113.xxxxxx | Emerson Electric | Mid-1900s to later |
| Other prefixes | Various suppliers | Varies by model |
Why it matters
Knowing the actual maker helps when you are matching parts (chuck, belts, pulleys, switch) and specs. For example, the 12434983 manual lists key specs like a 1/2 HP motor, B16 spindle taper, 5 speeds (680 to 3150 RPM), and 2-1/2 inch spindle travel, which are important when selecting accessories and setting up the drill press correctly.
Quick tip for model 12434983 owners
If you are troubleshooting power or switch issues, unplug the drill press first and follow the safety and wiring guidance in the manual. For electrical checks, a meter-based test process is often the fastest path; see how to use a multimeter to test electrical parts video.
Last updated: February 2026
What is the 4 inch rule for drill press?
The 4-inch rule for a drill press means keeping your hands and fingers at least 4 inches away from the rotating drill bit, chuck, and spindle while the Craftsman 12434983 drill press is running. It helps prevent your hand from slipping into the bit during drilling.
How to apply the 4-inch rule safely
- Clamp the workpiece to the table; do not hold it by hand.
- Keep your hands out of the drill bit’s path and avoid awkward hand positions.
- Use a vise for small parts, and clamp or bolt the vise to the table.
- Clear the table of tools and scraps before turning the drill press on.
- Let the spindle reach full speed before feeding the bit into the material.
- Remove the chuck key before switching the drill press on.
What the manual emphasizes (and how it relates)
Our owner's manual reinforces the same core idea as the 4-inch rule: keep hands out of the drill bit path, secure the work, and avoid freehand drilling. It also calls out key habits that prevent sudden grabs and spinning workpieces.
Quick safety checklist
| Task | Safer method | What it prevents |
|---|---|---|
| Holding small material | Use a clamped drill press vise | Fingers getting pulled toward the bit |
| Drilling large holes | Clamp workpiece firmly | Bit grabbing and spinning the work |
| Tightening the chuck | Remove chuck key before power on | Chuck key ejecting |
Why it matters
On a drill press, the bit can grab, the workpiece can spin, or your hand can slip forward unexpectedly. Keeping a 4-inch buffer, plus clamping and proper setup, reduces the chance of contact with rotating parts.
Last updated: February 2026
How much does a Craftsman 12434983 drill press weigh?
The Craftsman drill press model 12434983 weighs 60.63 lb (27.5 kg). This weight is listed in the specifications section of the 12434983 owner's manual, and it helps you plan safe lifting, bench mounting, and transport.
What to know before moving or mounting it
- Unplug the drill press before moving it.
- Lift with help; 60+ lb is awkward because of the column and base.
- Carry it by the base and column area; do not lift by the feed handles or belt cover.
- If you are bench-mounting, use sturdy hardware and a solid work surface.
- Keep the head and table secured so they do not slide during transport.
Weight details
| Spec | Value |
|---|---|
| Listed weight | 60.63 lb |
| Metric weight | 27.5 kg |
| Model | Craftsman 12434983 |
Why it matters
Knowing the correct weight helps prevent tip-overs and injuries, and it also helps you choose the right bench or stand. A stable setup improves drilling accuracy and reduces vibration, especially when using larger bits and higher feed pressure.
Last updated: February 2026
Where can I buy Craftsman replacement parts?
You can buy replacement parts for your Craftsman drill press model 12434983 directly through our Craftsman parts listings at Sears PartsDirect; start by confirming the exact model number on your tool, then match the part name in the parts diagram and list in the 12434983 owner's manual.
Best way to get the right part for model 12434983
Use the parts diagram and parts list to identify the exact component before ordering. This drill press manual includes a dedicated Parts diagram and Parts lists section, which is the fastest way to avoid mismatches.
- Find the model number tag on the drill press (use 12434983 exactly)
- Use the parts diagram to locate the item by position
- Match the position to the parts list description
- Double-check quantities (washers, nuts, bolts often repeat)
- Order the part that matches your diagram callout and description
Common drill press parts people replace
These are typical wear or damage items shown in drill press parts lists; your exact configuration is in the manual.
| Part type | What it affects | Common symptom |
|---|---|---|
| Switch / small switch | Power on/off | Won’t start, intermittent power |
| Line cord | Power supply | No power, damaged insulation |
| Motor | Spindle drive | Hums, stalls, weak torque |
| Laser assembly | Aiming | Laser not working or misaligned |
| Depth stop parts (dial, spring, labels) | Repeat drilling depth | Depth won’t hold or won’t repeat |
Why it matters
Ordering by model number alone is not enough for a drill press; using the diagram callout plus the parts list helps ensure the replacement part fits your exact head assembly, table, and drive setup.
Helpful checks before you order
- Unplug the drill press and inspect for obvious broken wires or loose terminals
- If the tool is completely dead, verify the outlet and extension cord first
- If the motor runs but the bit does not, inspect the drive and spindle area for binding
Last updated: February 2026
How to take chuck off Craftsman drill?
On the Craftsman drill press model 12434983, the chuck mounts to the spindle using a B16 taper (a press-fit taper, not a screw-on thread). To remove it, you break the taper connection so the chuck and arbor drop free; the owner's manual shows the correct chuck handling and seating method.
Before you start (safety and setup)
- Turn the drill press OFF and unplug it.
- Remove the drill bit and chuck key.
- Open the chuck jaws so they are fully recessed to prevent jaw damage.
- Lower the table for clearance; place a wood block on the table to catch the chuck.
- Wear eye protection; a taper-fit chuck can release suddenly.
Removing the chuck (B16 taper style)
Most B16 taper chucks on drill presses release by separating the arbor from the spindle taper.
- Lower the quill using the feed handle to expose the spindle/quill area.
- Look for a removal slot in the quill/spindle (some drill presses have one). If present, insert the correct drift key/wedge and tap it to pop the taper loose.
- Support the chuck with your hand or the wood block so it does not drop and get damaged.
- If there is no slot, the goal is still the same: apply a controlled separating force to the taper connection (avoid prying on the chuck jaws).
Reinstalling the chuck (so it stays tight)
The manual’s chuck installation steps are the best guide for a secure fit.
- Clean all mating taper surfaces with a non-petroleum cleaner.
- Keep the tapers dry and oil-free.
- Push the chuck onto the spindle, then seat it firmly by pulling down on the feed handle and using a wood mallet on a wood block (as described in the manual).
Quick reference
| Item | What it means | Why it matters |
|---|---|---|
| Spindle taper | B16 | Confirms it is a press-fit taper connection |
| Removal method | Break the taper bond | Prevents spindle and chuck damage |
| Reinstall method | Clean and seat firmly | Helps prevent the chuck from working loose |
Why it matters
A B16 taper chuck that is dirty, oily, or not fully seated can loosen during drilling, causing wobble, runout, and vibration. Proper removal and reseating protects the spindle taper and keeps the bit running true.
Last updated: February 2026