Owner’s manual


What are the cons of a downdraft range?
Downdraft ventilation (like the KitchenAid KIRD861VSS1) trades a clean sightline for performance and installation complexity. The biggest downsides are weaker capture of smoke and grease (especially from tall pots and high-heat cooking), plus tighter cabinet and ductwork requirements. See the KIRD861VSS1 owner's manual for layout and venting rules.
- Less effective at high heat: steam and smoke naturally rise, so a downdraft has to pull them downward against that airflow.
- Tall cookware blocks capture: large stockpots and griddles can keep smoke from reaching the intake.
- More frequent cleaning: grease can collect around the intake area and filters.
- Potential flame disruption (gas cooktops): strong airflow near burners can affect flame stability.
- More noise at higher speeds: you may run higher fan speed to get acceptable capture.
Our KIRD861VSS1 documentation calls out several constraints that can be deal-breakers in some kitchens:
- Cabinet depth is designed around 24 in. cabinetry; some installs need a countertop deeper than 25 in.
- Venting must terminate to the outside; do not vent into an attic or enclosed space.
- Use heavy (rigid) metal vent; avoid plastic or foil vent.
- Keep duct length and elbows to a minimum; the example system stays within a 35 ft maximum vent length.
| Feature | Downdraft vent | Overhead range hood |
|---|---|---|
| Smoke capture | Lower (especially high-heat) | Higher (captures rising plume) |
| Cabinet impact | Uses space below cooktop | Uses space above cooktop |
| Ducting complexity | Often higher (floor/wall routing) | Often simpler (up and out) |
| Cleaning | Intake area and filters | Baffles/filters and hood surfaces |
If you frequently sear, stir-fry, or boil with tall pots, the ventilation performance difference is noticeable. If your kitchen layout forces a downdraft, planning the duct path, elbow count, and cabinet clearances up front prevents weak airflow and noisy operation.
Last updated: January 2026
Do downdraft vents need to be vented outside?
Yes. For the KitchenAid KIRD861VSS1 retractable downdraft vent system, the fan is designed to be ducted to the outdoors; venting into attics, wall cavities, ceilings, crawl spaces, or garages is not recommended. For model-specific venting requirements and safety notes, use the KIRD861VSS1 owner's manual.
A properly ducted outdoor termination helps remove smoke, cooking vapors, and odors efficiently and reduces grease and moisture buildup in enclosed spaces.
- Terminate the vent system to the outside
- Use heavy (rigid) metal vent and metal ductwork
- Keep duct length and elbows to a minimum for better airflow
- Avoid venting into enclosed areas (attic, walls, ceilings, crawl space, garage)
- Seal joints with clamps to prevent leaks and backdrafting
| Setup | What happens | Performance | Safety and moisture control |
|---|---|---|---|
| Ducted to outdoors | Exhaust leaves the home | Best | Best |
| Into attic/wall/ceiling/crawl space/garage | Exhaust stays in the structure | Poor | Poor |
Downdraft systems move grease-laden air and moisture. Sending that air outdoors protects cabinets, drywall, insulation, and framing from odor, condensation, and residue, and it helps the blower work as intended.
Before changing ductwork, we recommend these checks:
- Confirm the vent rises fully and the blower runs at all speeds
- Check for a tripped breaker or blown house fuse
- Inspect the downdraft’s internal fuse; replace if needed with the range hood fuse WPW10235651
- Verify filters are seated correctly and clean
- Look for crushed ducting, blocked wall cap, or too many elbows
Last updated: January 2026
How much does downdraft ventilation cost?
A KitchenAid downdraft vent system like model KIRD861VSS1 typically costs about $900 to $2,000 for the unit itself, with total installed cost often higher depending on ductwork, electrical work, and cabinet modifications. For model-specific installation requirements that can affect cost, use the KIRD861VSS1 owner's manual.
Downdraft vents can require more labor than a standard range hood because the vent retracts into the countertop and must be ducted through cabinetry.
- Venting route and length (more elbows and longer runs increase labor and materials)
- Duct size and transitions (adapters and dampers add cost)
- Electrical work (a grounded outlet is required)
- Cabinet modifications (drawer removal or permanent drawer-front changes are common)
- Cooktop fit and cutout work (countertop depth and cutout dimensions matter)
| Cost item | Typical range | Notes |
|---|---|---|
| Downdraft vent unit | $900 to $2,000 | Varies by size, finish, and blower configuration |
| Installation labor | $300 to $1,200 | Higher when ducting is complex or access is tight |
| Ducting parts/materials | $50 to $400 | Depends on elbows, wall cap, transitions, clamps |
| Electrical/cabinet work | $0 to $800 | Depends on what your kitchen already has |
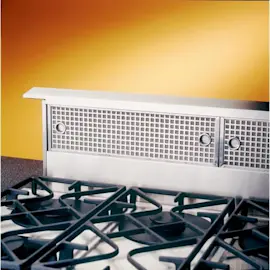
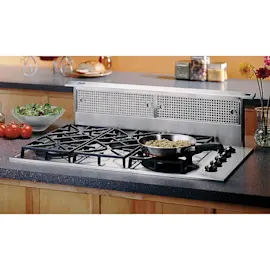
Many downdraft vents share a few common features; one of the most common is removable grease filter(s), which helps with routine cleaning.
A downdraft vent is only as effective as the installation. The manual’s venting guidance (including maximum vent length and proper sealing of openings) helps you avoid weak airflow, extra noise, and moisture issues.
Last updated: January 2026
Why is my KitchenAid downdraft vent not working?
If your KitchenAid downdraft vent system model KIRD861VSS1 is not working, the most common causes are a filter safety switch not being made (filters not fully seated), a blown fuse, or a failed switch or motor circuit. Start with the filter installation and power checks in the KIRD861VSS1 owner's manual.
- Make sure both metal filters are installed and locked behind the top flange; this model will not operate if the filter tabs are not seated correctly.
- Press and hold the up/down button for a few seconds (there is a slight delay by design).
- Confirm the blower speed slider is set to an On position.
- If there was a spill that could have seeped into the vent, turn the unit off and let it dry fully before trying again.
- Check the home breaker or fused disconnect feeding the downdraft.
If the basic checks above do not restore operation, these parts are common failure points on KIRD861VSS1:
| Symptom | What it often points to | Related part for this model |
|---|---|---|
| Vent will not run at all, no response | Blown internal fuse or no power to control | Range hood fuse WPW10235651 |
| Vent retracts but will not raise, or acts “dead” after filter cleaning | Filter microswitch not being activated by filter position | Downdraft vent filter switch kit W10235643 |
| Button does not reliably raise/lower vent | Failed up/down button switch | Downdraft vent up/down switch button W10235663 |
- Disconnect power at the breaker before opening or accessing wiring.
- Remove and reinstall the filters carefully; push them in as far as they will go so the filter switch is activated.
- If you suspect an electrical issue, test the fuse and switches with a meter using the procedures and wiring diagram in the KIRD861VSS1 owner's manual.
- If switches test good and the motor is receiving power but the vent still will not operate, the drive motor circuit is the next likely failure point.
This downdraft uses a built-in safety interlock: if the filters are not seated correctly, the microswitch stays inactive and the vent will not run. Fixing filter position first prevents unnecessary parts replacement and avoids running the unit with moisture inside.
Last updated: January 2026