
What's the difference between a snowblower and a snow thrower?
A snow thrower usually means a single-stage machine that uses a rubber-tipped auger to pull itself forward and throw snow; a snowblower usually means a two-stage (or three-stage) machine that uses an auger plus an impeller to move more snow farther. For Craftsman model 842240560, the terms are often used interchangeably, but “thrower” typically implies lighter-duty.
| Feature | Snow thrower (single-stage) | Snowblower (two-stage/three-stage) |
|---|---|---|
| Best for | Light to moderate snow | Deep, heavy, wet, or icy snow |
| Clearing width | Usually smaller | Usually larger |
| Drive system | Often self-propelled by auger contact | Wheel or track drive system |
| Throwing distance | Shorter | Farther |
| Surface type | Best on smooth pavement | Better on mixed surfaces and packed snow |
- Snow depth: single-stage is best for lighter accumulations; two-stage handles deeper snow.
- Snow type: wet, heavy snow favors a two-stage/three-stage design.
- Driveway size: larger areas benefit from higher capacity and longer throw.
- Surface: gravel or uneven surfaces are typically easier with skid shoes and higher intake height.
- Storage and handling: single-stage units are usually lighter and easier to maneuver.
Using the right stage design helps prevent clogging, improves throwing distance, and reduces wear on common wear items like belts, skid shoes, and scraper (shave) plates. If you are setting up or tuning your attachment, our DIY video on how to assemble a snowblower video helps you confirm the basic configuration before troubleshooting performance.
Last updated: February 2026
What is the life expectancy of a snowblower?
Most snowblowers last 10 to 20 years with normal use and consistent maintenance. For a Craftsman snow thrower attachment like model 842240560, lifespan depends most on off-season storage, lubrication, and replacing wear items (belts, skid shoes, shear pins) before they cause bigger damage.
Because this is a lawn tractor snowblower attachment, it often reaches the higher end of the range when it is kept clean and dry between storms.
| Snowblower type | Typical life expectancy | What usually ends it first |
|---|---|---|
| Gas walk-behind | 10 to 20 years | Corrosion, neglected oil/fuel system, worn friction/drive parts |
| Electric corded | 5 to 10 years | Motor wear, switch/cable damage |
| Battery electric | 5 to 10 years | Battery aging, electronics issues |
| Tractor attachment (like 842240560) | 10 to 20 years | Belt wear, auger gearbox wear, rusted auger/chute components |
We see the biggest lifespan gains from a few simple habits:
- Clean out snow and slush after every use; packed snow accelerates rust.
- Lubricate moving points (auger shaft, chute rotation points, and any grease fittings if equipped).
- Inspect belts and pulleys for glazing, cracking, or slipping.
- Replace shear pins promptly after an impact; running with damaged pins can stress the auger/gearbox.
- Store it dry and covered; keep it off bare ground to reduce corrosion.
A good maintenance routine is outlined in how to make your snowblower last longer.
These symptoms usually mean the attachment needs major repair or a rebuild:
- Auger binds or wobbles even after clearing debris
- Chute rotation is seized or repeatedly slips
- Frequent belt failures or constant belt slipping
- Excessive vibration that returns after tightening hardware
- Rust-through on the housing, chute, or key mounting points
A snowblower that is maintained to last 10 to 20 years throws snow farther, clogs less, and protects expensive components like the auger gearbox and drive system.
Last updated: February 2026
Can you put a snow blower on a lawn tractor?
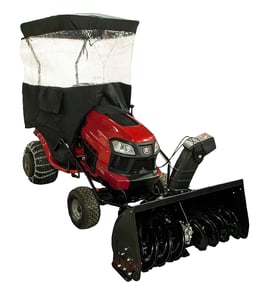
Yes. You can put a snow blower on a lawn tractor if the tractor is designed to accept a tractor-mounted snowblower attachment and the correct mounting hardware and drive system are installed. For the Craftsman 842240560 snowblower attachment, compatibility depends on the tractor’s frame and attachment lift and drive setup.
Most lawn tractor snowblower installs require more than the blower itself. Plan on these common items and adjustments:
- A model-specific mounting frame or subframe (attaches the blower to the tractor)
- A drive system (typically a belt and pulleys, or a PTO-style drive depending on tractor design)
- A lift mechanism (manual lift handle or electric lift, depending on tractor)
- Rear ballast (weights) to keep steering and traction stable
- Tire chains for grip on packed snow and ice
- Correct chute control linkage routing so the chute turns smoothly
Exact steps vary by tractor model, but the workflow is typically:
- Remove the mower deck (and any front bumper or guard that blocks the mount).
- Install the snowblower mount/subframe to the tractor frame.
- Hang the snowblower attachment and connect the lift linkage.
- Route and tension the drive belt; verify pulleys align and guards are in place.
- Add rear weights and install tire chains.
- Test engagement at low throttle first, then recheck belt tracking and fasteners.
Use this to decide if your lawn tractor is a good candidate.
| Check | What “good” looks like | What causes problems |
|---|---|---|
| Tractor frame | Has factory attachment points or a known snowblower subframe | No mounting points or custom fabrication required |
| Power | Enough engine power to keep auger spinning in heavy snow | Bogging down, frequent belt slip |
| Traction | Chains plus rear ballast fit your tire size | Spinning tires, poor steering control |
| Lift | Lift system can raise the blower without binding | Lift binds, won’t hold height |
A snowblower attachment puts heavy load on the tractor’s belt drive, steering, and traction. Using the correct mount, belt routing, and ballast prevents belt slip, poor throwing distance, and hard-to-control handling.
- How to assemble a snowblower video
- How to adjust a snowblower chute control rod video
- How to replace a snowblower belt video
Last updated: February 2026
Why do I keep breaking shear pins on my snowblower?
Repeatedly breaking shear pins on your Craftsman 842240560 snowblower attachment means the auger is being overloaded. The most common causes are hidden obstructions (ice chunks, gravel, newspapers), the wrong shear pins (using a standard bolt), or an auger that is binding from rust, bent components, or ice buildup.
- Shut the tractor/attachment off, remove the key, and wait for all moving parts to stop.
- Clear the area first; avoid plowing into gravel, frozen berms, or packed ice.
- Confirm you are using true shear pins for the auger (not a hardened bolt or “close enough” pin).
- Inspect both auger sections for free rotation; they should not feel seized or gritty.
- Look for ice packed around the auger shaft, impeller area, or inside the housing.
- Check the shear-pin holes in the auger and shaft; elongated holes let the auger “hammer” the pin.
Binding and misalignment are the big reasons pins snap even in normal snow.
| What you see | Likely cause | What to do next |
|---|---|---|
| Pins break as soon as you engage the auger | Auger frozen to shaft, ice jam, foreign object | Thaw/clear jam; verify auger spins freely by hand (engine off) |
| Pins break only on one side | Bent auger flighting, worn bushing/bearing, misalignment | Inspect that side closely; correct binding before installing new pins |
| Pins shear in light snow repeatedly | Wrong pin grade/diameter, loose fit, elongated holes | Use correct shear pins; replace worn components causing slop |
| Pins break when hitting end-of-driveway ridge | Impact overload from dense, refrozen snow | Take smaller bites; raise skid shoes slightly for that section |
- Align the holes perfectly before inserting the pin; forcing it in can damage the hole.
- Tighten the fastener snug; do not overtighten to the point the pin cannot shear cleanly.
- Replace pins in pairs if both sides have seen heavy impacts; it keeps auger loading even.
Shear pins are designed to fail first so the auger gearbox and drive components do not. If pins keep snapping, the attachment is telling you the auger is striking something or binding, and fixing that root cause prevents bigger repairs.
For related maintenance that reduces binding and winter wear, follow our guide: how to lubricate a snowblower auger shaft video.
Last updated: February 2026