 Owner’s manual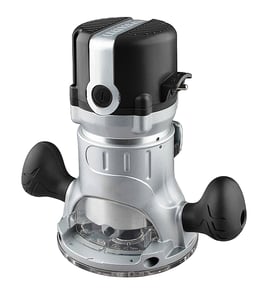

What size shank is a Craftsman router?
Most Craftsman routers use 1/4-inch shank bits; many mid-size and larger Craftsman routers also accept 1/2-inch shank bits when the router includes a 1/2-inch collet (or a separate collet is installed). For the correct shank size on your specific router, match the bit shank to the collet size listed in the 32037599 owner's manual.
How to confirm the shank size on your router
- Unplug the router before checking the collet.
- Remove the bit (if installed) and look at the collet opening.
- Measure the opening with a ruler or caliper:
- About 1/4 inch means 1/4-inch shank bits.
- About 1/2 inch means 1/2-inch shank bits.
- Check whether your router came with two collets (1/4 inch and 1/2 inch).
- If you are mounting the router in the Craftsman 32037599 router table, confirm your router model is compatible and mounted securely per the manual.
Quick compatibility guide (what to use when)
| Bit shank size | Typical use | What you need on the router |
|---|---|---|
| 1/4 inch | Light to medium routing, trim work, smaller profiles | 1/4-inch collet |
| 1/2 inch | Heavier cuts, larger bits, better rigidity | 1/2-inch collet |
Why it matters
Using the wrong shank size (or forcing a bit into the wrong collet) can cause poor grip, vibration, and unsafe operation. Matching the bit shank to the collet size helps the router run smoother and keeps the bit secured during cuts.
Last updated: February 2026
Where can I buy Craftsman replacement parts?
For your Craftsman router table model 32037599, the most reliable place to buy replacement parts is through Sears PartsDirect, using the model number to match the correct parts list and diagrams. For model-specific part identification and safe service guidance, use the owner's manual.
Best way to get the right part
When you shop by model number, you avoid ordering a look-alike part that does not fit your router table.
- Confirm the model number on the product label is 32037599
- Use the parts list and diagrams for the exact item name and placement
- Match any markings on the old part (shape, hole pattern, connectors)
- Replace missing or broken items before operating the tool
- Use only identical replacement parts for safe operation
What to check before you order
Even when a part looks similar, small differences can affect fit, safety, and performance.
| What to match | Why it matters | Quick tip |
|---|---|---|
| Model number | Ensures correct parts list | Use 32037599 exactly |
| Mounting pattern | Prevents misalignment and vibration | Compare hole spacing |
| Electrical connection type | Avoids poor contact or overheating | Check plug, switch, and outlet style |
| Guard and dust collection fit | Helps control debris and exposure | Verify guard coverage |
Why it matters
This router table is designed to be used with specific components and safe operating practices. The manual also emphasizes replacing broken or missing parts before use and using identical replacement parts to reduce injury risk.
Last updated: February 2026
How to attach a router to a table?
To attach a router to the Craftsman 32037599 router table, we remove the router’s base plate, align the router’s mounting pattern with the table’s mounting holes, then fasten it using the specified flat-head bolts. This keeps the bit centered in the insert opening and supports above-the-table adjustments when available.
Steps to mount the router (Craftsman 32037599)
- Unplug the router.
- Set the router table upright and make sure it’s stable on both legs.
- Remove the router base plate (sub-base) and hold the router upside down.
- Match your router’s mounting-hole pattern to the table’s hole pattern (the manual shows the patterns and a compatibility table).
- Align the above-the-table height adjustment hole (if your router supports it) and the three corresponding mounting holes in the center of the table.
- Insert three flat-head bolts through the chosen table holes and into the router; tighten securely with a Phillips screwdriver.
For the exact hole pattern and the mounting-hole locations, follow the owner's manual.
Router fit and compatibility checks
Most mounting issues come from hole-pattern mismatch or a base that is too large.
| What to check | What “good” looks like | What to do if it’s not |
|---|---|---|
| Router sub-base diameter | Does not exceed 6-7/8 in. | Use a compatible base/sub-base or a different router that meets the size limit |
| Mounting-hole alignment | 3 mounting holes line up cleanly | Re-check the selected pattern; rotate the router body and re-align |
| Above-table adjustment access | Adjustment hole lines up (when supported) | You can still mount using the main holes, but above-table adjustment may not be accessible |
Why it matters
A correctly mounted router reduces vibration, keeps the bit centered in the insert ring opening, and helps you make accurate cuts with the fence and featherboard. It also prevents the router from shifting under load, which can damage the workpiece and the router base.
Last updated: February 2026
Does Craftsman make a router table?
Yes. Craftsman makes router tables, including the Craftsman model 32037599 router table covered by this parts page. It’s designed to mount specific Craftsman routers and includes features like above-the-table bit height adjustment (with compatible models) and a dust collection guard; see the 32037599 operator’s manual.
What this router table is designed to do
The 32037599 router table is built to support common routing tasks with better control than freehand routing.
Key design features called out in the manual include:
- Miter gauge that adjusts from 0° to 60° in both directions
- 11/32-inch fastening holes to secure the table to a stable work surface
- Integrated switch shield to help keep dust out of the switch sockets
- Dust collection/guard (overhead guard) to reduce dust dispersal
- Above-the-table height adjustment using a hex wrench (not included)
Router compatibility (what “Craftsman makes a router table” means in practice)
Craftsman router tables are typically designed around specific mounting patterns. For the 32037599, the manual lists compatible Craftsman router models for mounting and for above-the-table height adjustment.
Compatibility overview
| Feature | What to check | Why it matters |
|---|---|---|
| Mounting to the table | Your router model is listed as suitable for mounting | Ensures the base and bolt pattern fit correctly |
| Above-the-table height adjustment | Your router model is listed for above-the-table adjustment | Lets you adjust bit height from the top instead of reaching underneath |
| Router sub-base diameter | Sub-base does not exceed 6-7/8 in. | Prevents interference with the table opening and mounting area |
Before you buy or set up a router table
These checks prevent fit issues and improve safety.
- Confirm your router model is listed for the 32037599 table
- Measure the router sub-base diameter (keep it at or under 6-7/8 in.)
- Plan to bolt the table to a stable bench using the fastening holes
- Use the correct insert ring opening for the bit size (the table uses multiple insert rings)
- Unplug the router before mounting or adjusting anything
Why it matters
A router table is only “the right tool” when the router mounts securely and adjustments are accessible. Proper compatibility and fastening reduce vibration, improve cut quality, and lower the risk of kickback during routing.
Last updated: February 2026
Will a Dewalt router fit a Craftsman router table?
Yes, a DeWalt router can mount to the Craftsman router table model 32037599 if the router’s sub-base diameter is 6-7/8 in. or smaller and you can align a usable mounting-hole pattern. Above-the-table height adjustment typically will not be accessible with DeWalt.
What “fit” means on model 32037599
A router “fits” when it mounts flat and secure, clears the center opening, and can be operated safely.
- Router sub-base diameter is 6-7/8 in. max
- Router can be bolted to the tabletop using the table’s mounting holes
- Bit clears the 2-3/16 in. router hole and insert rings
- Router sits centered and stable under the table
Compatibility details from the manual
The 32037599 router table is designed around specific Craftsman router models (for example 17541, 17542, 17540, 17543, 2767, 27666, 2768, 27669, 27680, 27683, 28084, 28190, 37595). If your router is not listed, it can still be installed using the main mounting holes, but above-the-table adjustment access may not line up.
Quick test-fit steps
- Unplug the router before test-fitting.
- Remove the router base plate (sub-base) if required for mounting.
- Hold the router upside down and check if the table’s mounting holes align with the router base.
- Confirm the router base sits flat; no rocking or gaps.
- Verify bit clearance through the insert ring opening you plan to use.
Common outcomes
| Outcome | What it means | What to do |
|---|---|---|
| Mounts securely, no adjustment access | Fits for routing | Adjust height from below the table |
| Holes do not align | Does not fit safely | Use a router-specific mounting plate or a compatible router |
Why it matters
A router that is not mounted flat and tight can shift during a cut, hurting accuracy and increasing kickback risk.
For the mounting-hole patterns and adjustment-hole locations, use the 32037599 owner's manual.
Last updated: February 2026