
Where can I buy replacement parts for Ryobi?
For your Ryobi DP80 drill press, we recommend buying replacement parts by searching the Ryobi DP80 parts listing on Sears PartsDirect using the exact model number (DP80) so you match the correct motor, switch, belts, pulleys, and hardware for your drill press.
Because drill press parts can look similar across models, matching by model number helps you avoid ordering the wrong spindle, chuck, or depth stop components.
- Confirm the model number on the drill press nameplate: DP80
- Identify the system you are repairing (drive, quill/spindle, table, electrical)
- Compare part descriptions carefully (shaft size, belt type, mounting holes)
- If you are unsure, replace wear items in sets (for example, belt plus pulleys)
- Keep fasteners organized so reassembly stays aligned and square
These are the most frequent wear or failure items on drill presses like the Ryobi DP80.
| Part type | What it affects | Common symptom |
|---|---|---|
| Drive belt | Spindle speed and torque | Slipping, squealing, burning rubber smell |
| On/off switch | Power control | Won’t start, intermittent power |
| Chuck | Bit holding | Bit wobble, slipping bits |
| Bearings | Smooth rotation | Grinding noise, runout, heat |
| Pulleys | Speed changes | Vibration, belt walking, uneven speeds |
These steps help confirm the failed component so you only buy what you need.
- Unplug the drill press and inspect the power cord for cuts or loose prongs
- Spin the chuck by hand; roughness points to bearings or spindle issues
- Check belt tension and pulley alignment; misalignment causes vibration
- Test the switch and cord continuity with a multimeter
Using the correct DP80-COMPATIBLE parts keeps the spindle aligned and speeds accurate, which improves hole accuracy and reduces vibration that can damage bearings and pulleys.
For help locating the model tag or understanding what the model number means when ordering, use how to find your appliance model number (and what it means for parts).
Last updated: February 2026
How to change bit in Ryobi drill press?
On the Ryobi DP80 drill press, you change the bit by opening the chuck, removing the old bit, inserting the new bit straight, then tightening the chuck evenly so the bit runs true. Always unplug the drill press before touching the chuck or bit.
- Unplug the DP80 and lower the quill so the chuck is easy to reach.
- Support the bit with one hand and loosen the chuck (use the chuck key if your DP80 has one).
- Remove the old bit and wipe the shank clean.
- Insert the new bit shank fully, then pull it back out about 1/16 inch so it seats and tightens properly.
- Tighten the chuck in all keyholes (if keyed) to center the bit.
- Spin the chuck by hand to confirm the bit is straight and not wobbling.
Some DP80 setups use a keyless chuck. In that case:
- Hold the rear sleeve and turn the front sleeve counterclockwise to open.
- Insert the bit, then hand-tighten firmly.
- Give the sleeve a final snug twist; do not overtighten.
| What you see | Likely cause | What to do |
|---|---|---|
| Bit wobbles | Bit not centered in jaws | Re-seat and tighten evenly |
| Bit slips in use | Chuck not tight, oily shank | Clean shank; tighten more |
| Chuck won’t open | Packed dust or light rust | Brush out jaws; add a drop of light oil |
A properly centered, tight drill bit reduces runout, improves hole accuracy, and helps protect the chuck, spindle, and bearings from vibration.
For more DIY safety basics before working around moving parts and electricity, use our guide: are diy appliance repairs safe.
Last updated: February 2026
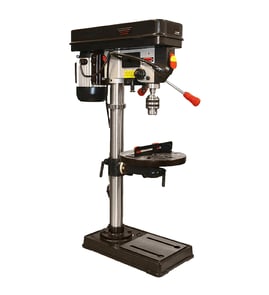
What are the parts of a drill press?
A Ryobi DP80 drill press is built from a few core assemblies: a heavy base and column for stability, an adjustable table to support the workpiece, and a head that houses the motor and the quill/spindle that turns the drill bit. For safe, accurate drilling, each part has a specific job.
- Base: Supports the entire drill press; provides stability and a surface for bolting down.
- Column: Vertical post that supports the table and head; keeps alignment rigid.
- Table (and table clamp/lock): Holds the work; tilts or raises/lowers depending on design.
- Head: Upper housing that supports the drive system and drilling mechanism.
- Motor and drive (belt/pulleys or direct drive): Powers the spindle; belt and pulley systems change speed.
- Quill and spindle: Quill moves up/down; spindle rotates and drives the chuck.
- Chuck: Grips the drill bit or accessory.
- On/off switch (often with a removable safety key)
- Feed handles: Lower and raise the quill for drilling
- Depth stop: Limits how deep the bit can drill
- Return spring: Brings the quill back up after drilling
- Guard (if equipped): Helps shield the chuck/bit area
| Part | What it affects most | Typical issue when it’s loose/worn |
|---|---|---|
| Table clamp/lock | Accuracy and repeatability | Work shifts; holes wander |
| Belt/pulleys | Speed and torque | Slipping, squealing, poor power |
| Chuck/spindle | Runout and bit grip | Wobble, bit slipping |
| Quill | Smooth drilling travel | Binding, chatter, inconsistent depth |
Knowing these parts helps you troubleshoot common drill press problems like wobble (chuck/spindle), inconsistent hole depth (depth stop/quill), or poor cutting power (belt tension/speed setting). It also helps you identify the right replacement part by name when you search.
Because no model-specific part list is provided here, we recommend matching by model number DP80 and the part name (for example: chuck, belt, switch, return spring). Use our model number tips in how to find your appliance model number (and what it means for parts).
Last updated: February 2026
Are Ryobi parts diagrams available online?
Yes. For the Ryobi DP80 drill press, we provide online parts diagrams (exploded views) that help you identify components and match them to the correct replacement parts when you are repairing or maintaining the tool.
Use these steps to get to the correct illustrated parts breakdown:
- Confirm the model number on the drill press nameplate is DP80
- Open the model page and look for the parts diagram or illustrated parts list section
- Use the diagram reference numbers to identify the part you need (for example: pulley, belt, chuck, switch)
- Compare the diagram callouts to your drill press so you select the correct variation
- If you have multiple Ryobi tools, repeat the process for each model number
For help confirming you are using the correct model number format, use how to find your appliance model number (and what it means for parts).
Most drill press parts diagrams are organized by assemblies so you can narrow down the area you are working on.
| Diagram area | Common parts shown | Why it helps |
|---|---|---|
| Head and drive | pulleys, belt, spindle parts | Tracks vibration, squeal, or speed-change issues |
| Quill and chuck | chuck, arbor, bearings | Helps with runout, wobble, or chuck slippage |
| Table and column | rack, crank, locks | Helps with table drift or height adjustment problems |
| Electrical | switch, cord, strain relief | Helps with no-power or intermittent power |
Using the correct DP80 illustrated parts diagram reduces wrong-part orders and speeds up repairs because you can confirm the exact assembly and hardware (washers, screws, spacers) that often get missed.
- Unplug the drill press before inspecting parts
- Take a photo of the assembly before disassembly
- Measure belts and note pulley steps if you are troubleshooting speed issues
- If the tool will not power on, check the outlet and cord condition first
- For electrical troubleshooting, a meter test is often faster than guessing
If you are testing wiring or switches, how to use a multimeter to test electrical parts video is a good walkthrough.
Last updated: February 2026