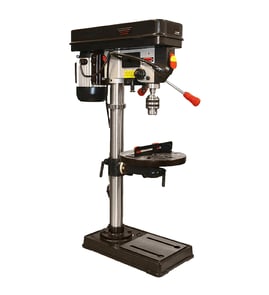
How to repair a drill press spindle?
On a Craftsman drill press model 137219340, spindle repair usually means removing the quill assembly, inspecting the spindle and bearings, and replacing worn parts (most often the spindle bearings) before reassembling and rechecking runout. This restores smooth rotation and accurate drilling.
- Unplug the drill press and remove the chuck key.
- Lower the table or remove the workpiece so you have clear access.
- Mark the depth stop and quill return spring position so reassembly is easier.
- Take photos as you go; it helps with washer and spacer order.
- If the spindle is bent or the quill is cracked, replace the damaged component instead of trying to straighten it.
- Remove the chuck: Open the jaws fully and use the correct method for your chuck style (tapered arbor or keyed retention).
- Remove the quill: Take off the quill retaining hardware (often a retaining ring or collar) and slide the quill out.
- Separate spindle from quill: Support the quill and press or tap the spindle out carefully to avoid scoring the bore.
- Inspect and replace bearings: Spin bearings by hand; any roughness, noise, looseness, or heat discoloration means replacement.
- Reassemble: Install bearings squarely, reinstall the spindle into the quill, then reinstall the quill and return spring.
- Test: Check for smooth quill travel, no binding, and minimal chuck wobble.
- Wobble at the chuck: often worn bearings or a damaged arbor taper.
- Quill play (side-to-side): quill wear, quill bore wear, or bearing fit issues.
- Grinding noise: failing bearings.
- Runout increases with speed: bent spindle or damaged pulley/sheave alignment.
| Symptom | Most common cause | Typical fix |
|---|---|---|
| Chuck wobbles | Worn spindle bearings | Replace bearings, verify proper seating |
| Quill sticks | Dirty or damaged quill bore | Clean, deburr, lightly lubricate |
| Loud rumble | Bearing failure | Replace bearings |
| Visible wobble at spindle | Bent spindle | Replace spindle |
A drill press spindle that is straight and properly supported by good bearings keeps the chuck aligned, reduces vibration, and prevents oversized holes, broken bits, and premature belt and pulley wear.
For electrical checks while troubleshooting vibration caused by a failing motor or switch, use our how to use a multimeter to test electrical parts video.
Last updated: February 2026
What are 5 important rules for a drill press?
Five important rules for using a drill press (including the Craftsman 137219340) are: remove the chuck key before starting, clamp the workpiece so it cannot spin, wear eye protection and avoid loose clothing, set the correct speed for the bit and material, and never adjust, measure, or clear chips while the spindle is moving.
- Remove the chuck key immediately after tightening the bit.
- Secure the workpiece with a vise or clamps; never hold small stock by hand.
- Use proper PPE: safety glasses (and hearing protection when needed); tie back hair and remove jewelry.
- Match speed to the job: slower for larger bits and metal, faster for small bits and wood.
- Keep hands away from moving parts: stop the machine before changing belts, adjusting the table, or brushing away chips.
| Item to check | What “good” looks like | What it prevents |
|---|---|---|
| Bit is seated and tightened | Bit fully inserted, chuck snug | Bit slipping or wobble |
| Work is clamped | Vise or clamps tight, stable support | Workpiece spinning or lifting |
| Speed is appropriate | Belt/pulley set for material and bit size | Overheating, grabbing, broken bits |
| Table is locked | Table height and tilt locked down | Sudden movement during drilling |
A drill press creates high torque at the bit. If the chuck key is left in, the workpiece is not clamped, or the speed is wrong, the tool can throw parts, snap bits, and damage the spindle, chuck, or table alignment.
Last updated: February 2026
What is a good horsepower for a drill press?
For the Craftsman drill press model 137219340, a good horsepower is the horsepower it was designed with: this model is commonly listed as 2/3 HP, and some literature may also describe it as 1 HP maximum developed. For most home-shop drilling in wood and light metal, that power level is the right fit.
- 1/3 to 1/2 HP: Light-duty bench work, small bits, softwood
- 2/3 to 3/4 HP: Strong all-around choice for hardwood and occasional metal
- 1 HP (running): Frequent large bits, hole saws, thicker stock, more steel work
- More HP helps most at low RPM: That is where big bits and metal need torque
- Setup still matters: A dull bit or loose belt can mimic “low horsepower”
Some drill presses are advertised with a continuous (running) HP and a higher “maximum developed” number.
| Rating term | What it means in practice | What to focus on |
|---|---|---|
| Running/continuous HP | Power the motor can deliver during normal drilling | Best for comparing machines |
| Maximum developed HP | Short-duration peak number used in some marketing | Not a day-to-day drilling baseline |
- Speed range (low RPM options) for metal and large bits
- Belt and pulley condition to prevent slipping under load
- Sharp bits and correct feed pressure to avoid stalling
- Workholding (vise or clamps) to prevent spinning material
Choosing the right HP keeps torque available when you slow the spindle down for larger bits and metal drilling; that reduces stalling, overheating, and rough holes.
If you are matching parts or accessories to this drill press, confirm the model number on the ID label first using how to find your appliance model number (and what it means for parts).
Last updated: February 2026
Where is the model number on a Craftsman drill press?
On the Craftsman drill press model 137219340, the model number is typically printed on a data plate or sticker on the base near the column. We recommend writing it down exactly as shown before you look up diagrams or order replacement parts.
Look for a metal plate, foil label, or stamped tag in these spots:
- On the base casting, close to where the column mounts
- Along the rear edge of the base (facing away from the operator)
- On the column itself, a few inches above the base
- On the head assembly (motor/pulley housing), usually on a flat side panel
- Under the table support area (less common, but worth a quick look)
Once you find the label, capture the details exactly.
| What to record | Example | Why it matters |
|---|---|---|
| Model number | 137219340 | Ensures the correct parts list and diagrams |
| Serial number | Varies | Helps match production runs when designs change |
| Electrical rating | Volts/amps | Helps when troubleshooting switches, cords, or motors |
If the plate is scratched, painted over, or gone, these steps usually get you back on track:
- Wipe the area with a rag and mild cleaner; use a flashlight at an angle to spot faint printing
- Check for an imprint outline where a sticker used to be
- Look for a stamped number on the base or head casting
- Compare your drill press features (belt cover shape, table crank style, switch location) to parts diagrams
- Use our guide: how to find your appliance model number (and what it means for parts)
The model number is the fastest way to match the correct Craftsman drill press parts, especially for items like the chuck, belts, switch, quill components, and depth stop hardware that can vary by production run.
Last updated: February 2026