Installation guide
 Owner’s manual



How can I tell what size my microwave is?
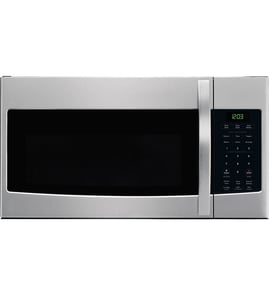
For your Whirlpool UMV1160CW8 microwave/hood combo, “size” usually means two things: the exterior dimensions (to fit the cabinet opening) and the interior cooking capacity (cubic feet). Measure the outside width, height, and depth for fit, then use the specs in the installation guide to confirm required clearances.
What to measure (and why)
Use a tape measure and record all measurements in inches.
- Exterior width: most important for matching the cabinet opening (common OTR widths are 30 inches).
- Exterior height: helps confirm clearance to the upper cabinet and mounting location.
- Exterior depth: confirms how far the unit projects from the wall and cabinet.
- Cabinet opening width: the space between the cabinets where the microwave installs.
- Side clearance: if installed near a left sidewall, allow at least 6 inches so the door opens fully.
Quick fit checklist for UMV1160CW8
The installation requirements for this model focus on safe mounting and clearance.
- Plan for a properly supported installation (the location must support up to 150 lb including the microwave and items placed inside).
- Confirm there is at least one wall stud available for mounting (two studs are preferred).
- Verify a grounded electrical outlet is available in the upper cabinet.
- If venting through the roof with a rectangular-to-round transition, keep at least 3 inches of clearance above the microwave so the damper opens freely.
Exterior size vs. interior capacity
These terms get mixed up, so we separate them:
| What you’re trying to size | What to use | What it affects |
|---|---|---|
| Fit in the opening | Exterior width, height, depth | Cabinet fit, door swing, venting |
| Cooking space | Interior capacity (cubic feet) | How much food fits inside |
Interior capacity is a spec, not a measurement we recommend estimating with a tape measure. For the most accurate capacity and cutout requirements, use the owner's manual.
Why it matters
Correct sizing prevents installation problems like a door that cannot open fully, poor vent performance, or a mounting setup that is not properly supported.
Last updated: February 2026
What are common problems with whirlpool microwaves?
Common problems on a Whirlpool microwave like model UMV1160CW8 include a no-power condition (often a tripped breaker or blown internal fuse), not heating (high-voltage component failure), and door-related issues that prevent operation. We recommend starting with the basic checks in the UMV1160CW8 owner's manual.
Most common symptoms (and what they usually point to)
- Microwave will not operate at all: household breaker/fuse, door not fully closed, or an internal fuse issue
- Runs but does not heat: magnetron, high-voltage diode, capacitor, or transformer problem
- Intermittent operation: door interlock or switch alignment issue
- Buttons/display act up: control panel or electronic control board problem
- Turntable not rotating: turntable motor or drive components
Quick checks we recommend before replacing parts
- Confirm the outlet has power (try a small lamp or phone charger).
- Reset the household circuit breaker or replace the home fuse if it is blown.
- Open and firmly close the door; make sure nothing is preventing a full latch.
- Heat 1 cup of cold water for 2 minutes on High; if it does not heat, focus on the heating circuit.
Parts that commonly fail on this model
The UMV1160CW8 parts list includes several components that match the most common failures:
| Symptom | Common suspect part | Example part on this model |
|---|---|---|
| No power / dead display | Internal fuse | Microwave fuse W11707984 |
| Runs but no heat | High-voltage diode | Gaoxin-hvd c W11256462 |
| Runs but no heat | Magnetron | Microwave magnetron W10754299 |
| Won’t start / door issues | Door interlock/switch | Interlock WPW10156813 |
Why it matters
Microwave heating circuits use high voltage; accurate diagnosis prevents repeat failures and avoids replacing expensive parts unnecessarily. Starting with power and door checks also helps rule out simple issues that mimic major component problems.
Last updated: February 2026
What is the average lifespan of a whirlpool microwave?
Most Whirlpool microwaves, including the Whirlpool UMV1160CW8 microwave/hood combo, typically last 7 to 10 years with normal household use. Heavy daily use, poor ventilation, and power issues can shorten lifespan; keeping vents clear and the door sealing properly helps the unit reach its full service life.
Typical lifespan and what affects it
A microwave’s life is mostly driven by heat management, door/interlock wear, and electrical stress.
- Light to normal use: about 7 to 10 years
- Heavy use (multiple cycles daily): about 4 to 6 years
- Well-maintained, lighter use: often 10+ years
Parts that commonly end a microwave’s service life
When a microwave stops heating or won’t run, the issue is often in the high-voltage or safety circuits.
- High-voltage heating components (magnetron, capacitor, diode)
- Safety door switch system (interlock and switch mounts)
- Line protection (internal fuse)
- Electronic control board or control panel
- Venting and airflow restrictions that cause overheating
If your UMV1160CW8 is not heating, we use the same basic “heat a cup of water” check described in the UMV1160CW8 owner’s manual to confirm a heating failure before moving to parts testing.
Quick symptom-to-part guide (UMV1160CW8)
| Symptom | Most likely area | Example part on this model |
|---|---|---|
| Runs but does not heat | High-voltage circuit | Microwave magnetron W10754299, gaoxin-hvd c W11256462 |
| Completely dead (no display) | Power supply protection | Microwave fuse W11707984 |
| Starts then stops when door moves | Door safety switches | Interlock WPW10156813 |
| Loud hum, burning smell, trips breaker | High-voltage component failing | Capacitor W10850446 |
Why it matters
Knowing the typical lifespan helps you decide whether to repair or replace. If your UMV1160CW8 is under 10 years old, replacing a common failure part (like a fuse, interlock, or diode) is often a practical fix; if it is well past 10 years, multiple high-voltage failures can make replacement more cost-effective.
Last updated: February 2026