Owner’s manual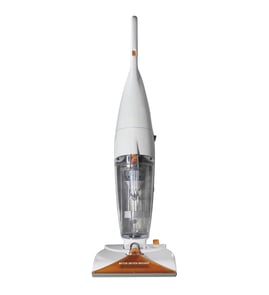

Which is better, steam cleaner or vacuum cleaner?
A steam cleaner and a vacuum cleaner do different jobs, so the “better” choice depends on what you’re cleaning. Your Hoover F5835-900 steam cleaner is best for sanitizing and loosening stuck-on grime on hard, sealed surfaces; a vacuum is best for fast, dry pickup of dust, hair, and debris.
Quick decision guide
- Choose a vacuum for everyday floors, rugs, and pet hair pickup
- Choose a steam cleaner for sticky spills, soap scum, and sanitizing hard surfaces
- Use both for best results: vacuum first, then steam clean
- Avoid steam on unsealed wood, waxed floors, and heat-sensitive finishes
- For carpets and upholstery, use the cleaning method recommended in your owner's manual
Steam cleaner vs vacuum: side-by-side
| Feature | Steam cleaner (Hoover F5835-900) | Vacuum cleaner |
|---|---|---|
| What it removes best | Stuck-on grime, some germs, residue | Loose dirt, dust, crumbs, hair |
| Needs chemicals | Usually no (uses heated water) | No (dry pickup) |
| Dry time | Surface must dry after cleaning | No dry time |
| Best surfaces | Sealed tile, sealed grout, sealed hard floors | Hard floors, carpet, rugs |
| Speed for daily cleaning | Slower | Faster |
Best practice: use them together
- Vacuum first to remove grit that can scratch surfaces.
- Steam clean second to break down residue and refresh the surface.
- Let it dry fully before walking on it, especially on smooth floors.
Why it matters
Using the right tool protects your floors and improves results. A vacuum prevents grit from being pushed around, while steam helps lift films and buildup that dry cleaning leaves behind.
Last updated: February 2026
What solution do you use in a Hoover steam vac?
For the Hoover F5835-900 SteamVac-style steam cleaner, we use hot tap water in the solution (clean) tank, then add the Hoover carpet cleaning solution specified for the machine. Fill only to the marked fill line so the pump can mix and dispense correctly; see the owner's manual.
What to put in each tank
Most Hoover SteamVac units use two separate tanks; one for clean solution and one for dirty recovery water.
- Solution (clean) tank: hot tap water plus the recommended Hoover cleaning formula
- Recovery (dirty) tank: nothing added; it collects the extracted water and soil
- Never use: bleach, ammonia, vinegar, or high-foaming detergents (they can damage seals and cause excessive suds)
Quick fill steps (typical for this style)
- Remove the solution tank and take it to a sink.
- Open the cap and fill with hot tap water to the top fill line.
- Add the cleaning solution per the bottle directions for an extractor/SteamVac.
- Reinstall the tank fully so the valve seats and the unit can prime.
Choosing the right cleaner
Use a low-foam carpet/upholstery extractor formula intended for Hoover machines.
| Cleaner type | OK to use? | Why |
|---|---|---|
| Hoover carpet cleaning solution (extractor formula) | Yes | Designed for correct foaming and pump flow |
| Dish soap or laundry detergent | No | Too much foam; can overflow into the motor path |
| Vinegar or bleach mixes | No | Can attack plastics, seals, and finishes |
Why it matters
Using the correct solution keeps the pump, hoses, and nozzle flowing properly, prevents over-foaming, and helps the SteamVac recover water efficiently so carpets dry faster.
Last updated: February 2026
Why is my Hoover steam mop not steaming?
If your Hoover F5835-900 steam cleaner isn’t producing steam, the most common causes are a blocked steam path, a tank that isn’t seated and sealing correctly, or mineral buildup restricting flow. We recommend checking the tank fit first, then clearing clogs and descaling.
Quick checks (most fixes)
- Unplug the unit and let it cool completely.
- Confirm the water tank is filled with water and fully clicked into place.
- Reseat the tank and make sure the valve area is clean so it can open.
- Inspect the steam outlet and any nozzle openings for lint, debris, or dried residue.
- If you use hard water, descale to remove mineral deposits.
Step-by-step troubleshooting
1) Verify tank seating and water delivery
A steam cleaner can look “full” but still not feed water if the tank valve is not opening.
- Remove the tank, wipe the valve area, and reinstall firmly.
- Check for cracks, warped seals, or debris where the tank meets the base.
2) Clear a clogged steam path
Buildup can block the connection points between the tank, heater, and steam outlet.
- Use a wooden toothpick or soft brush to clear visible openings.
- Wipe away residue; avoid metal tools that can damage plastic ports.
3) Descale mineral buildup (hard water)
Minerals can restrict flow and reduce heating efficiency.
- Run a descaling routine recommended in the owner's manual.
- After descaling, flush with clean water to clear loosened deposits.
Symptoms and what they usually mean
| What you notice | Most likely cause | What to do first |
|---|---|---|
| No steam at all | Tank not seated, clogged port | Reseat tank; clear outlet |
| Weak steam | Mineral scale, partial clog | Descale; clean openings |
| Steam starts then stops | Intermittent feed, buildup | Clean tank valve area; descale |
Why it matters
When the steam path is restricted, the heater may not get a steady water supply, so steam output drops to zero or becomes inconsistent. Keeping the tank connection clean and descaling regularly helps restore normal steam performance and prevents repeat clogs.
Last updated: February 2026
Are Hoover steam cleaners good?
Hoover steam cleaners, including the Hoover F5835-900 steam cleaner, are a solid choice for routine household cleaning when you want chemical-free sanitizing on sealed hard surfaces. They are typically valued for versatility and attachments; long-term satisfaction depends most on proper maintenance and using them on the right surfaces (not delicate or unsealed materials).
What “good” means for a steam cleaner
A steam cleaner is “good” when it reliably heats, produces steady steam, and has attachments that match your jobs (floors, grout lines, upholstery). For the F5835-900, the best way to confirm approved uses, fill limits, and care steps is the owner's manual.
Where Hoover steam cleaners usually perform best
- Sealed tile, sealed stone, and sealed grout (spot work and edges)
- Sealed hardwood or laminate (only if the manual allows it)
- Bathroom fixtures and tight crevices with a detail nozzle/brush
- Quick refresh of washable upholstery (light passes, not soaking)
- Sticky residue cleanup on durable, non-porous surfaces
Common drawbacks (and how to avoid them)
Most complaints we see across steam cleaners come from mismatched expectations or skipped upkeep.
| Issue customers notice | Most common cause | What we recommend |
|---|---|---|
| Weak steam | Mineral scale buildup | Use distilled water if allowed; descale per manual |
| Water drips/spits | Overfilling or not preheating | Fill to the line; allow full heat-up |
| Short run time | Small tank by design | Plan smaller zones; refill after cool-down |
| Reduced durability | Heat stress, clogged passages | Keep vents clear; store dry; follow maintenance |
Quick buying and care checklist
- Match the tool set to your tasks (floors vs. handheld detailing)
- Use only the water type and additives allowed in the owner's manual
- Let the unit fully heat before judging steam output
- Empty the tank after use and store it dry
- Avoid unsealed wood, delicate fabrics, and heat-sensitive finishes
Why it matters
Steam cleaners can sanitize and lift grime without detergents, but they can also damage finishes if used on the wrong surface. Following the model-specific guidance for the Hoover F5835-900 protects your floors, upholstery, and the cleaner’s heating system.
Last updated: February 2026