- Kenmore refrigerator water filters
- Whirlpool refrigerator water filters
- Samsung refrigerator water filters
- GE refrigerator water filters
- LG refrigerator water filters
- Frigidaire refrigerator water filters
- KitchenAid refrigerator water filters
- Maytag refrigerator water filters
- Kenmore Elite refrigerator water filters
- Estate refrigerator water filters
- GE Profile refrigerator water filters
- Amana refrigerator water filters
- Bosch refrigerator water filters
- Dacor refrigerator water filters
- Electrolux refrigerator water filters
Top DIY repair help
View All Repair Categories
Appliances
Lawn & Garden
Power Tools
Home Improvement
Sports & Leisure
Heating & Cooling
Quick Links
How to replace a wall oven hidden bake element
less than a minute readFeb 18Lyle Weischwill
Repair time and Difficulty
30 minutes or less
Tools Required
- 1/4-inch nut driver
- Needle-nose pliers
- Slot screwdriver
- Work gloves
This oven repair guide explains how to replace a hidden bake element in a wall oven. In some cases, you might see visible damage in the element, but the element can seem intact and still not heat. Replace the bake element with a manufacturer-approved wall oven part if the oven doesn't heat in bake mode or if the bake element is damaged.
Although the video below shows a range, this basic repair process works for replacing the hidden bake element in many Kenmore, Frigidaire, Electrolux and Samsung wall ovens.
Instructions
- 1. Shut off electrical power
Electric ovens typically have 2 house fuses or a double breaker, one for each 120-volt leg of the 240-volt power. To prevent electrical shock and damage to the control board, remove both fuses or shut off both breakers (if a clip connects the double breakers, shutting off one should shut off both).
- 2. Remove the bottom panel
Remove the oven racks.
If the bake element is hidden under a bottom panel, remove the thumb screws that hold the panel in place. If a screw is stuck, use a slot screwdriver to free it.
Lift the back of the panel slightly and push back to release the bottom oven panel from the retaining lip. Push down on a front corner of the bottom panel so it tips enough that you can grasp it. Work the bottom oven panel up and out of the oven.
Tip: If you can't complete this repair because the door gets in your way, remove the door, following instructions in your owner's manual. You might need help lifting the door off the oven. Set the door on a pad.
- 3. Detach the bake element
To detach the bake element, use a 1/4-inch nut driver to remove 2 screws in the bottom base of the oven and 2 screws at the very back of the oven.

PHOTO: Remove the front screws. 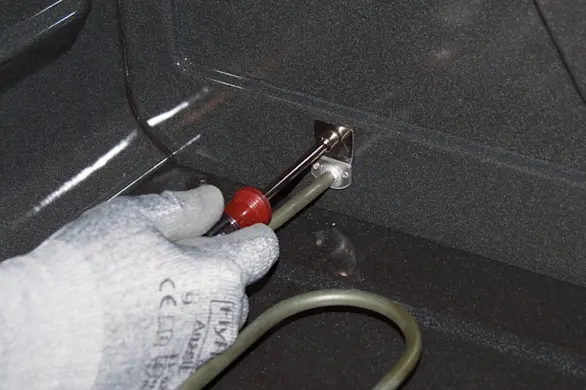
PHOTO: Remove the mounting screws.
- 4. Disconnect the wires
Carefully pull the bake element forward until you can reach the wires attached to the back of it. Use needle-nose pliers to disconnect the wires, taking care not to let the wires slip through the holes at the back of the oven. If the wires slip through the holes, you must pull the oven out of the cabinet to retrieve them.
Remove the element from the oven and set it aside for disposal.

PHOTO: Pull the element forward. 
PHOTO: Disconnect the wires.
- 5. Connect the new element
Connect the wires to the back of the new bake element. Push the female spade connectors onto the spades on the new bake element. Push the female spade connectors until they are seated properly and fully connected.
Carefully push the leads of the bake element into the holes at the back of the oven.
- 6. Fasten the element to the oven
Position the mounting brackets so the screw holes line up. Insert and firmly tighten the mounting screws.
- 7. Reinstall the bottom panel
Work the bottom panel into place. Make sure the bottom oven panel is properly positioned under the retaining lip. Line up the thumb screw holes at the back of the bottom oven panel. Insert the thumb screws and tighten them by hand.
- 8. Reinstall the racks
Slide the racks back into the oven.
- 9. Restore power to the oven
Switch on the circuit breakers or reconnect the fuses.