 Owner’s manual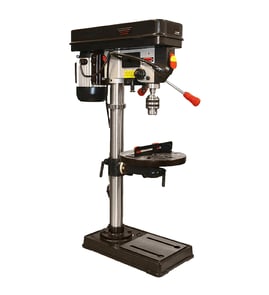

How to repair a drill press spindle?
On the Craftsman 113213850 15" drill press, spindle repair typically means removing the chuck and quill assembly, inspecting the spindle nose/taper and bearings, then reassembling and adjusting the quill so it feeds smoothly and returns without binding. Use the 113213850 owner's manual for the correct removal and adjustment points.
- Turn the switch OFF and unplug the drill press
- Remove the switch key so it cannot be started accidentally
- Wear eye protection; secure loose clothing and hair
- Keep the chuck key out of the chuck at all times
- Remove the chuck from the spindle (the manual describes using the locking collar to eject the chuck)
- Remove feed handles and the quill return spring housing as needed
- Remove quill retaining hardware and slide the quill assembly out of the head
- Separate the spindle from the quill to access bearings
- Replace worn bearings and any damaged spindle surfaces (splines, taper, threads)
- Reinstall the spindle into the quill, then reinstall the quill into the head
| Check | What to do | Why it matters |
|---|---|---|
| Chuck seating | Clean the chuck taper and spindle nose; apply a light film of oil | Dirt causes wobble and runout |
| Quill movement | Adjust so feed is smooth and unrestricted | Prevents sticking and uneven drilling |
| Belt tension | Set proper belt tension before use | Loose or tight belts add vibration |
- Chuck wobble: dirty taper or spindle nose; clean and reseat
- Grinding/rumbling: worn spindle bearings; replace bearings
- Quill sticks: adjustment too tight or dirty rack/splines; clean, lubricate, and adjust
The spindle, bearings, and quill alignment control runout and drilling accuracy. Correct chuck seating and smooth quill travel reduce vibration, improve hole quality, and protect the belt drive.
Last updated: February 2026
What are the parts of a drill press?
On the Craftsman 113213850 15-inch drill press, the main assemblies are the base and column, the table and table support, and the head (which houses the motor, pulleys, belts, quill, spindle, and chuck). For the exact component names used for ordering, use the owner's manual.
- Base and column: Stabilize the drill press and support the working height.
- Table and table support: Holds the workpiece; raises/lowers and locks in position.
- Head: Contains the drive system and drilling mechanism.
- Quill and spindle: The quill moves up and down; the spindle rotates to drive the bit.
- Chuck: Grips the drill bit.
- Feed handles and depth stop: Control drilling pressure and drilling depth.
- Switch and cord: Provide power control and electrical connection.
The parts list in the manual calls out many individual components. These are some of the most common categories you will run into when identifying or replacing parts:
- Drive parts: V-belts, motor pulley, spindle pulley, center pulley
- Rotating support parts: Ball bearings, thrust bearing, spacers
- Table lift parts: Rack, collar, crank, worm/elevation gear
- Controls and safety parts: Switch, switch cover/plate, cord clamp, belt guard
| Assembly | Typical parts included | What you notice when it fails |
|---|---|---|
| Drive system | Belt, pulleys, motor mount hardware | Slipping, squealing, wrong speeds |
| Quill/spindle | Quill tube, spindle, bearings, depth stop | Wobble, runout, rough feed |
| Table support | Rack, crank, gears, clamps | Table won’t raise/lower or won’t lock |
| Electrical | Switch, cord, connectors | Won’t start, intermittent power |
Knowing the assembly name (head, quill, table support, base) helps you match symptoms to the right diagram and parts list, so you order the correct hardware, bearings, belts, or switch components for your Craftsman drill press.
Last updated: February 2026
Where is the model number on a Craftsman drill press?
On the Craftsman drill press model 113213850, the model and serial number are located at the rear of the head (the upper housing). We recommend recording both numbers and using the model number any time you look up parts or service information in the owner's manual.
Check these common label locations on a 15-inch floor drill press like model 113213850:
- Rear of the head (back side of the motor and pulley housing)
- On a metal plate or label attached to the head casting
- Near the serial number marking (often on the same plate)
- Occasionally on the side of the head if the drill press has been rotated in a tight shop space
Use this checklist so you capture the right information the first time:
- Model number: 113213850
- Serial number: unique to your drill press
- Product type: Craftsman 15-inch floor drill press
- Best practice: write both numbers down and keep them with your shop records
The model number ties your drill press to the correct parts list and diagrams. Even within the same Craftsman drill press family, parts like the switch, belts, chuck, spindle, and bearings can vary by model and production run.
| Item | What it identifies | When you need it |
|---|---|---|
| Model number | The drill press design and parts breakdown | Ordering parts, using the correct parts list |
| Serial number | Your specific unit | Verifying production details, service records |
Last updated: February 2026