 Owner’s manual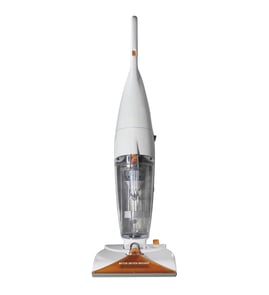

Is the Hoover steam cleaner any good?
Yes. The Hoover F5881-900 SteamVac deep cleaner is a solid, effective choice for routine carpet and upholstery cleaning when it’s used the way Hoover specifies: vacuum first, use the correct detergent mix, and finish with dry strokes for faster drying. For model-specific use and care details, follow the owner's manual.
What it does well (when used correctly)
- Deep-cleans carpet and can handle carpeted stairs and upholstery with the right tool
- Helps reduce streaking when you overlap passes (about 1 inch)
- Improves drying time when you end with extra dry strokes
- Can pick up small liquid spills (up to 1 gallon total and no more than 1/4 inch deep)
- Works best when you avoid over-wetting one spot (no more than 4 wet strokes per area)
What to watch out for
A lot of “good vs. not good” comes down to setup and technique. These are the most common issues we see:
- Using the wrong cleaner (or adding wax) can hurt performance
- Over-saturating carpet can leave it wet longer and reduce results
- Not vacuuming first leaves grit behind and limits cleaning effectiveness
- Waiting too long to empty the recovery tank can reduce suction
- Using it like a dry vacuum (it is not designed for that)
Detergent and mixing basics (from Hoover guidance)
| Cleaning task | What to use | Typical mix guidance |
|---|---|---|
| Carpet, stairs, upholstery | Hoover carpet/upholstery detergent | Measure about 5 oz per tank; heavy-traffic areas may use more per instructions |
| Bare floors | Hoover bare floor cleaner | Use only on bare floors; do not use on carpet or upholstery |
Why it matters
This model’s cleaning results depend heavily on using the correct Hoover detergent, limiting wet passes, and finishing with dry strokes. Those steps protect your carpet, improve pickup, and shorten drying time.
Last updated: February 2026
Why is my Hoover steam mop not steaming?
If your Hoover F5881-900 isn’t producing steam or spray, the most common causes are an empty or unseated solution tank, the speed selector set to OFF, or a blockage in the fluid path. We recommend confirming the basic settings first, then checking for clogs and tank seals using the owner's manual.
Quick checks that fix most “no steam/no spray” issues
- Refill the clean solution tank with hot tap water and the correct cleaning solution for the surface.
- Reseat the solution tank; make sure it’s firmly locked in position.
- Set the speed selector to LOW or HI (not OFF).
- Squeeze and hold the trigger while making a slow forward pass.
- Verify the recovery tank lid is installed securely; an improperly seated lid can affect pickup and operation.
Check for clogs and flow restrictions
A clog can stop flow even when the tank is full.
- Remove the tank and inspect the tank valve area for debris or dried solution.
- Check the tool/hose path (if you are using a hose tool); clear any blockage at the tool end.
- Inspect the nozzle area for buildup; rinse removable parts with warm water and let them dry fully before reinstalling.
Settings and tank seating: what to look for
| What you see | Likely cause | What we do next |
|---|---|---|
| No output at all | Solution tank empty or not seated | Refill and lock tank in place |
| Unit runs but nothing dispenses | Speed selector on OFF | Move selector to LOW or HI |
| Works with floor nozzle but not with tool | Blockage in tool/hose | Remove tool and clear blockage |
| Weak pickup and odd sound | Recovery tank lid not sealed | Reseat lid firmly |
Why it matters
When the solution tank is not locked in or the selector is OFF, the pump and flow system cannot deliver hot water/solution to the cleaning path. Clearing clogs and reseating lids also helps restore normal suction and consistent cleaning performance.
Last updated: February 2026
Why is my steam cleaner not picking up water?
If your Hoover F5881-900 SteamVac is not picking up water, the most common cause is the recovery (lower) tank being full and triggering the automatic shutoff float, which reduces suction and stops dirty-solution pickup. Empty the recovery tank, then check the tank lid and filter for debris.
Quick checks that fix most pickup problems
- Turn the unit OFF and unplug it before removing tanks.
- Empty the recovery (lower) tank; a higher-pitched motor sound and reduced suction point to the automatic shutoff.
- Look for the red float disk in the recovery tank lid area; if it is up, the tank is full or the float is stuck.
- Remove debris from the recovery tank filter and rinse it with clean water.
- Rinse the recovery tank lid and let it air dry.
- Reinstall both tanks firmly so they seat and latch correctly.
Clean the nozzle to restore suction
Lint and debris can lodge in the nozzle and restrict airflow. The manual recommends flushing the nozzle rather than removing the nozzle cover:
- Pour 1 to 2 cups of clear water on a non-carpeted floor (do not use a wood floor).
- Pick up the water with the cleaner.
- Repeat until the debris clears.
For the full “automatic shut off” and cleaning steps, follow the owner's manual.
Settings that affect water pickup
When you are trying to pick up liquid (or you want maximum suction with minimal brushing), use the correct brush setting:
| What you are doing | Recommended setting | Why it helps |
|---|---|---|
| Picking up a spill | Agitator/brushes OFF | Helps prevent spreading and focuses on suction |
| Normal carpet cleaning | HI or LO | Balances agitation and extraction |
| Gentle cleaning | LO | Reduces aggressive brushing |
Why it matters
When the recovery tank is full, the automatic shutoff is doing its job by protecting the machine from overfilling. Clearing the float, filter, and nozzle restores airflow so the SteamVac can extract dirty solution again.
Last updated: February 2026
How do I use my Hoover F5881-900?
To use your Hoover F5881-900 SteamVac deep cleaner, we fill the clean solution tank with the right detergent and hot tap water, power the unit on with the foot switch, then make slow cleaning passes while the brushes scrub and the recovery tank picks up dirty solution. For model-specific steps and diagrams, use the owner's manual.
Quick start steps (carpet and rugs)
- Vacuum the area first so you are not turning loose dirt into mud.
- Mix solution in the clean solution tank: add Hoover detergent, then fill to the 1-gallon fill line with hot tap water.
- Lock the tank cap fully (it must be locked to prevent leaks and maintain performance).
- Press the foot-activated handle release to recline the handle.
- Step on the foot-activated on/off switch to start cleaning.
- Make slow forward passes to apply and scrub; then make passes to pick up as much water as possible.
Tank and detergent basics
Use only Hoover detergents; they are formulated for this SteamVac-style deep cleaner. For heavy-traffic areas, pre-treat first; if you do not have pre-treat available, use a stronger mix (the manual notes doubling detergent to 2 capfuls or 10 oz per 1-gallon tank).
| Item | What it does | What to watch for |
|---|---|---|
| Clean solution tank (upper) | Holds hot water and detergent | Cap must be locked; rubber ring seated correctly to prevent leaks |
| Recovery tank (lower) | Collects dirty solution | Empty when it reaches the fill level; rinse and air-dry before storage |
| Brushes/agitator selector | Scrubs carpet fibers | Use the gentler setting when needed; avoid over-wetting |
After-cleaning and storage
- Empty and rinse the recovery tank.
- Let tanks and internal parts air-dry thoroughly before storing.
- Do not store the cleaner with a full solution tank installed.
- Do not add lubricant to the motor bearings (it can cause damage).
Why it matters
Correct detergent mixing, a fully locked tank cap, and slow pickup passes help your Hoover F5881-900 clean deeper while reducing leaks, over-wetting, and long dry times.
Last updated: February 2026