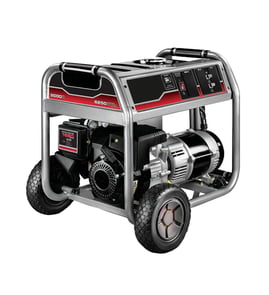

How long can an 800 watt generator run?
An 800-watt class generator can typically run about 4 to 10 hours per tank, depending on the fuel tank size and how hard it’s working. For the Coleman PM800, runtime is mainly driven by load (watts used), fuel capacity, and engine condition; use a light load for the longest run time.
- Load level: 25% to 50% load usually runs much longer than near 100% load.
- Fuel tank size: Bigger tanks mean longer runtime at the same load.
- Fuel quality and age: Old fuel can reduce efficiency and cause surging.
- Altitude and temperature: Higher altitude and extreme heat reduce engine output and can increase fuel use.
- Maintenance: A dirty air filter or worn spark plug can shorten runtime.
| Load on the generator | What it feels like | Typical runtime per tank |
|---|---|---|
| Light (25% to 40%) | A few small loads | 7 to 12 hours |
| Medium (50% to 70%) | Steady household basics | 5 to 9 hours |
| Heavy (80% to 100%) | Near max output | 3 to 6 hours |
- Add up the watts of what you’ll run (starting watts for motors matter).
- Aim to operate around 50% load for a practical balance of runtime and stability.
- Do a timed test: fill the tank, run your normal load, and record hours to refill.
Runtime is not just convenience; it helps prevent overloading, reduces nuisance shutdowns, and improves power quality for sensitive items like chargers, small tools, and electronics.
For more DIY electrical testing tips that help diagnose poor runtime or unstable output, use our guide: how to use a multimeter to test electrical parts video.
Last updated: February 2026
What engine is in a Coleman Powermate PM800?
The Coleman PM800 generator uses a small 4-stroke gasoline engine; PM800 units are commonly found with a Kawasaki-built engine (often around the 80 cc class). The sure way to identify your exact engine is to read the engine ID tag on your specific PM800.
Use the engine’s identification label, not the generator model number alone, when you need carburetor, ignition, or governor parts.
- Find the data tag on the blower housing, recoil starter cover, or valve cover area
- Write down the engine brand (often Kawasaki), plus any model, spec, and serial numbers
- Take a clear photo of the tag before ordering parts
- If the tag is missing, look for stamped numbers on the shroud or crankcase
- Match tune-up parts to the engine ID (spark plug, air filter, carburetor, fuel line)
Many PM800 generators are in the compact, low-wattage range. If your label shows a much higher rating, you may have a different Powermate model.
| Spec on the label | What you may see | Why it matters |
|---|---|---|
| Running watts | About 600 W | Confirms you are working with the PM800 class |
| Surge/max watts | About 800 W | Helps size loads and diagnose “overload” complaints |
| Engine type | 4-stroke | Confirms separate crankcase oil (no fuel mixing) |
The generator model number PM800 identifies the Coleman unit, but the engine ID determines the correct fuel-system and ignition parts. Using the engine tag prevents ordering the wrong carburetor or spark plug.
If the engine runs but you have no AC output, basic electrical testing is the fastest next step.
Last updated: February 2026
What can I run on an 800 watt generator?
On the Coleman PM800 generator, treat 800 watts as peak (surge) power, not an all-day running target. For steady use, plan around about 600 running watts and reserve extra capacity for startup surges from motors and compressors.
These are usually safe choices when your total stays near 600 running watts:
- LED lights or a few lamps
- Phone, tablet, and battery chargers
- Laptop and small monitor
- Wi-Fi router and modem
- Small TV
- Small box fan (check the label for watts)
These commonly exceed 600 running watts or have high startup surge:
- Refrigerator or freezer (compressor surge)
- Microwave, toaster oven, hot plate
- Coffee maker, electric kettle
- Space heater
- Window AC or portable AC
- Larger power tools (air compressor, table saw)
| Item type | Typical running watts | Startup surge? | Good fit on PM800? |
|---|---|---|---|
| LED lighting | 5 to 100 | No | Yes |
| Laptop + charger | 45 to 120 | No | Yes |
| Router/modem | 10 to 30 | No | Yes |
| Box fan | 40 to 120 | Sometimes | Usually |
| Refrigerator/freezer | 100 to 300 | Yes (often 3x to 7x) | Sometimes (one at a time) |
| Microwave | 900 to 1500 | No | No |
| Space heater | 1000 to 1500 | No | No |
- Add up running watts for everything you want on at the same time.
- For anything with a motor/compressor, plan for surge watts at startup.
- Keep a buffer; target 400 to 600 running watts for steadier voltage.
- Plug in the largest load first, then add smaller loads one at a time.
- If lights flicker, the engine bogs, or a breaker trips, reduce the load immediately.
Running above the generator’s steady capacity causes low voltage, nuisance breaker trips, and extra heat in motors and electronics. Staying near the PM800’s running limit gives more stable power and fewer shutdowns.
For checking actual draw, see how to use a multimeter to test electrical parts video.
Last updated: February 2026