Owner’s manual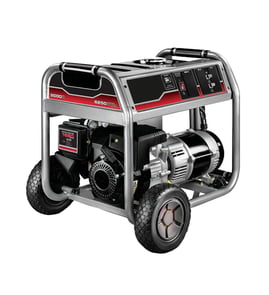

How to reset briggs and stratton generator?
For the Briggs 01653 generator, a “reset” usually means removing the cause of shutdown (overload, low oil, bad connection), then resetting the output protection and restarting with all loads unplugged. Start by checking and resetting the push-to-reset breaker, then restart using the steps in the owner's manual.
Safe reset steps (most common)
- Turn OFF and unplug all devices from the generator receptacles.
- Let the generator run at no-load for a few minutes if it is running rough or just carried a heavy load.
- If AC output is lost, press the push-to-reset circuit breaker back in (it protects the 120/240V output).
- Check oil level and keep the unit on a level surface; low oil or an unlevel unit can prevent starting or cause shutdown.
- Check your cord set and receptacle connection; a loose or damaged cord can look like “no power.”
- Restart the generator and let the engine stabilize before reconnecting loads.
If it keeps tripping or “bogs down” under load
This points to an overload or a shorted load, not a control-panel memory issue.
| Symptom | Most likely cause | What to do next |
|---|---|---|
| Runs but no AC output | Breaker open | Reset breaker; reduce load |
| Runs fine with nothing plugged in, bogs with loads | Overload or shorted device | Disconnect loads; reconnect one at a time |
| Output drops when a specific tool is plugged in | Bad tool or cord | Try a different device/cord |
Why it matters
Resetting the breaker and restarting with loads disconnected protects the stator and receptacles from repeated overload events. It also helps you quickly identify a shorted appliance or cord before it damages generator wiring.
Helpful parts and resources
- If you suspect a damaged power cord or internal lead, compare wiring and routing in the owner's manual.
- For electrical troubleshooting basics, use how to use a multimeter to test electrical parts video.
- If the breaker will not reset or will not stay set, the replacement part is the generator circuit breaker 94396BGS.
Last updated: February 2026
What type of oil goes in a Briggs & Stratton generator?
For the Briggs & Stratton generator model 01653, use the engine oil type and viscosity listed in the engine section of the owner's manual. In most conditions, small engines commonly use SAE 10W-30 for general use, SAE 30 for warmer temperatures, and synthetic 5W-30 for cold-weather operation.
Oil type and viscosity: practical guidance
We match oil viscosity to outdoor temperature because it affects starting, lubrication, and engine wear.
- Warm weather use: SAE 30 is commonly used when temperatures stay above about 40°F (5°C)
- All-around use: SAE 10W-30 is a common choice across a wide range of temperatures
- Cold weather use: Synthetic SAE 5W-30 is commonly used for easier starting and protection in low temperatures
- Do not overfill: keep the oil level at the proper mark on the dipstick
- Check oil often during break-in: the manual notes oil should be checked frequently during engine break-in
What the 01653 manual specifically tells you to do
The 01653 generator manual directs you to follow the engine owner's oil recommendations and to start with the generator on a level surface.
| Step | What to do | Why it matters |
|---|---|---|
| 1 | Set the generator on a level surface | Prevents false low-oil readings and shutdowns |
| 2 | Fill to the proper level on the dipstick | Avoids low-oil protection trips and engine damage |
| 3 | Check oil often during break-in | New engines can consume oil early on |
If the generator shuts down or runs poorly
Low oil level is a common reason portable generators stop during operation.
- Verify the unit is level
- Check the dipstick and fill to the proper level
- Reduce electrical load if the generator “lacks power”
- If you are doing an oil change, use the correct grade and dispose of used oil properly
Helpful parts for maintenance
If you are stocking up for routine service, we list engine oil options and other parts for this model.
Why it matters
Using the correct oil viscosity helps your Briggs & Stratton 01653 start easier, run cooler, and last longer; checking oil level regularly also helps prevent nuisance shutdowns from low-oil conditions.
Last updated: February 2026
How do I find the model number on my 01653?
The model number for your Briggs generator is printed on the unit’s data tag. On model 01653, use that data tag to confirm the model, revision, and serial number before ordering parts or getting service information; our 01653 owner's manual calls this out for support and assembly.
Where to look on the generator
Check these common data tag locations on portable generators like the Briggs 01653:
- On the generator frame or cradle rail (side of the base)
- Near the control panel area (behind or beside the receptacles)
- Close to the engine area on the frame (not on the muffler)
- On a lower crossmember where it is protected from heat
What to write down (and why)
The manual notes you should have the model, revision, and serial number from the data tag available. Record all three so we can match the correct generator parts list.
| Data tag item | What it does | When you need it |
|---|---|---|
| Model number (01653) | Identifies the generator platform | Always, especially for parts lookup |
| Revision | Identifies design changes within the same model | When parts vary by production run |
| Serial number | Identifies your exact unit | For troubleshooting and correct part selection |
Tips if the tag is hard to read
- Wipe the tag gently with a damp cloth; avoid solvents that can remove printing
- Use a flashlight at an angle to make stamped characters easier to see
- Take a clear photo and zoom in to confirm digits
- If the tag is missing, check for a secondary label near the control panel or frame
Why it matters
Using the exact model and revision helps prevent ordering the wrong electrical parts (like a receptacle or circuit breaker) and speeds up troubleshooting when output is lost or the unit vibrates excessively.
Last updated: March 2026