
Can I use a drill to remove bolts?
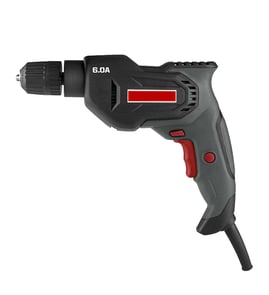
Yes; with the right setup, you can use a drill to back out a bolt (using a socket adapter or screw extractor) or to drill the bolt out if it is seized or the head is stripped. For Craftsman model 90066820, the safest approach is to start with removal methods first, then drill only as a last resort.
Best ways to remove a bolt using a drill
We recommend trying these options in order, depending on the bolt condition:
- Back it out with a socket adapter: Use a drill-to-socket adapter and the correct socket; run the drill in reverse at low speed.
- Use a screw/bolt extractor: Drill a pilot hole, then drive the extractor with the drill in reverse to bite and turn the bolt out.
- Drill the bolt out (last resort): Start with a small bit and step up in size until the bolt releases or the head separates.
- Use penetrating oil and wait: This often makes the difference on rusted threads.
- Switch to an impact driver (if available): Impacts break corrosion better than steady drill torque.
Drill settings and technique that prevent damage
Using the right speed and control matters more than raw power.
| Task | Direction | Speed | Tip |
|---|---|---|---|
| Backing out with socket | Reverse | Low | Keep the socket straight to avoid rounding |
| Using an extractor | Reverse | Low to medium | Let the extractor bite; do not force it |
| Drilling out a bolt | Forward | Low | Use cutting oil; step up bit sizes gradually |
Quick safety checklist
- Disconnect power before changing bits, sockets, or extractors.
- Wear eye protection; drilling hardened fasteners can throw chips.
- Clamp the workpiece so it cannot spin.
- Keep hands clear of rotating sockets and extractor shanks.
Why it matters
Bolts usually fail to come out because the head is stripped, threads are corroded, or the fastener is cross-threaded. Starting with reverse removal methods reduces the chance of breaking the bolt flush, which is the hardest scenario to fix.
For tool and test gear basics that help with DIY repairs, see must have tools for appliance repair.
Last updated: February 2026
What is the strongest drill bit you can buy?
The “strongest” drill bit depends on what you’re drilling. For the toughest materials, carbide (solid carbide or carbide-tipped) is the hardest and most wear-resistant; cobalt HSS (M35/M42) is the best all-around choice for tough metals because it handles heat well; standard HSS is strongest for general-purpose use.
Best choice by material (quick guide)
- Concrete, masonry, tile, stone: carbide-tipped masonry bit (or solid carbide for specialty work)
- Hardened steel, stainless steel: cobalt HSS (M35/M42) or solid carbide (rigid setup required)
- Wood (clean holes): brad-point or auger bits (material strength matters less than geometry)
- Sheet metal and mixed materials: cobalt HSS or quality HSS with the right point angle
- Fasteners, thin metal, enlarging holes: step bit (usually HSS with a coating)
Carbide vs cobalt vs HSS (what “strong” really means)
| Bit type | What it’s best at | Tradeoffs |
|---|---|---|
| Carbide (solid or tipped) | Maximum hardness and wear resistance | More brittle; chips if side-loaded or used in a hand drill aggressively |
| Cobalt HSS (M35/M42) | High heat resistance; excellent for stainless and hard metals | Costs more than HSS; still needs cutting oil and correct speed |
| HSS (high-speed steel) | General drilling; good toughness | Dulls faster on hard metals and masonry |
How to get maximum durability from any “strong” bit
- Match the bit to the material (masonry bits in concrete, cobalt in stainless).
- Use the right speed: slower RPM for harder metals; too fast overheats and dulls edges.
- Use cutting oil on metal to reduce heat and extend bit life.
- Keep the bit straight; side pressure is what breaks carbide and snaps small bits.
- Resharpen when possible; a sharp edge outperforms a “stronger” dull bit.
Why it matters for your Craftsman model 90066820
Your Craftsman 90066820 is listed under power tool parts and is identified as a drill bit sharpener; the right bit material plus proper sharpening and drilling technique is what delivers the longest life and best results. For general upkeep and safe DIY habits, we recommend reviewing are diy appliance repairs safe.
Last updated: February 2026
How to unlock a drill without a chuck key?
The Craftsman 90066820 is a drill bit sharpener, not a handheld power drill; it does not use a keyed drill chuck, so there is nothing to “unlock” with a chuck key on this model. If you are working with a different Craftsman drill, use the steps below.
First: confirm what you have
Use this quick check so you do not apply force to the wrong tool.
- Drill bit sharpener (90066820): holds bits in a guide or clamp, then sharpens them
- Power drill: has a rotating chuck that grips a bit
- Keyed chuck: has a toothed ring and uses a chuck key
- Keyless chuck: tightens by hand (no key)
If you meant a power drill: unlock without a chuck key
These methods apply to a keyed chuck when the key is missing.
- Unplug the drill or remove the battery.
- Set the drill to reverse.
- Use a strap wrench around the chuck to turn it counterclockwise.
- If the jaws are seized, add a drop of light oil into the jaw openings and work the sleeve back and forth.
- If the chuck is damaged or will not release, replace the chuck.
What to avoid
- Do not use locking pliers directly on the chuck sleeve; it deforms the chuck.
- Do not hammer on the jaws; it chips the jaw faces.
- Do not run the drill at high speed while forcing the chuck loose.
Quick troubleshooting table
| What you see | Most common cause | Best next step |
|---|---|---|
| Chuck will not rotate | Overtightened or rusted | Strap wrench; add light oil |
| Jaws will not open | Debris in jaws | Clean jaw slots; oil; cycle open/close |
| Chuck turns but bit stays stuck | Bit shank galled | Oil; twist and pull the bit straight out |
Why it matters
Using controlled torque prevents damage to the chuck jaws and spindle threads; that keeps the drill running true and avoids turning a simple stuck-bit issue into a parts replacement.
For safe DIY practices when working on powered equipment, use our are diy appliance repairs safe.
Last updated: February 2026
What are the parts of a power drill?
Craftsman model 90066820 is a drill bit sharpener, not a handheld power drill; it does not use a chuck, trigger, clutch, or forward/reverse switch. The key parts are the drive motor and the sharpening components that hold the bit and grind the cutting edges.
Main parts on a drill bit sharpener (like Craftsman 90066820)
- Motor and drive: spins the sharpening mechanism at a steady speed
- Grinding wheel or sharpening stone: removes material to restore the cutting edge
- Bit holder/collet: centers and clamps the drill bit during sharpening
- Alignment/angle guide: sets the correct sharpening angle and lip relief
- Housing and base: supports the motor and keeps the sharpener stable
- Power cord and switch: supplies power and turns the unit on and off
Drill vs. drill bit sharpener: what’s different
| Feature | Handheld power drill | Drill bit sharpener (90066820) |
|---|---|---|
| Holds the tool | Chuck grips the bit | Collet/holder positions the bit |
| Main job | Spins a bit to drill holes | Regrinds the bit’s cutting edges |
| Common controls | Trigger, forward/reverse, clutch | Simple on/off switch, angle guides |
Quick symptom-to-part checklist
- Bit won’t sharpen evenly: alignment/angle guide set wrong, bit not seated in holder
- Excessive vibration or noise: worn grinding wheel, loose mounting, debris buildup
- Motor runs but sharpening is poor: grinding wheel glazed or worn
- No power: cord, switch, or internal wiring issue
Why it matters
Using drill terminology (chuck, clutch, gearbox) can send troubleshooting in the wrong direction. On a sharpener, accuracy comes from the holder alignment and wheel condition, which directly control bit geometry and cutting performance.
For safe electrical checks during diagnosis, we follow step-by-step meter testing like in how to use a multimeter to test electrical parts video.
Last updated: February 2026
Is a 500 watt drill powerful?
A 500-watt drill is powerful for many DIY drilling tasks, but watts alone do not tell you how well a tool performs. For Craftsman model 90066820, the key point is that it is a drill bit sharpener, so drill “power” is not the right way to judge it.
How to judge “power” for a drill vs. a sharpener
For a corded drill, watts relate to electrical input and can hint at capacity, but real performance depends on torque and speed under load. For a drill bit sharpener, performance is about how consistently it restores a cutting edge.
- Drill: torque, RPM range, chuck size, and duty cycle matter most
- Sharpener (like 90066820): motor speed consistency, wheel condition, and correct bit alignment matter most
- Material matters: drilling steel or masonry needs different features than drilling wood
- Bit condition matters: a sharp bit makes a lower-watt drill feel stronger
- Technique matters: steady pressure and correct speed prevent stalling and overheating
Quick comparison
| What you’re evaluating | Corded drill | Drill bit sharpener (90066820) |
|---|---|---|
| “Power” indicator | Watts plus torque under load | Consistent sharpening results, not watts |
| Best performance clues | Torque, RPM range, gear settings | Wheel condition, alignment, repeatability |
| Typical use | Making holes, driving fasteners | Restoring dull drill bits |
What to check if you’re trying to improve results
If your goal is better drilling performance, start with the bit. If your goal is better sharpening performance, focus on setup and wear items.
- Inspect the bit for chips or heavy rounding before sharpening
- Clean debris from the sharpener’s guides and bit channels
- Check for worn components (wheel, guides, or guards) that affect alignment
- Use a test hole in scrap wood after sharpening to confirm the edge is cutting cleanly
Why it matters
A “powerful drill” question is about drilling load; a drill bit sharpener is about edge quality. Matching the right metric to the right tool prevents buying the wrong replacement parts and helps you get clean, accurate holes.
For safe electrical checks on corded tools, follow the steps in how to use a multimeter to test electrical parts video.
Last updated: February 2026