

What are the five parts of the lathe machine?
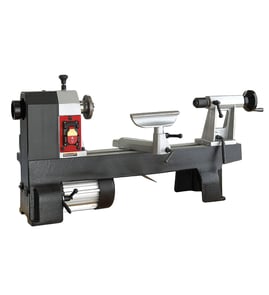
A lathe is commonly described by five main assemblies: the bed, headstock, tailstock, carriage, and the feed system (lead screw/feed rod). On a Craftsman 10128980 12-inch metal turning lathe, these are the core structures that support, rotate, and move the work and cutting tool.
- Bed: The rigid base that keeps the headstock, tailstock, and carriage aligned.
- Headstock: Houses the drive components and supports the spindle.
- Tailstock: Supports the free end of long workpieces; often holds a drill chuck for drilling.
- Carriage: Holds and moves the cutting tool along the bed (typically includes saddle, cross slide, and tool post).
- Feed system (lead screw/feed rod): Moves the carriage automatically for turning and threading.
| Part | Primary job | What you notice when it has an issue |
|---|---|---|
| Bed | Alignment and rigidity | Tapered cuts, chatter, poor finish |
| Headstock | Spins the work via spindle | Vibration, noise, speed problems |
| Tailstock | Supports/drills | Off-center drilling, poor support |
| Carriage | Positions the cutting tool | Binding, backlash, uneven travel |
| Lead screw/feed | Power feed and threading | Inconsistent feed, bad threads |
Knowing these five assemblies helps you troubleshoot faster. For example, tapered turning often points to alignment (bed or tailstock), while threading problems usually point to the lead screw/feed mechanism or carriage engagement.
If you are identifying a worn component (like a lead screw, tool post, or tailstock quill), confirm the exact model tag reads 10128980 before ordering; our guide on how to find your appliance model number (and what it means for parts) helps you match the right diagram and part listing.
Last updated: February 2026
What is a chip pan in a lathe machine?
A chip pan on a lathe is the tray (usually metal) that sits under the work area to catch metal chips and swarf, along with cutting fluid drips. On the Craftsman 10128980 12" metal turning lathe, it helps keep the bed and shop area cleaner and makes chip disposal safer.
- Collects chips, swarf, and small offcuts during turning, facing, and drilling
- Helps contain cutting oil or coolant runoff (if you use it)
- Reduces cleanup time around the lathe stand or bench
- Helps keep chips away from lead screws, ways, and moving slides
- Does not replace regular cleaning and lubrication of the ways and carriage
Metal chips are sharp and can get pulled into moving parts. Keeping chips contained helps protect sliding surfaces (ways), reduces premature wear, and lowers the chance of cuts when you brush chips off the machine.
- Remove chips with a brush or chip hook; avoid using bare hands
- Wipe out oil and fines so they do not turn into abrasive sludge
- Keep chips out of the cross slide and carriage travel paths
- Check that the pan is seated flat so it does not vibrate or rattle
| Part | What it’s for | What you interact with most |
|---|---|---|
| Chip pan | Collects chips and fluid | During cleanup |
| Carriage | Moves the cutting tool along the bed | During cutting passes |
| Cross slide | Moves the tool in and out (diameter control) | Facing and turning |
| Tailstock | Supports work or holds a drill chuck | Drilling and support |
If your lathe has a motor, switch, or wiring issue, using a meter correctly is key before replacing electrical parts: how to use a multimeter to test electrical parts video
Last updated: February 2026
How do I find the model number on my 10128980?
The model number for your Craftsman 12" metal turning lathe is typically printed on a model and serial tag attached to the machine. On model 10128980, check common tag locations on the bed, headstock area, or the rear of the base or cabinet.
Check these spots first (use a flashlight and wipe off oil or dust):
- The back side of the headstock casting
- The front or side of the bed (near the ways)
- The rear of the lathe base or cabinet stand
- Inside an access door or cover panel (if your lathe has a cabinet)
- Near the motor mount or belt guard area
Most Craftsman tags include a few key fields. Use the model number for parts lookup.
| Label field | What it’s used for | Example you might see |
|---|---|---|
| Model | Identifies the exact lathe version for parts diagrams | 10128980 |
| Serial | Production identifier | Letters and numbers |
| Type/Spec | Internal build details | Varies |
Model tags can be hard to read on older power tools. These steps help prevent ordering the wrong parts.
- Write the model number exactly as shown (include all digits)
- Take a clear photo before cleaning further
- If the tag is missing, check for the number stamped into the metal near the tag location
- Confirm you are searching for lathe parts, not a motor or accessory model
Parts lists and diagrams are model-specific. Using the correct model number (10128980) ensures the right fit for items like belts, bearings, switches, and guards.
For more help with identifying model information, use [how to find your appliance model number (and what it means for parts)].
Last updated: March 2026