
What AC parts are most commonly replaced?
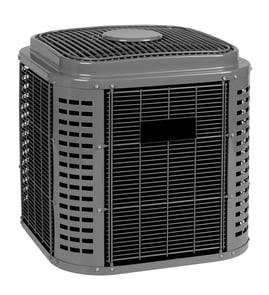
For an Amana central air conditioner condensing unit like model RCB24B2A, the most commonly replaced items are electrical start/run components and fan-related parts, plus service parts used during repairs (fasteners and wire management). These parts fail from heat, vibration, and outdoor exposure.
Most common replacements (what we see most often)
- Dual run capacitor (compressor and condenser fan start/run support)
- Contactor (switches high voltage to the compressor and fan)
- Condenser fan motor (moves air across the outdoor coil)
- Fan blade (can crack or loosen and cause vibration)
- Fuses or disconnect components (protect the circuit)
- Wiring/terminals (burnt spade connectors, rubbed insulation)
Parts on this model page you may use during repairs
These are common “service hardware” items that help you complete a safe, tidy repair on RCB24B2A:
- Screw WP90767 for securing panels or brackets
- Screw WP489349 for replacing missing or stripped fasteners
- Keps nut WP488130 for vibration-resistant fastening
- Tie WPW10339879 for bundling and routing wires away from the fan
Quick symptom-to-part guide
| What you notice | Common cause | What to check first |
|---|---|---|
| Outdoor unit hums but fan will not start | Weak capacitor or bad fan motor | Capacitor, fan spins freely (power off) |
| Clicking but no compressor start | Contactor or capacitor issue | Contactor contacts, capacitor value |
| Unit runs but trips breaker | Shorted compressor, motor, or wiring | Wiring condition, motor windings |
| Loud rattling/vibration | Loose hardware or fan blade issue | Fan blade, mounting screws/nuts |
Why it matters
Replacing the right “high-failure” part early helps prevent repeat shutdowns, nuisance breaker trips, and secondary damage (like overheated wiring or a stressed compressor). Using correct fasteners and wire ties also reduces vibration wear and keeps wiring clear of moving parts.
Last updated: February 2026
What is the error code BR on an AC unit?
On many Amana air conditioners, the BR (or Br) error indicates brownout protection; the unit detected low incoming voltage and temporarily shut down to protect the compressor and controls. On an Amana RCB24B2A central air conditioner, treat BR as a power-supply issue first.
What to check first (safe, homeowner-level)
- Reset the thermostat to OFF, wait 5 minutes, then call for cooling again.
- Check the indoor breaker (air handler/furnace) and the outdoor condenser breaker; reset only if tripped.
- Verify the outdoor disconnect is fully seated (if your system has one).
- Replace weak thermostat batteries (if applicable) and confirm the thermostat display is stable.
- If BR returns during peak heat, reduce other heavy electrical loads and try again.
Electrical checks (best for a qualified technician)
Low voltage can be caused by supply issues or failing components. A technician typically checks:
- Line voltage at the disconnect and contactor
- Voltage drop under load
- Loose/burnt connections at lugs and terminals
- Contactor condition and wiring integrity
For DIY learning on electrical testing, use our how to use a multimeter to test electrical parts video.
Common causes and what they usually mean
| Cause | What you may notice | Typical fix |
|---|---|---|
| Utility brownout / low supply voltage | BR appears during high-demand hours | Restore stable power; retry after voltage stabilizes |
| Loose electrical connection | Intermittent shutdowns, buzzing, heat marks | Tighten/repair connections |
| Weak capacitor or failing compressor | Hard starts, repeated trips | Diagnose and replace failed component |
| Control board sensing issue | BR with normal voltage | Diagnose controls and sensors |
Why it matters
Running a central AC with low voltage can overheat the compressor and damage electrical components. Brownout protection helps prevent expensive failures by stopping operation until power is stable.
Last updated: February 2026
What are the main parts of a central air conditioner?
A typical central air conditioner is a split system with an outdoor condensing unit and an indoor evaporator section. For your Amana RCB24B2A system, the “main parts” usually mean the compressor, condenser coil, condenser fan, evaporator coil, metering device, and the controls that manage power and airflow.
Main components (what they do)
- Compressor (outdoor unit): Pumps refrigerant through the system and raises pressure/temperature.
- Condenser coil (outdoor unit): Releases heat to outdoor air.
- Condenser fan and motor (outdoor unit): Pulls air through the condenser coil to remove heat.
- Evaporator coil (indoor unit): Absorbs heat from indoor air.
- Metering device (indoor coil area): Controls refrigerant flow into the evaporator (often a TXV or fixed orifice).
- Electrical controls and safety devices: Contactor/relay, capacitor(s), and protection devices that help the unit start and run safely.
Other parts you will commonly see
- Refrigerant lines: Suction line (larger, insulated) and liquid line (smaller).
- Air handler or furnace blower: Moves air across the evaporator coil and through ductwork.
- Air filter and ductwork: Helps keep airflow clean and consistent.
- Thermostat and low-voltage wiring: Calls for cooling and controls staging.
Quick “where is it?” map
| Location | What’s there | What it affects |
|---|---|---|
| Outdoors | Compressor, condenser coil, condenser fan, electrical compartment | Heat rejection, system starting/running |
| Indoors | Evaporator coil, metering device, blower (air handler/furnace) | Cooling capacity, airflow, humidity removal |
Why it matters
Knowing which parts are indoors vs. outdoors helps you troubleshoot faster. For example, weak airflow points you toward the indoor blower, filter, or evaporator coil, while loud buzzing or hard starting points you toward outdoor electrical components.
Parts and hardware notes
When you’re replacing panels or securing wiring after service, using the correct fasteners and ties helps prevent vibration and wire rub-through. If you need common hardware for this model’s assemblies, we list items like the screw WP90767 and tie WPW10339879.
Last updated: February 2026
Why is my Amana AC remote not working?
If your Amana central air conditioner remote is not working, the most common causes are weak batteries, a blocked signal path, or a remote that is no longer sending an infrared signal. Start with fresh batteries and basic checks; then move to power and control troubleshooting.
Quick checks that fix most remote problems
- Install brand-new batteries (match polarity and clean the battery contacts).
- Make sure nothing blocks the signal path between the remote and the indoor unit receiver.
- Stand closer to the unit and try again (rule out range issues).
- Power-cycle the system: turn off the breaker/disconnect for 2 minutes, then restore power.
- If the unit works from the thermostat or manual controls but not the remote, the remote is the likely failure point.
How to tell whether the remote is actually transmitting
Many remotes use infrared (IR). A fast test:
- Open your phone camera.
- Point the remote at the camera lens.
- Press a button and look for a flashing light at the remote’s IR tip.
If you see no flash with fresh batteries, the remote is typically defective.
Electrical and control items to check (when the remote seems fine)
If the remote appears to transmit but nothing responds, focus on power and wiring to the receiver/control:
- Verify the indoor unit has power (breaker on, disconnect seated).
- Check for loose or damaged low-voltage wiring at the control connections.
- Inspect for pinched wires where panels were reinstalled.
For safe testing practices and basic electrical checks, use our how to use a multimeter to test electrical parts video.
Parts you might need
This model page lists small hardware that is commonly used when re-securing panels or wire routing after troubleshooting:
| Part | What it’s used for | When it helps |
|---|---|---|
| Tie WPW10339879 | Securing wire bundles | After repairing or rerouting wires |
| Keps nut WP488130 | Fastening panels/grounds | If a nut is missing or stripped |
| Screw WP90767 | Panel or bracket fastening | If a screw is lost during service |
Why it matters
A non-working remote can look like an AC failure, but it is often a simple control issue. Confirming batteries, signal, and power first prevents unnecessary part swaps and helps you restore normal operation faster.
Last updated: February 2026
Where is the reset button on an Amana AC unit?
Most Amana central AC outdoor units like model RCB24B2A do not have a single, dedicated “reset button” on the cabinet. Resetting is typically done by turning power off at the outdoor disconnect (and the breaker), waiting a few minutes, then restoring power so the control board can reboot.
Where to look (and what you are actually resetting)
On a split central air system, the “reset” function is usually one of these:
- Circuit breaker for the outdoor condenser (main electrical panel)
- Outdoor disconnect box mounted near the condenser (pull-out or switch)
- Indoor furnace/air handler control board (some systems have a small resettable fuse or board logic reset)
- Thermostat reboot (power cycle or batteries, depending on thermostat type)
Safe reset steps for an outdoor condenser
- Set the thermostat to OFF.
- Turn OFF power at the outdoor disconnect.
- Turn OFF the condenser breaker in the main panel.
- Wait 5 minutes.
- Turn the breaker ON, then the disconnect ON.
- Set thermostat to COOL and wait 5 to 10 minutes for the system to start.
If it still will not start
These checks often pinpoint why a “reset” did not help:
- Confirm the thermostat is calling for cooling (setpoint below room temp).
- Check the indoor unit door is fully closed (some have a safety switch).
- Look for a blown fuse or tripped breaker again (repeat trips indicate a fault).
- Inspect for loose/burned wiring at the disconnect or service panel (power off first).
- If you recently removed a panel, make sure all screws are installed and panels are seated; a loose panel can lead to vibration and wire rub.
Common reset outcomes (what it means)
| What happens after power is restored | What it usually indicates | What to do next |
|---|---|---|
| Starts normally after 5 minutes | Temporary control lockout or glitch | Monitor operation |
| Breaker trips immediately | Short, seized compressor, or wiring fault | Stop and schedule service |
| Outdoor fan runs, no cooling | Compressor not starting or low charge | Service diagnosis needed |
| Nothing runs | No power, bad contactor, or control issue | Verify power path and call service |
Why it matters
A central AC “reset” is really a power-cycle that clears some control lockouts. If a breaker trips again, repeatedly resetting can damage components; the underlying electrical or compressor issue needs to be corrected.
For DIY electrical checks, we recommend using a meter correctly and safely; see our how to use a multimeter to test electrical parts video.
Last updated: February 2026