Owner’s manual


Do downdraft vents need to be vented outside?
Yes. For the Kenmore downdraft ventilation system model 2335994690, a ducted installation must vent to the outdoors for safe, effective removal of smoke, heat, grease, and odors. This model’s safety instructions specifically state that ducted fans must always be vented outside; see the 2335994690 owner's manual.
Ducted vs. ductless (recirculating): what to expect
Most downdraft systems are designed to move cooking air out of the home through ductwork. Some ventilation products offer ductless operation, but that requires a dedicated recirculation kit and charcoal filtration.
- Ducted (to outdoors): best capture and odor removal
- Ductless (recirculating): relies on filters and returns air to the kitchen
- For 2335994690: follow the ducted-to-outdoors requirement in the manual
- Use metal ductwork (recommended for fire safety)
- Avoid add-on speed controls; use the built-in controls
Quick install and safety checklist
Before you cut, drill, or route ducting, we recommend confirming the vent path and electrical supply requirements in the manual.
- Vent termination goes outside (wall, roof, or other approved exterior termination)
- Use metal ductwork and seal joints appropriately
- Keep the activating switch location compliant (not directly behind a burner; maintain clearance)
- Provide a properly grounded receptacle in the cabinet for the power cord
- Protect hidden wiring and utilities when opening walls or floors
Performance comparison
| Setup | Odor removal | Grease removal | Best for |
|---|---|---|---|
| Ducted to outdoors | Strong | Strong | Frequent cooking, high heat, smoky foods |
| Ductless recirculating | Moderate | Limited | Only when exterior ducting is not possible |
Why it matters
Venting outdoors is what actually removes contaminated air from your kitchen. Recirculating setups can reduce some odor, but they do not exhaust heat and moisture the same way, and they depend heavily on filter condition and airflow.
Last updated: February 2026
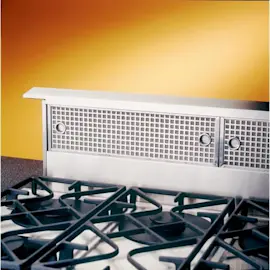
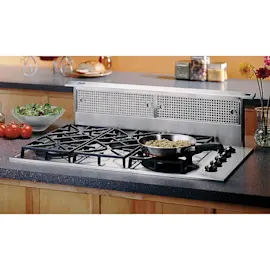
What is built-in downdraft ventilation?
Built-in downdraft ventilation is a vent system installed into the countertop or cabinet (instead of above the cooktop) that pulls cooking smoke, steam, and odors downward into ductwork. On Kenmore model 2335994690, the downdraft blower is designed to exhaust airborne contaminants while you cook; it can be mounted in an island, peninsula, or wall location (see the 2335994690 owner's manual).
How a downdraft system works
A downdraft vent rises (or opens) near the cooktop, then a blower pulls air down through an intake and pushes it through ducting to a wall cap or roof cap.
Common features you will see on systems like this:
- A lift-up vent/air intake that captures smoke at the cooking surface
- A blower motor that moves air through the duct
- Ductwork (often 3-1/4 in. x 10 in., sometimes transitioned to 6 in. round)
- A control area for up/down and fan speed
- An electrical connection inside the base cabinet
Installation and performance basics (what matters most)
For best performance, we plan the duct run to be as short and straight as possible.
- Use the shortest duct length you can
- Minimize elbows and transitions
- Confirm the discharge direction you need before final placement
- Check for interference with joists, studs, wiring, or plumbing
- Allow adequate flat countertop space behind the cooktop for proper fit
Quick comparison: downdraft vs. overhead ventilation
| Feature | Built-in downdraft | Overhead range hood |
|---|---|---|
| Best for | Islands, open sightlines | Most kitchens, strongest capture |
| Capture effectiveness | Good, depends heavily on ducting | Typically better for smoke/grease |
| Space impact | Uses cabinet space below | Uses space above cooktop |
Why it matters
Downdraft ventilation is a practical choice when an overhead hood is impractical, but duct layout and clearances drive real-world results. On some gas cooktops, higher airflow can affect the flame; lowering blower speed corrects it.
Last updated: February 2026
How are downdraft ventilation units ducted?
For Kenmore downdraft ventilation system model 2335994690, we duct the unit from the blower housing into ductwork that can run through the cabinet and then out through the floor, wall, or roof. The key is planning the route first, then connecting sealed duct sections per the 2335994690 owner's manual.
Common duct routing options
Downdraft ducting does not have to go straight down. Most installations use one of these paths:
- Down through the cabinet base and out through the floor
- Back through the cabinet and into the wall cavity
- Sideways inside the cabinet to avoid a joist or stud, then down or back
- To an exterior wall cap or up to a roof cap (depending on the home layout)
What the installation process looks like
The manual’s basic sequence is consistent across most downdraft blowers:
- Cut the countertop opening behind the cooktop.
- Mount the downdraft unit and level it with the leveling brackets.
- Cut cabinet and wall or floor openings as needed for the duct run.
- Attach ductwork, elbows, and transitions; tape all joints airtight.
- Connect the ductwork to the downdraft; slide the blower left or right if needed to meet the duct.
Ducting details that matter
Small choices in duct layout make a big difference in airflow and noise.
| Ducting choice | What we recommend | Why it helps |
|---|---|---|
| Elbows | Use as few as possible | Less restriction, better capture |
| Joints | Tape all connections airtight | Prevents leaks and odor blowback |
| Route | Avoid tight turns and long runs | Keeps performance consistent |
| Clearances | Check for wiring, plumbing, joists | Prevents damage during cutouts |
Why it matters
A downdraft blower depends on a low-restriction, sealed duct path to pull smoke and steam down effectively. A longer run or extra elbows can reduce airflow, and leaks can push cooking odors back into the cabinet.
Last updated: February 2026
What are the cons of a downdraft range?
Downdraft ventilation (like the Kenmore 2335994690 system used with a cooktop) captures smoke and steam at the cooking surface, so it is typically less effective than an overhead range hood for heavy searing, tall pots, and high-heat cooking. It also takes cabinet space and can cost more to duct and service.
Main drawbacks to expect
- Weaker capture for heavy smoke/grease: rising heat and smoke naturally move upward, so a downdraft has to pull harder to catch it.
- Performance depends heavily on ducting: long runs, elbows, and transitions reduce airflow.
- Can affect some gas flames: high airflow can disturb a gas flame; lowering blower speed corrects it.
- Reduced cabinet storage: the blower, ductwork, and housing occupy under-cooktop space.
- More involved cleaning and service access: the intake area and internal components can be harder to reach than a wall hood.
- Higher install complexity in some kitchens: routing ductwork through cabinets, floors, or toe-kicks can add labor.
What matters most for real-world ventilation
The biggest “con” is usually not the blower itself, it is the duct layout. For this Kenmore downdraft blower system, we plan ducting so the total equivalent duct length stays at 40 ft or less for best efficiency (straight duct plus elbows and transitions).
Quick comparison
| Feature | Downdraft ventilation | Overhead hood |
|---|---|---|
| Smoke capture | Fair to good (varies by setup) | Good to excellent |
| Best for | Open sightlines, islands | Frequent high-heat cooking |
| Cabinet impact | Uses base cabinet space | Uses upper cabinet or wall space |
| Ducting sensitivity | High | Moderate |
Tips to reduce the downsides
- Keep duct runs short and straight; minimize elbows.
- Use the correct duct size and transitions listed in the 2335994690 owner's manual.
- If you have a gas cooktop and notice flame disturbance, reduce blower speed.
- If the vent will not raise/lower reliably, check the switch adjustment procedure in the manual; a worn lift drive can point to the motor gear box 99080590.
Why it matters
Downdraft systems are often chosen for design reasons (especially on islands), but cooking results depend on how well the system captures and exhausts contaminants. Planning duct length, wiring, and access up front prevents weak airflow, noise, and service headaches later.
Last updated: February 2026
Does downdraft cooktop ventilation work?
Yes. On Kenmore downdraft ventilation system model 2335994690, downdraft ventilation works well for everyday steam, light smoke, and cooking odors because it pulls air down at the cooktop surface; for heavy smoke or high-heat searing, performance depends heavily on blower speed and having short, low-restriction ductwork (few elbows).
What “works well” means for a downdraft
Downdrafts capture contaminants close to the cooking surface, but they compete with rising heat and smoke. You will get the best results when you run the blower early and keep airflow restrictions low.
- Turn the blower on before you start cooking so the vent is already pulling air.
- Use a higher speed for boiling, frying, or strong odors.
- Keep filters clean; greasy filters reduce airflow.
- Use the shortest duct run possible with minimal elbows and transitions.
- If you have a gas cooktop and the flame wavers, lower the blower speed (this is normal with high airflow).
Quick performance checklist (most common causes of weak capture)
| Symptom | Most likely cause | What to do |
|---|---|---|
| Steam/smoke escapes into the room | Blower speed too low | Increase speed using the recessed knob on the vent |
| Poor airflow at all speeds | Grease filters clogged | Wash the aluminum grease filters and reinstall with tabs up |
| Noisy or vibrating | Loose mounting or worn isolators | Inspect mounting points; replace vibration parts if needed |
| Vent rises but airflow is weak | Fan/motor issue or duct restriction | Check duct for blockage; inspect blower components |
Why ductwork matters more than you think
Your 2335994690 system is designed for 3-1/4 in. x 10 in. ductwork (and can be transitioned to 6 in. round). Shorter duct runs with fewer elbows move more air, which directly improves smoke and odor capture.
Parts that commonly affect performance
If cleaning and duct checks do not restore performance, these model-matched parts are common suspects:
- Range hood fan motor assembly S97011311: drives airflow; weak or failing motors reduce capture.
- Air box S97010994: leaks or damage can reduce effective suction.
- Isolator S99100484: helps control vibration and rattling that can worsen over time.
For operating steps, filter cleaning, and duct planning guidance, follow the 2335994690 owner's manual.
Last updated: February 2026
How much does downdraft ventilation cost?
For a Kenmore downdraft ventilation system like model 2335994690, total cost is the price of the vent (or repair parts) plus installation labor. Most downdraft projects run about $900 to $2,000 for the unit, then $300 to $1,500+ for installation, depending on ductwork and cabinet work. Use the 2335994690 owner's manual to plan the duct route and electrical hookup before requesting quotes.
What usually drives the total cost
Downdraft installs vary because the blower has to fit the base cabinet and connect to ducting. The biggest cost drivers are:
- Ductwork length and complexity (more elbows and transitions increases labor and materials)
- Cabinet and countertop modifications (cutouts, reinforcement, fit adjustments)
- Electrical work (adding or relocating a grounded outlet, circuit updates)
- Exterior termination (wall or roof cap, access, sealing)
- Repair vs. replace decisions (motor, switch, or wiring issues add parts cost)
Model-specific planning items to check
The Kenmore 2335994690 documentation includes installation planning sections that affect labor time and materials. Before you get estimates, confirm:
- Discharge direction and how it will align with your ducting
- Maximum practical duct length guidance and elbow equivalents
- Outlet location and cord reach requirements
- Required cabinet opening and clearances
Typical cost components (quick view)
| Cost component | What it covers | Typical impact |
|---|---|---|
| Equipment | New downdraft unit or major assemblies | High |
| Ducting materials | Duct, elbows, transitions, cap | Medium |
| Labor | Venting, carpentry, electrical | High |
| Finish work | Trim, sealing, cleanup | Low to medium |
Why it matters
Downdraft performance depends on duct design. A shorter, straighter duct run usually costs less to install and helps the blower move air more effectively.
Last updated: February 2026