Owner’s manual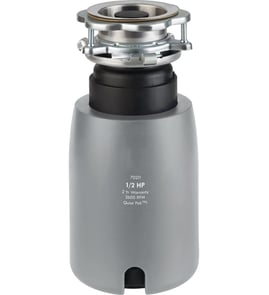

Why don't plumbers like garbage disposals?
Many plumbers dislike garbage disposals because they are frequently misused; food scraps, grease, and fibrous waste can build up in drain lines and create clogs, leaks, and jams. With a Kenmore 175605811 garbage disposal, correct use and flushing habits prevent most of the problems plumbers get called for.
Most service calls come from a few predictable issues:
- Grease or fat poured into the sink; it coats pipes and traps debris
- Fibrous foods (corn husks, artichokes, celery); they can wrap and clog
- Large volumes of peels at once; they pack the grind chamber and drain
- Hard or non-food items (glass, metal, plastic); they can jam or damage the unit
- Not running enough cold water before and after grinding; waste stays in the trap
The care and use guidance in the owner's manual focuses on simple habits that keep the grind chamber and drain line clear.
| Action | Do this | Avoid this |
|---|---|---|
| Water flow | Run a moderate-to-strong cold flow before switching on | Using hot water while grinding food waste |
| Flushing | Keep cold water running about 15 seconds after grinding | Shutting off water immediately after the sound changes |
| What to grind | Small bones, fruit pits, and ice (helps scour) | Grease, extremely fibrous waste, whole corn husks |
A disposal does not “make food disappear”; it only grinds it smaller. Everything still has to move through the sink trap and branch drain. When grease, fibrous scraps, or too much waste goes down at once, it increases the chance of a blockage, especially in older plumbing.
- Use the owner's manual for safe jam-clearing steps (power off first) and approved operating practices.
- If you need replacement parts for your Kenmore 175605811, start with the model parts list, or search by model number on Sears PartsDirect.
Last updated: February 2026
Are all garbage disposals universal fit?
Most garbage disposals are not a universal fit. Many models (including Kenmore disposers like model 175605811) mount to a common sink opening size, but the mounting assembly style, discharge outlet position, dishwasher inlet, and under-sink clearance can vary, so you still need to match the disposer to your sink and plumbing.
Many kitchen sinks use a common drain opening, and many disposers are designed around that. Fit problems usually come from the hardware and space around the opening, not the opening itself.
- Sink opening size may be standard, but mounting ring and flange designs differ
- Discharge tube height and angle can force plumbing changes
- Dishwasher drain connection may require a dishwasher drain connection kit
- Cabinet depth and nearby pipes can limit overall disposer dimensions
- Electrical hookup method (corded vs. hardwired) can affect installation parts needed
Use this checklist to avoid ordering a disposer that will not line up with your setup.
- Measure under-sink clearance (depth, width, and height)
- Identify your current mount style (sink flange, backup ring, mounting ring)
- Check where the discharge outlet must meet your trap
- Confirm whether you need a dishwasher inlet
- Verify your electrical setup (switch, wiring, clamp connector)
| Item to match | What to look for | Why it matters |
|---|---|---|
| Sink mount | Flange and mounting ring style | Determines whether it bolts up cleanly |
| Discharge outlet | Height and direction | Prevents drain misalignment |
| Dishwasher inlet | Port present or add-on kit | Enables dishwasher drain connection |
| Space | Body diameter and height | Avoids cabinet and pipe interference |
A disposer that “almost fits” can lead to leaks, vibration, or a drain line that will not align. Matching the mount and outlet layout first saves time and prevents rework during installation.
For model-specific installation details and the mounting assembly components (stopper, sink flange, fiber gasket, backup ring, mounting ring), use the owner's manual. If you need to shop by model number, start with the parts list for Kenmore 175605811, or search by model on Sears PartsDirect.
Last updated: February 2026
How long does a Kenmore garbage disposal last?
Most Kenmore garbage disposals, including model 175605811, last 10 to 12 years with normal household use. Lifespan depends on what you grind, how consistently you run cold water, and whether you clear jams and overloads correctly using the steps in the owner's manual.
A disposer’s service life is mainly driven by motor load, heat, and internal corrosion.
- Longer life: cold-water flushing, small batches, routine cleaning
- Shorter life: frequent jams, fibrous foods, grinding without enough water
- Common wear signs: more resets, slower grinding, louder operation, recurring clogs
| Usage pattern | Typical service life | Best habit |
|---|---|---|
| Light | 12+ years | Run cold water during grinding and briefly after |
| Normal | 10 to 12 years | Avoid overloading; keep batches small |
| Heavy | 7 to 10 years | Reduce tough waste; clean more often |
- Start a moderate to strong flow of cold water before turning the disposer on
- Keep cold water running about 15 seconds after grinding to flush the drain line
- Grind ice or small hard scraps occasionally to help scour the chamber
- Grind citrus peelings to freshen odors
- Turn off power and water
- Use the bottom wrench slot to free the jam, then remove debris with tongs
- Let the motor cool, then press the red reset button on the bottom
Good flushing and correct jam clearing reduce heat buildup and drain stress; those are the main factors that shorten disposal life.
If you’re shopping for replacement parts, search by model number on Sears PartsDirect.
Last updated: February 2026
Is it cheaper to repair or replace a garbage disposal?
Repair is cheaper for a Kenmore 175605811 garbage disposal when the problem is minor (a jam, a tripped reset, or a small leak at the drain connection). Replacement is the better value when the unit leaks from the housing or the motor is failing, because labor plus major repairs can rival a new disposer.
- Repair if it hums but will not spin (common jam).
- Repair if it will not run and the reset has tripped.
- Repair if the leak is at the discharge tube, drain trap, or mounting connection.
- Replace if it leaks from the disposer body or housing seam.
- Replace if it has repeated electrical failures or frequent service calls.
| Option | What you pay for | Typical total cost |
|---|---|---|
| DIY repair | Jam clearing, tightening connections | Often under $50 |
| Pro repair | Service call plus minor labor | About $100 to $250 |
| Pro replacement | New disposer plus installation | About $200 to $600 |
The owner's manual emphasizes safety and simple fixes that often restore operation:
- Turn the wall switch off before clearing a jam or pressing reset.
- Use the self-service wrenchette or a long wooden handle to free the grind plate.
- Remove objects with long-handled tongs or pliers (keep hands out of the chamber).
- Run a strong flow of cold water; keep water running about 15 seconds after grinding.
- Avoid grease, hot liquids, and very fibrous waste (corn husks) that can clog.
Repairing a jam or a drain-connection leak usually costs the least and gets you back to normal quickly. Replacing a disposer with a housing leak or weak motor prevents repeat clogs, under-sink water damage, and repeated labor charges.
You can look up diagrams and order replacement items by model number on the parts list, or search more broadly on Sears PartsDirect.
Last updated: February 2026