Owner’s manual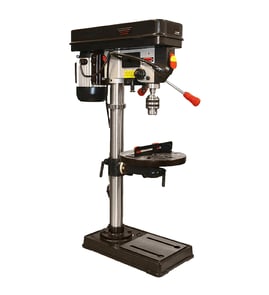

What is the 4 inch rule for drill press?
The 4-inch rule for a drill press means we keep our hands and fingers at least 4 inches away from the spinning drill bit at all times. On the Craftsman 12434986 drill press, that rule is followed by clamping the work securely to the table (never drilling freehand) so your hands never need to get close to the bit.
How to follow the 4-inch rule on a drill press
We use workholding and setup habits that physically prevent our hands from drifting toward the bit:
- Clamp the workpiece to the table, or use a drill press vise for small parts.
- Keep hands out of the drill bit’s path; avoid awkward hand positions where a slip could pull your hand into the bit.
- Brace the workpiece against the left side of the column when appropriate to help prevent spinning.
- Let the spindle reach full speed before drilling; feed with only enough pressure to let the bit cut.
- Remove the chuck key before turning the power on.
- Wait for the spindle to come to a complete stop before touching the workpiece.
Quick setup checklist (safe distance built in)
| Task | What we do | Why it helps |
|---|---|---|
| Workholding | Clamp or vise the work | Keeps hands away from the bit |
| Positioning | Support large pieces at table height | Prevents tipping and grabbing |
| Start-up | Clear the table; jog the switch to check wobble | Reduces surprises at the bit |
| Drilling | Use recommended speed; do not force feed | Prevents grabbing and spinning |
Why it matters
A drill bit can grab and spin the workpiece suddenly, especially with larger holes or unstable material. When we clamp the work and keep a minimum 4-inch hand clearance, we reduce the most common injury risk: hands being pulled into the rotating bit or a spinning workpiece.
Where to confirm model-specific safety rules
For the Craftsman 12434986, we follow the safety and workholding instructions in the owner's manual.
Last updated: February 2026
Where is the model number on a Craftsman drill press?
On the Craftsman drill press model 12434986, the model number is printed on the identification label; it is typically located on the base near the column. Use that exact model number whenever you look up parts or follow service instructions in the owner's manual.
Where to look (fast checklist)
- Check the base casting on the front or side, close to where the column mounts.
- Look for a metal plate or adhesive label with “Model 124.34986” or “12434986”.
- Wipe off dust and oil; labels can be hard to read under shop grime.
- Use a flashlight and look from a low angle; stamped plates are easier to read with raking light.
- If the drill press is bolted down, check the accessible edges of the base first.
What the model number helps you match
Having the correct model number ensures we match the right parts and specs for your exact drill press.
| What you’re doing | Why the model number matters |
|---|---|
| Ordering replacement parts | Prevents buying the wrong switch, chuck, belt, or pulley parts |
| Using the parts list/diagrams | Ensures the diagram matches your exact build |
| Checking specifications | Confirms key specs like swing, spindle travel, and speed range |
Why it matters
Craftsman drill presses can look similar across different model families, but parts like the ON/OFF switch, chuck size, belts, and spindle components can vary. Using 12434986 keeps troubleshooting and parts selection accurate and saves time.
Tip for recording it correctly
- Write it down as 12434986 (no spaces).
- If the label shows a dotted format (example: 124.34986), record both; we use 12434986 for model lookups.
Last updated: February 2026
What maintenance does a drill press need?
For your Craftsman 12434986 drill press, routine maintenance is mostly cleaning, rust prevention, and light lubrication of the spindle. Keep dust out of the motor, wax the table and column to prevent rust, and oil the spindle about every three months (with power unplugged). See the owner's manual for the full maintenance and safety steps.
Regular maintenance checklist
- Unplug the drill press before any cleaning, adjustment, or lubrication.
- Blow out or vacuum dust from the motor area frequently (dust buildup can cause overheating).
- Apply a thin coat of paste wax to the table and column to keep surfaces clean and help prevent rust.
- Lower the spindle to maximum depth and oil it moderately about once every three months.
- Inspect the power cord; replace it immediately if it is worn or cut.
- Check belt tension if operation becomes noisy; adjust tension as needed.
What to lubricate (and what not to)
Most lubrication points on this model are minimal.
| Item | What to do | How often |
|---|---|---|
| Spindle/quill | Oil moderately with spindle fully lowered | About every 3 months |
| Ball bearings | No lubrication needed (factory greased) | None |
| Table/column surfaces | Paste wax to reduce rust and make cleanup easier | As needed |
Quick troubleshooting clues tied to maintenance
Good maintenance prevents common drill press problems.
- Noisy operation: belt tension too loose or spindle is dry.
- Bit burns or smokes: wrong speed, chips not clearing, or dull bit.
- Bit wobble/runout: bit not seated in chuck, chuck not seated, bent bit, or worn bearings.
- Bit binds in workpiece: excessive feed pressure, pinching, or improper belt tension.
Why it matters
A clean chuck area, correct belt tension, and a lightly oiled spindle help the bit run true, reduce heat, and protect the motor. Waxing the table and column also prevents rust that can affect accuracy and workpiece control.
Last updated: February 2026
What are the measurements of a drill press?
For the Craftsman drill press model 12434986, the key size measurements are: 17-inch swing, 66.14-inch total height, and an 18.11 x 13.78-inch base. These specs help you confirm floor space, drilling capacity, and whether the tool fits your shop setup (see the owner's manual).
Model 12434986 measurements (from the manual)
| Measurement | Spec | What it tells you |
|---|---|---|
| Swing | 17 in (432 mm) | Max distance from spindle center to column times two; affects max workpiece width |
| Total height | 66.14 in (1680 mm) | Overall height; helps with ceiling and storage clearance |
| Base size | 18.11 x 13.78 in (460 x 350 mm) | Footprint on the floor or stand |
| Column diameter | 3.62 in (92 mm) | Rigidity and table support size |
| Spindle travel | 4.72 in (120 mm) | Max drilling depth per stroke |
| Weight | 229.28 lb (104 kg) | Stability and moving/installation planning |
How to choose the “right” drill press size for your space
When you compare drill presses, these are the measurements that matter most:
- Swing: determines the largest workpiece you can drill near the center.
- Total height: ensures the head and belt cover clear shelves and ceilings.
- Base footprint: tells you how much floor area you need.
- Spindle travel: affects how deep you can drill without repositioning.
- Weight: heavier presses typically vibrate less and drill more accurately.
Why it matters
Correct measurements prevent common setup problems like an unstable base, not enough clearance to raise the table, or choosing a press that cannot handle the width of your workpiece. For safer drilling, we also recommend bolting the base down when possible and clamping large workpieces to the table.
Last updated: February 2026
What is a good horsepower for a drill press?
A good horsepower depends on what you drill most often. For the Craftsman drill press model 12434986, the manual lists a 1-1/2 HP motor, which is a strong, shop-capable size for wood and metal when you also use the correct belt speed and a sharp bit.
Quick horsepower guidelines
Use these ranges to match the drill press to your typical work:
- 1/3 to 1/2 HP: light duty, small bits, softwood
- 1/2 to 3/4 HP: most DIY drilling in wood, plastic, and light metal
- 1 HP and up: frequent metal drilling, larger bits, and heavier workloads
- 1-1/2 HP (like model 12434986): heavy-duty capability with better torque reserve
What matters as much as horsepower
Horsepower helps resist stalling, but drilling performance is often limited by speed control and setup.
Key factors to compare:
- Lowest speed available for larger bits and steel
- Number of speeds (belt steps) for better control
- Speed range (low RPM to high RPM)
- Chuck size (capacity), meaning the maximum bit shank it can hold
- Spindle (quill) travel for deeper drilling
Craftsman 12434986 specs (from the manual)
These model-specific specs show why 1-1/2 HP is more than adequate for most shop tasks.
| Spec | Craftsman 12434986 | Why it matters |
|---|---|---|
| Motor power | 1-1/2 HP | Helps maintain torque under load |
| Speeds | 12 | More RPM choices for different materials |
| Speed range | 210 to 3020 RPM | Low end supports larger bits and metal |
| Chuck capacity | 0.63 in (16 mm) | Accepts up to a 16 mm shank |
| Spindle travel | 4.72 in (120 mm) | Drills deeper without repositioning |
For the full spec list and the recommended drilling speed chart, use the owner's manual.
Why it matters
Choosing enough horsepower and the right RPM reduces stalling, overheating, and bit grabbing; it also improves hole quality when drilling larger diameters.
Last updated: February 2026