 Owner’s manual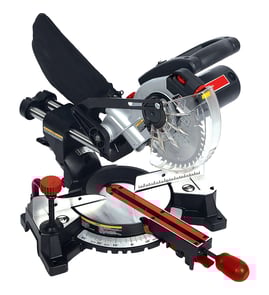
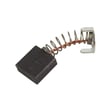

Where can I buy Craftsman replacement parts?
You can buy replacement parts for your Craftsman miter saw model 113234640 through the model’s parts list and diagrams on Sears PartsDirect. For the best fit and safe operation, match parts by the exact part number shown in the owner's manual parts list (not by the diagram key number).
Use these checks before you purchase anything:
- Confirm the model number is 113234640 on the saw’s ID label
- Use the parts list in the owner's manual and order by part number, not the key number
- Match the part description to what you are replacing (example: switch, brush, blade guard)
- Compare left-hand vs right-hand versions (example: handle LH vs handle RH)
- For safety-related items (guard parts, lock hardware), replace with identical parts
The manual’s parts list for the 10-inch compound miter saw includes items in these groups:
| Assembly area | Examples of parts listed | What it affects |
|---|---|---|
| Arm and motor assembly | Switch, cord with plug, brush, brush cover | Power, starting, and motor performance |
| Pivot assembly | Pivot support, bevel indicator, lock hardware | Accurate miter/bevel movement and locking |
| Blade and blade guard assembly | Guard components, actuator lever, dust bag clamp | Cutting safety and dust control |
The manual warns that this saw is specially insulated and should use only identical replacement parts listed for the tool. For electrical items (like the switch, cord, or motor-related wiring), we recommend having a qualified service technician handle the repair.
Using the correct part number for Craftsman 113234640 helps your miter saw cut accurately and helps the blade guard, pivot locks, and electrical system operate as designed. Substituting “close enough” hardware can create safety and performance problems.
Last updated: February 2026
What should you never cut with a miter saw?
With the Craftsman 113234640 miter saw, we never cut materials the saw is not designed for (anything other than wood, wood-like products, or soft metals like aluminum), and we never cut short pieces that cannot be properly supported and kept a safe distance from the blade; both situations can cause binding, grabbing, or thrown workpieces. See the owner's manual for the model-specific safety rules.
Avoid cutting materials that can shatter, grab the blade, or create unsafe debris.
- Ferrous metals such as steel or iron (unless your saw and blade are specifically rated for it)
- Masonry products (brick, concrete, tile)
- Hardened metals, rebar, or chain
- Unknown composites that can splinter or melt (some plastics and laminates)
- Any material that exceeds the saw's cutting capacity or forces the motor to bog down
These are common situations that lead to kickback, binding, or loss of control.
- Short pieces you cannot support while keeping your hold-down hand at least 4 inches from the blade path
- Freehand cuts (workpiece not held firmly against the fence)
- Ripping (cutting with the grain) because a miter saw is built for crosscuts and angle cuts
- Round stock (dowel rods, tubing) without a proper holding fixture; it can roll and the blade can “bite”
- Confining the cutoff (holding, clamping, touching it, or using a length stop against it); the cutoff must be free to move sideways
| Check | What we look for | Why it matters |
|---|---|---|
| Blade selection | Correct 10-inch blade for the material | Reduces grabbing and overheating |
| Workpiece condition | No nails or foreign objects | Prevents tooth damage and kickback |
| Support and control | Workpiece tight to fence; stable support | Prevents shifting into the blade |
| Personal safety | Eye and hearing protection; no gloves or loose clothing | Reduces injury risk |
A miter saw can throw a cutoff violently if the blade binds or if the workpiece rolls, shifts, or gets wedged. Following the 113234640 safety rules (especially for short pieces and cutoffs) helps prevent sudden movement into the blade path.
Last updated: February 2026
Why is 31.6 on a miter saw?
The 31.6° mark is there to speed up common crown molding cuts. On a Craftsman miter saw like model 113234640, 31.6° is a standard miter setting used with a matching bevel setting to create tight 90° corner joints (45° miters) when crown molding is cut as a compound angle.
When you are cutting crown molding (especially “nested” against the fence or using a compound setup), the saw’s miter and bevel scales help you repeat the same angles accurately.
Common uses include:
- Cutting crown molding for inside corners and outside corners
- Making repeatable compound cuts without trial-and-error
- Matching common crown “spring angles” used in trim work
- Speeding up production cuts for long runs of molding
Most saws pair the 31.6° miter with a bevel close to 33.9° for common crown molding spring angles.
| Crown molding setup | Miter setting | Bevel setting | Typical goal |
|---|---|---|---|
| Common compound crown cut | 31.6° | 33.9° | 90° corner joint |
| Straight crosscut (square cut) | 0° | 0° | Cut to length |
| Basic miter corner (no bevel) | 45° | 0° | Flat stock corners |
Before making angled cuts, we follow the same control points your saw is designed around: lock the angle, support the work, and confirm nothing interferes with the blade path.
- Unplug the saw before changing adjustments or checking clearances
- Set the miter angle, then tighten the miter lock handle
- Set the bevel angle, then tighten the bevel lock handle
- Keep the workpiece firmly against the fence and down on the table
- Lower the blade by hand first to confirm clearance at the turn table slot
For the exact control locations and adjustment notes (miter lock handle, bevel lock handle, fence positions, and clearance checks), use the owner's manual.
Crown molding is unforgiving; being off by even a small amount can open gaps at the ceiling or wall. The 31.6° mark is a built-in shortcut that helps you hit common compound angles consistently, which saves material and rework.
Last updated: February 2026
What are the parts of a miter saw?
On the Craftsman 113234640 10-inch compound miter saw, the main parts include the base and miter scale, the table and fence that support the workpiece, the pivoting arm and motor assembly that drives the blade, and the blade guard and dust bag that help with safety and cleanup. For diagrams and key numbers, use the owner's manual.
These are the big groups called out in the parts list for the Craftsman 113234640:
- Base (includes scale): supports the saw and includes the miter degree scale
- Table: the rotating surface that sets the miter angle
- Fence and fence arm: keeps the board square and stable during the cut
- Arm and motor assembly: includes the motor, handle halves, cord, and switch parts
- Pivot assembly: lets the head tilt for bevel cuts and locks the bevel angle
- Blade and blade guard assembly: includes upper and lower guards, springs, and blade hardware
- Dust bag: captures some sawdust at the rear of the blade area
| Part name | What it does | Where you use it |
|---|---|---|
| Trigger switch | Turns the motor on and off | In the handle on the arm/motor assembly |
| Lock switch | Helps prevent unintended starts | Near the trigger switch |
| Brush and brush cover | Feeds power to the motor (wear item) | On the motor housing |
| Blade guard (upper/lower) | Covers the blade during operation | Around the blade area |
| Spindle lock and related hardware | Helps hold the blade for blade changes | At the arbor/spindle |
| Miter indicator and clamp parts | Shows and locks the miter angle | At the base/table |
Knowing the assembly name (base, pivot, arm and motor, blade guard) helps you match what you see on the saw to the correct diagram and parts list entry, so you order the right replacement and reassemble it exactly as designed.
- Unplug the saw before removing covers or the blade guard
- Let the blade stop completely; confirm the brake is not engaged unexpectedly
- Keep the blade guard moving freely; clean out packed sawdust
- Use only identical replacement electrical parts and reassemble exactly as originally assembled
Last updated: February 2026
How thick of wood can you cut with a 10-inch miter saw?
On the Craftsman 113234640 10-inch miter saw, the maximum wood thickness you can cut in one pass depends on the saw’s cutting capacity and how the depth stop is set. Use the 113234640 owner's manual to check the “maximum cutting capacity” procedure and keep the saw adjusted for full travel.
This saw’s usable thickness is limited by how far the blade can drop and where the blade enters the table slot relative to the fence. The manual explains maintaining maximum cutting capacity by checking blade clearance and adjusting the depth stop.
- Depth stop setting (limits downward blade travel)
- Blade clearance to the turntable structure (including at 45 degree bevel)
- Distance from the fence to where the blade enters the table slot
- Workpiece position (flat on the table, tight to the fence)
- Blade condition and alignment (sharp, undamaged, properly aligned)
These are reliable planning ranges for most 10-inch miter saws; confirm your exact capacity with a test cut on scrap after verifying adjustments in the manual.
| Stock size (actual thickness) | Typical one-pass at 90 degrees | Common workaround if it does not clear |
|---|---|---|
| 1x and 2x lumber (3/4 in. to 1-1/2 in.) | Yes | None needed |
| 4x4 post (about 3-1/2 in.) | Often yes on many 10-inch saws | Flip-cut (rotate the post and finish the cut) |
| Over about 3-1/2 in. | No | Flip-cut or use a different saw type |
The manual’s “Maintaining maximum cutting capacity” section focuses on keeping the blade travel and clearance correct.
- Unplug the saw before any adjustment.
- Lower the head fully with power off; hand-spin the blade to confirm it clears the table and slot.
- If a sharpened blade reduces diameter, reset the depth stop to regain maximum travel.
- After installing a new blade, recheck clearance and the maximum cutting distance near the fence.
Trying to cut stock beyond capacity increases binding, kickback risk, and inaccurate cuts. Keeping the depth stop and blade clearance set correctly gives you the maximum safe cut thickness your Craftsman 113234640 can deliver.
Last updated: February 2026