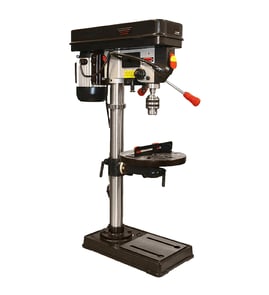

What are the parts of a drill press?
A drill press is built around a rigid base and column that support the head (motor and drive), plus a height-adjustable table and a quill/spindle assembly that moves the chuck straight up and down for accurate drilling. On Craftsman model 33525987, these are the core functional sections.
Main drill press parts (what each one does)
- Base: Heavy platform that stabilizes the drill press; often has slots for bolting the stand down.
- Column: Vertical post that supports the head and table; keeps the machine aligned.
- Head: Houses the motor and the speed-change system (belt and pulleys on many models).
- Table: Work surface that supports the material; typically tilts and raises/lowers on the column.
- Table clamp/lock: Locks the table height and rotation so it does not drift during drilling.
- Quill: Sliding sleeve that moves up/down when you pull the feed handle.
- Spindle: Rotating shaft inside the quill that drives the chuck.
Controls and common add-ons you may see
- On/off switch: Powers the motor.
- Feed handle: Lowers and raises the quill for drilling.
- Depth stop: Limits how deep the bit can drill.
- Chuck: Holds the drill bit (keyed or keyless).
- Fence (optional): Helps position work consistently on the table.
Quick reference table
| Part | Primary job | What problems it affects |
|---|---|---|
| Base/column | Stability and alignment | Vibration, crooked holes |
| Head/drive | Creates rotation and sets speed | Wrong speed, slipping belts |
| Table/clamp | Supports and positions work | Inaccurate hole placement |
| Quill/spindle/chuck | Feeds and spins the bit | Runout, wobble, poor drilling |
Why it matters
Knowing the names of the base, column, head, table, and quill/spindle helps you troubleshoot issues faster (for example, vibration usually points to the base/column setup, while wobble points to the chuck or spindle).
For more DIY help that applies to tool wiring and testing, use our guide: how to use a multimeter to test electrical parts video.
Last updated: February 2026
Where can I buy Craftsman replacement parts?
You can buy replacement parts for your Craftsman model 33525987 drill press stand by searching the model number on Sears PartsDirect. Using the exact model number helps match the correct diagrams and part listings so you order the right hardware, switches, belts, or guards.
Best way to shop for the right part
Start with the model number 33525987, then narrow down by the part category (for example: base, table, spindle/quill area, motor mount, or electrical components if your setup includes them).
- Confirm the full model number from the ID label before ordering
- Compare the part description to what you see on the tool (shape, mounting holes, finish)
- Measure key dimensions (shaft diameter, belt width, bolt length) before checkout
- Replace worn fasteners and washers when you replace a moving part
- If the part is electrical, match wire count and connector style
What information to gather before ordering
Having these details ready prevents wrong-part returns and downtime.
| What to check | Why it matters | Example |
|---|---|---|
| Model number | Ensures correct parts list | 33525987 |
| Serial/date code (if present) | Helps confirm production variation | Label on column/base |
| Photos of the broken part | Confirms shape and mounting | Bracket, pulley, guard |
| Measurements | Confirms fit | Belt width, bolt length |
Common replacement part types for drill press stands
Even without a model-specific parts list shown here, these are the items most often replaced on drill press stands and related assemblies:
- Belts and pulleys (slipping, glazing, squeal)
- Depth stop hardware (won’t hold setting)
- Table clamp and tilt hardware (table drifts)
- Return spring components (quill does not retract smoothly)
- Switches, cords, and strain reliefs (intermittent power)
Why it matters
Craftsman drill press components are built around specific alignments and tolerances. Ordering by model number first helps you avoid fit issues that can cause vibration, belt wear, runout, or unsafe operation.
Last updated: February 2026
Where is the model number on a Craftsman drill press?
On the Craftsman drill press stand model 33525987, the model number is typically printed on a rating/model plate on the base, usually close to the column. Use that full model number when looking up parts to make sure you get the correct match.
Where to look on the drill press
Check these common spots first (starting with the most likely):
- On the base casting, near where the column bolts on
- On the rear edge of the base (facing away from the operator)
- On the side of the base near the column
- On a sticker or metal tag attached to the base
- Occasionally on the column a few inches above the base
What the model tag looks like
Most Craftsman power tool model tags are easy to miss because they are small and low on the machine.
| What you might see | What it means | What to write down |
|---|---|---|
| “Model” or “MOD.” | The model identifier | 33525987 (exactly as shown) |
| “Serial” or “S/N” | Unit-specific serial number | Optional, but helpful |
| Electrical ratings | Voltage/amps/Hz (if listed) | Helpful for motor or switch matching |
Tips to make it easier to find
- Unplug the drill press before reaching around the base.
- Wipe dust and oil off the base; tags are often covered by shop grime.
- Use a flashlight and look at a low angle; stamped plates can be hard to read.
- If the tag is damaged, check for a stamped number on the base near the column mount.
Why it matters
The model number is the fastest way to match the correct Craftsman drill press stand parts and hardware (base, column, table support components) and avoid ordering a similar-looking part that does not fit.
For more help identifying model information, use how to find your appliance model number (and what it means for parts).
Last updated: February 2026