 Owner’s manual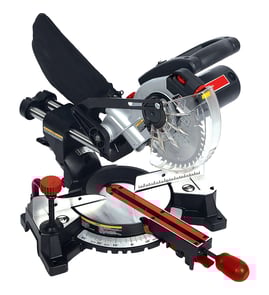
What should you never cut with a miter saw?
For the Craftsman miter saw model 137212540, never cut metals or masonry, and never cut small pieces that would put your hands within 7-1/4 inches of the blade; also avoid any freehand cutting. Use the 137212540 owner's manual for the model’s specific safety rules and “no hands zone” guidance.
Materials and cuts to avoid
- Ferrous metals (steel, iron) and masonry (brick, concrete, tile)
- Small workpieces that force hands/fingers inside the 7-1/4 inch safety zone
- Freehand cuts (cutting without the work firmly against the fence and table)
- Hand-held metal cutting (if cutting non-ferrous metal at all, it must be clamped)
- Warped, round, or odd-shaped stock that can roll, shift, or bind unless properly supported and secured
What you can cut safely (typical use)
This saw is designed for wood and wood-like products using cross-cutting blades. Some users cut non-ferrous metals (such as aluminum) only with the correct blade and secure clamping, but the safest approach is to keep this saw dedicated to wood unless your manual’s instructions and your setup fully support that use.
| Material / task | Use this miter saw? | What to do instead / key requirement |
|---|---|---|
| Wood, trim, molding | Yes | Clamp when practical; keep stock tight to fence/table |
| Steel, iron, rebar | No | Use a metal-cutting saw designed for ferrous metals |
| Brick, tile, concrete | No | Use a masonry saw or angle grinder with the right wheel |
| Very small parts | No | Use a jig/fixture or a different tool that keeps hands away |
Setup rules that prevent kickback and thrown pieces
- Clamp the workpiece whenever practical; a clamp is required if hands would be too close.
- Keep the work tight to the fence and table; eliminate gaps that let it shift.
- Support long stock with stands or sawhorses; do not use another person as a support.
- Let the motor reach full speed before cutting; wait for the blade to stop before raising the saw.
Why it matters
Miter saw injuries usually happen when the workpiece shifts, binds, or gets pulled into the blade, or when hands enter the blade path. Following the 7-1/4 inch rule, clamping, and avoiding metal and masonry cuts reduces kickback risk and keeps the guard working as intended.
To find diagrams and replacement parts by model number, start with the parts list for 137212540 or search on Sears PartsDirect.
Last updated: February 2026
Which is better, a chop saw or miter saw?
A miter saw is better when you need accurate angle cuts and trim-style versatility; a chop saw is better when you need fast, repeatable straight cuts (most often in metal). For the Craftsman 137212540 miter saw, we recommend using it for wood and wood-like materials as described in the 137212540 owner's manual.
Quick comparison: chop saw vs. miter saw
| Feature | Miter saw (like Craftsman 137212540) | Chop saw |
|---|---|---|
| Best for | Crosscuts, miters, bevels, compound cuts | Straight 90° cuts, high-volume work |
| Typical materials | Wood and wood-like products | Metal (with the correct abrasive or metal-cutting blade) |
| Angle capability | Miter and bevel adjustments | Usually limited (primarily straight cuts) |
| Finish quality | Cleaner cuts with the right crosscut blade | Rougher finish (especially abrasive wheels) |
Choose a miter saw when you need
- Miter cuts for trim, frames, and molding (including compound cuts)
- Repeatable angle accuracy for finish carpentry
- Cleaner crosscuts in dimensional lumber
- Better control for detailed woodworking projects
Choose a chop saw when you need
- High-volume straight cuts where speed matters more than finish
- Frequent cutting of metal stock (pipe, angle iron, rebar) with the correct setup
- A dedicated station for repetitive 90° cuts
Safety and use notes for the Craftsman 137212540
The 137212540 is designed for crosscutting with the correct blade type and safe operating practices.
- Use only cross-cutting saw blades; carbide-tipped blades should have a negative hook angle
- Do not use thin kerf blades (they can deflect and contact the guard)
- Keep hands at least 7-1/4 inches from the blade path; clamp the work when possible
- Wait for the blade to stop completely before raising the head or moving the workpiece
- Do not cut metals or masonry products with this miter saw
Why it matters
Picking the right saw improves cut quality, accuracy, and safety. Using a miter saw like the Craftsman 137212540 for its intended materials and blade types helps prevent kickback, guard contact, and premature wear.
For replacement parts and diagrams for your Craftsman 137212540, start with the parts list for this model, or search by model number on Sears PartsDirect.
Last updated: February 2026
Can a 10-inch miter saw cut a 2x4?
Yes. The Craftsman 137212540 is designed to use a 10-inch blade and it cuts standard 2x4 lumber (about 1-1/2 in. x 3-1/2 in. actual size) in normal crosscuts and most miter setups. For the correct positioning and safety steps, use the 137212540 owner's manual.
What to expect when cutting a 2x4
A 2x4 is within the normal cutting range for a 10-inch compound miter saw; capacity changes with angle and how the board is placed.
- Crosscut at 90 degrees with the board flat: one-pass cut
- Miter cuts: one-pass cut in most cases
- Bevel and compound cuts: capacity decreases as angles increase
- Cutting on edge (vertical): use a spacer or auxiliary wood fence for stability
- Long stock: add support so the board stays flat on the table
Capacity reference (from the manual, with an auxiliary fence)
| Cut setup | Capacity noted | 2x4 result |
|---|---|---|
| Crosscut | 3-1/2 in. x 3-1/2 in. | Covers a 2x4 width |
| Miter 45 degrees | 3-1/2 in. x 2 in. | Works when positioned correctly |
| Bevel 45 degrees | 2 in. x 3-1/2 in. | Works; reduced capacity |
| Compound 45 degrees | 2 in. x 2 in. | May require repositioning |
Setup tips that prevent binding and kickback
- Keep the workpiece tight against the fence (especially if it is bowed)
- Keep your holding hand at least 7-1/4 inches from the blade
- Use only recommended 10-inch blades; avoid thin kerf blades if the manual warns against them
- Let the blade reach full speed; cut smoothly without forcing
- Wait for the blade to stop before removing small cutoffs
Why it matters
A 2x4 is easy to cut, but unstable support or an incorrect angle setup can cause binding, splintering, or thrown cutoffs. Using the fence, support, and blade guidance in the manual improves accuracy and safety.
For replacement parts and diagrams for model 137212540, use the model parts list, or search by model number on Sears PartsDirect.
Last updated: February 2026
Why is 31.6 on a miter saw?
On the Craftsman miter saw model 137212540, the 31.6° marking is a built-in shortcut for making compound cuts in standard crown molding. Our 137212540 owner's manual shows 31.6° used with a 33.9° bevel to produce tight inside and outside corner joints when the molding is laid flat on the saw table.
What the 31.6° mark is for
The 31.6° miter setting is part of a crown-molding setup chart. It helps you repeat accurate corner cuts without calculating angles each time.
Use it when you are:
- Cutting crown molding for 90° inside corners
- Cutting crown molding for 90° outside corners
- Making repeatable cuts with the same spring-angle molding
- Trying to reduce gaps caused by small angle errors
Quick reference: crown molding laid flat
The manual’s crown-molding chart uses these compound settings for standard crown molding positioned flat on the table.
| Cut type | Bevel setting | Miter setting | What changes between cuts |
|---|---|---|---|
| Inside corner | 33.9° | 31.6° | Left vs. right miter direction and which edge is the finished piece |
| Outside corner | 33.9° | 31.6° | Left vs. right miter direction and molding orientation against the fence |
Tips to get clean, accurate joints
Even with presets, crown molding is sensitive to setup and support.
- Test-cut on scrap first; fine-tune for your room corners
- Keep the molding flat on the table as the chart specifies
- Hold the work tight to the fence and table (use clamps when possible)
- Support long stock so it does not lift or twist
- Let the blade stop fully before raising the saw head
Why it matters
Crown molding joints only close up when the bevel, miter, and molding orientation match the molding’s spring angle and the corner. The 31.6° detent exists to speed up those common compound cuts.
For parts diagrams and replacement items for model 137212540, start with the model parts list or search by model on Sears PartsDirect.
Last updated: February 2026