Owner’s manual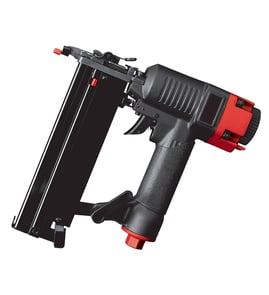

How to unjam a 16 gauge Craftsman nail gun?
To unjam a Craftsman nailer like model 351181770, disconnect the air supply first, release spring tension in the magazine, open the quick-release nose cover, remove the stuck fastener with pliers, then close everything and confirm the driver returns fully upward before reloading. See the owner's manual for the exact jam-clear steps and safety notes.
Steps to clear a jam (model 351181770)
- Disconnect the nailer from the air supply.
- Pull the pusher housing back until the pusher is clear of the nails.
- Depress the latch and let the housing slide forward to release tension.
- Slide the nail strip back and remove it from the magazine (fasteners can be under spring pressure).
- Pull the nose cover outward to disengage the pin, then swing the fastener guide plate open.
- Use long-nose pliers to remove the jammed fastener.
- Close the guide plate, hook the pin into the latch, and snap the nose cover closed.
Quick checks before you start nailing again
After the jam is cleared, we recommend these checks to prevent repeat jams:
- Confirm the driver blade is fully returned to the up position.
- Inspect the nail strip; discard bent or damaged fasteners.
- Clean the magazine if it is dirty.
- Add 5 to 6 drops of air tool oil into the inlet cap if lubrication is low.
- Use the correct nail type and size for the magazine (wrong angle or gauge commonly causes jams).
Common causes and what to do
| What you notice | Likely cause | What to do |
|---|---|---|
| Nails keep hanging up in the magazine | Dirty or worn magazine | Clean the magazine; use a dry film lubricant |
| Frequent jams with a new strip | Damaged fasteners | Discard damaged fasteners; reload a straight strip |
| Tool cycles weakly and jams | Low lubrication or air supply issue | Oil the inlet; verify air supply is steady |
Why it matters
Clearing the jam the right way protects the contact trip safety system, prevents fasteners from ejecting under spring pressure, and helps avoid bending the driver/ram, which can turn a simple jam into a bigger repair.
Last updated: February 2026
Does Craftsman have a nail gun?
Yes. Craftsman makes nail guns, and your Craftsman model 351181770 is a pneumatic 15-gauge in-line angle finish nailer designed for trim, cabinetry, furniture, and door/window work. It drives 15-gauge finish nails and uses a 32° angled magazine for tight spaces (see the owner's manual).
What type of Craftsman nail gun is model 351181770?
This model is an air-powered finish nailer (not cordless). Key specs from the manual:
- Nail type: 15-gauge finish nails (0.068 to 0.072 inch diameter)
- Nail length range: 1-1/4 to 2-1/2 inches
- Magazine capacity: 100 nails
- Operating pressure: 70 to 110 PSI
- Air inlet: 1/4 inch NPT
| Feature | What it means for you |
|---|---|
| 32° angled magazine | Easier nailing in corners and tight trim areas |
| Contact-trip safety | Tool will not fire unless pressed to the workpiece |
| Depth adjustment knob | Helps set nails flush or slightly countersunk |
| Quick-release nose cover | Faster access when a nail jams |
Quick setup checklist (pneumatic)
Use these basics to get consistent driving power and reduce jams:
- Set the regulator to a starting point around 90 PSI, then fine-tune for your material
- Use clean, dry air; drain your compressor tank regularly
- Keep the air filter clean so pressure does not drop under load
- Use the correct 15-gauge nails in the supported length range
- Confirm the contact trip moves freely and returns fully
Why it matters
Craftsman makes several nailer styles (brad nailers, finish nailers, framing nailers). Knowing that 351181770 is a 15-gauge pneumatic finish nailer helps you choose the right nails, set the correct PSI, and avoid misfires or damage to trim.
Last updated: February 2026
Why won't my Craftsman nail gun shoot?
If your Craftsman power nailer model 351181770 will not shoot, the most common causes are a jammed fastener, the contact trip safety not fully pressed, or an air supply and lubrication problem. Start by disconnecting the air supply, then follow the jam-clearing and troubleshooting steps in the owner's manual.
Quick checks that fix most “won’t fire” problems
- Disconnect the tool from the air supply before opening the nose or handling the magazine.
- Press the contact trip firmly against the workpiece; this model will not fire unless the contact trip is engaged.
- Check for a jam; the quick-release nose cover gives access to the fastener path.
- Use the correct fasteners: 15-gauge finish nails, 1-1/4 to 2-1/2 inches long.
- If it cycles weakly or inconsistently, add 5 to 6 drops of air tool oil into the air inlet.
Clear a jam (Craftsman 351181770)
- Disconnect from air.
- Pull the pusher housing back until the pusher is clear of nails; depress the latch to release tension.
- Slide the nail strip back and remove it (fasteners are under spring pressure).
- Open the nose cover, swing the fastener guide plate away from the magazine, and remove the jammed nail with long-nose pliers.
- Close the guide plate, snap the nose cover shut, reload, and test.
Troubleshooting by symptom
| What you see | Most likely cause | What to do |
|---|---|---|
| Tool will not operate | Insufficient air supply | Check compressor output, regulator setting, and hose fittings |
| Tool operates slowly or loses power | Low lubrication, head valve binding | Oil the inlet; clean and grease internal moving parts per manual |
| Skips nails or fires inconsistently | Wrong fastener size, low air, buildup on ram/nose | Use correct 15-gauge nails; verify air; clean nose/ram area |
| Air leaking at cap or nose | Loose bolts, worn O-rings, damaged gasket/bumper | Tighten fasteners; replace worn seals as needed |
Why it matters
A nailer that will not shoot is usually either blocked by a jam or prevented from firing by the contact trip safety. Correcting the cause prevents dry-firing, damaged fasteners, and premature wear on the piston/ram and seals.
Last updated: February 2026