 Owner’s manual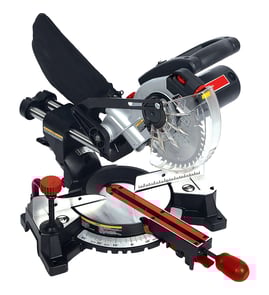

What size is the miter slot on a Craftsman table saw?
Most Craftsman table saws use a standard miter slot that is 3/4 inch wide by 3/8 inch deep; that is the size many aftermarket miter gauges and sled runners are built around. For exact slot dimensions on your specific saw, confirm the model number and check the 137212140 owner's manual.
Quick way to confirm your slot size
We recommend measuring the slot directly because some older or specialty Craftsman saws can vary.
- Unplug the saw before measuring.
- Measure width across the top opening of the slot.
- Measure depth from the tabletop down to the bottom of the slot.
- Check for a T-slot lip (a wider undercut) if your gauge uses a T-bar.
- Test-fit your miter gauge bar; it should slide smoothly with minimal side-to-side play.
Typical Craftsman miter slot sizes (what you will usually see)
| Slot style | Typical width | Typical depth | Notes |
|---|---|---|---|
| Standard slot | 3/4 in | 3/8 in | Most common; fits many miter gauges |
| T-slot (undercut) | 3/4 in (top) | 3/8 in (to undercut) | Helps retain the bar; varies by design |
Why it matters
A correctly sized miter slot keeps your miter gauge, crosscut sled, and featherboards tracking straight. If the bar is undersized, cuts can wander; if it is oversized, it can bind and affect accuracy and safety.
If you are shopping for a miter gauge or runner
- Match the slot width and depth first.
- Prefer an adjustable bar (set screws or expansion discs) for a snug fit.
- If your saw has a T-slot, choose a compatible T-bar design.
- Verify your saw’s model number before ordering parts or accessories.
Last updated: February 2026
What should you never cut with a miter saw?
You should never cut metal or masonry with the Craftsman 137212140 miter saw, and you should never cut any workpiece so small that your hands would be within 7-1/4 inches of the blade. We also never recommend freehand cuts; clamp and support the work to prevent binding and kickback. See the safety rules in the 137212140 owner's manual.
Materials you should not cut
- Ferrous metals (steel, iron) and most other metals unless your saw and blade are specifically rated for it
- Masonry products (brick, tile, concrete, stone)
- Very small pieces that put fingers inside the 7-1/4 inch no-hands zone
- Loose cutoffs that can get trapped and thrown by the blade
- Warped or unstable stock that cannot sit flat against the fence and table
Cuts and setups to avoid
- Freehand cutting (not held firmly against the fence and table)
- Cutting without waiting for the blade to reach full speed
- Changing angles or moving the workpiece before the blade fully stops
- Cutting long boards without side support (tables, sawhorses, blocks)
Quick safety limits at a glance
| Situation | Safe approach | What to do instead |
|---|---|---|
| Metal or masonry | Not allowed on this saw | Use the correct tool for the material |
| Hands within 7-1/4 inches of blade | Not allowed | Clamp the workpiece or use a jig/fixture |
| Long or odd-shaped work | Higher risk of tipping or binding | Add supports and plan the cut to prevent binding |
| Cutoff trapped against blade | Can be thrown | Keep the cutoff free to move sideways after the cut |
Why it matters
Miter saw injuries usually happen from kickback, binding, or thrown pieces. Keeping hands out of the blade path, clamping small work, and avoiding metal or masonry cuts reduces the chance of sudden movement and flying debris.
Last updated: February 2026
Will any miter saw stand work with any miter saw?
No. Most miter saw stands are designed to fit many saws, but they are not truly universal. For your Craftsman 137212140 miter saw, the stand must match (or adapt to) the saw’s mounting-hole pattern and base size so the saw bolts down securely and stays stable during cuts.
What to check for a safe, solid fit
We recommend confirming these items before you buy or mount the saw:
- Mounting hole spacing on the saw base vs. the stand’s bracket range
- Bolt size and hardware the stand expects (and whether washers/spacers are needed)
- Base support: the stand rails should support the saw base without rocking
- Work support length: extension wings should support long stock on both sides
- Clamping options: ability to clamp the workpiece (safer than freehand)
- Stability: wide stance, locking legs, and minimal flex under load
The 137212140 operator guidance emphasizes safe setup and inspection, including checking mounting holes and keeping the work firmly supported. Use the 137212140 owner's manual to confirm mounting and setup details.
Universal stand vs. brand-specific stand
Most “universal” stands work by using adjustable mounting brackets. If the brackets do not line up with your saw’s holes, a simple adapter plate can help.
| Stand type | Typical fit | Best for |
|---|---|---|
| Universal stand (adjustable brackets) | Fits many saws after adjustment | Jobsite portability, mixed tool brands |
| Stand with quick-release mounts | Fits many saws if brackets align | Fast setup and teardown |
| Brand/model-specific stand | Most direct bolt-on fit | Maximum rigidity and repeatable alignment |
If the holes do not line up
A safe workaround is an adapter plate (commonly plywood or MDF) that bolts to the saw, then bolts to the stand.
- Use a flat, stiff plate thick enough to resist flex
- Bolt the saw to the plate using the saw’s mounting holes
- Bolt the plate to the stand using the stand’s slots/holes
- Recheck for wobble and retighten hardware after a few cuts
Why it matters
A stand that does not fully support and secure the saw can shift during a cut, which increases the risk of binding, inaccurate cuts, and loss of control. Stable mounting and proper work support help you cut safely and consistently.
Last updated: February 2026
How thick wood can a mitre saw cut?
On the Craftsman miter saw model 137212140, the maximum thickness you can cut depends on the cut type and setup. With an auxiliary wood fence installed, the manual lists up to about 3-1/2 in. thickness for a straight crosscut, and up to 2 in. thickness for common miter and compound cuts (see the 137212140 owner's manual).
Cutting thickness for common cuts (model 137212140)
These are the manual-listed capacities when using an auxiliary wood fence (a straight board about 3/4 in. thick) and the blade is in the correct position.
| Cut type | Typical max thickness (approx.) | Notes |
|---|---|---|
| Crosscut (90 degrees) | 3-1/2 in. | Can cut a dimensional 4x4 in one cut with auxiliary fence |
| Miter 45 degrees (left or right) | 2 in. | Thickness drops because the blade travels diagonally |
| Bevel 45 degrees | 1-1/2 in. | Bevel reduces vertical capacity |
| Compound 45 degrees (miter + bevel) | 2 in. | Listed as 2 in. x 2 in. capacity |
How to estimate thickness on your next cut
We recommend using these quick checks before you cut thicker stock:
- Do a dry run (lower the saw with power off) to confirm the blade clears the fence and workpiece.
- Keep hands out of the no-hands zone; the manual calls out staying 7-1/4 in. or more from the blade path.
- Clamp the workpiece whenever possible; never cut freehand.
- Support long boards so the work stays flat on the table.
- Wait for a complete blade stop before lifting the saw or moving the work.
Why thickness changes with miter and bevel cuts
A miter or bevel cut changes the blade angle and the path through the wood. That reduces the usable vertical clearance, so a board that crosscuts at 3-1/2 in. thick may only miter at about 2 in. thick on this saw.
Safety notes that matter for thick stock
Thicker and longer boards are harder to control. For safer, cleaner cuts:
- Never cut metal or masonry with this saw; it is designed for wood and wood-like products.
- Avoid tiny cutoffs; repetitive cuts that create 1 in. or smaller pieces can get caught and thrown.
- Use an auxiliary wood fence only as described; remove it for bevel cutting if it interferes with the guard.
Last updated: February 2026
What are the parts of a miter saw?
On a Craftsman miter saw like model 137212140, the main parts include the cutting arm and motor, the blade and blade guard, and the miter and bevel controls that set your cut angle. For the exact names and locations on your saw, use the 137212140 operator's manual.
Main parts you will see on most miter saws
- Motor assembly (armature, field, motor housing)
- Cutting arm and pivot (raises and lowers the blade)
- Blade and arbor (arbor shaft and arbor bolt/screw hold the blade)
- Lower blade guard (moves as the arm lowers, then closes when you raise the arm)
- Miter system (miter scale, pointer, detent/lock mechanism)
- Bevel system (bevel lock handle and bevel scale for tilt cuts)
- Fence and table (supports the workpiece; includes a table insert)
Controls and adjustment points (common on 137212140-STYLE saws)
These are the parts you typically touch when setting up a cut:
- Power switch/trigger
- Miter lock handle or knob (locks the turntable angle)
- Bevel lock handle (locks the tilt angle)
- Spindle/arbor lock (helps during blade changes on many saws)
- Stop hardware (bracket stop and related fasteners)
Quick “what it does” table
| Part | What it does | Why you care |
|---|---|---|
| Lower guard | Covers the blade when the arm is up | Helps reduce contact risk and keeps debris contained |
| Miter scale/pointer | Sets left-right angle | Controls crosscut angle accuracy |
| Bevel lock handle | Sets blade tilt | Needed for bevel and compound cuts |
| Arbor shaft/bolt | Secures blade to motor | A loose arbor can cause wobble and poor cuts |
Why it matters
Knowing the part names helps you follow maintenance and troubleshooting steps correctly, especially for safety checks like verifying the arm return spring action and making sure the lower guard fully closes after each cut.
Safety and maintenance notes we recommend
- Unplug the saw before adjustments, setup, or blade changes.
- Confirm blade direction: teeth point downward at the front of the saw.
- Keep guards installed and properly adjusted.
- Inspect for cord damage, binding, and misalignment before each use.
- Replace worn motor carbon brushes as a set when they get short.
Last updated: February 2026