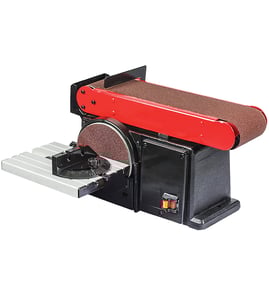


What is a disc and belt sander used for?
A disc and belt sander like the Craftsman 13510570 is used to shape, smooth, and refine wood and other workable materials. The disc is best for squaring ends and shaping outside curves; the belt is best for fast stock removal and smoothing flat or gently curved surfaces.
- Disc sanding: truing and squaring end grain, beveling edges, shaping outside curves
- Belt sanding: flattening faces, smoothing long edges, removing saw marks quickly
- Both: refining a cut before finishing, fitting joints, easing sharp corners
- Squaring a board end after cutting on a miter saw
- Shaping a small part (like a bracket, jig, or trim piece)
- Smoothing glued joints and leveling proud edges
- Rounding over corners before paint or stain
- Cleaning up rough cuts on plywood or hardwood
| Task | Use the disc | Use the belt |
|---|---|---|
| Square an end | Yes | Sometimes (with care) |
| Remove material fast | Sometimes | Yes |
| Long straight edge | No | Yes |
| Outside curve shaping | Yes | Sometimes |
| Fine smoothing before finish | Yes (light pressure) | Yes (finer grit) |
- Use light, steady pressure; let the abrasive do the work
- Keep the workpiece moving to avoid grooves and burn marks
- Sand with the grain when possible for best finish quality
- Use a dust collection bag or shop vacuum if your setup supports it
- Unplug the sander before changing belts, discs, or making adjustments
Using the right surface (disc vs belt) helps you get straighter edges, cleaner curves, and a smoother finish with less rework. It also reduces overheating, burning, and accidental rounding that can ruin a precise fit.
For help confirming you have the correct model number before ordering abrasives or replacement items, use how to find your appliance model number (and what it means for parts).
Last updated: February 2026
What are the main parts of a belt sander?
On the Craftsman belt and disc sander model 13510570, the main belt-sander components are the abrasive sanding belt, two rollers (drive and idler), a motor-driven drive system, and the belt-tracking/tension hardware that keeps the belt centered and tight during sanding.
- Abrasive sanding belt: Removes material; grit choice controls speed vs. finish quality.
- Drive roller (lower roller): Powered by the motor; pulls the belt.
- Idler roller (upper roller): Free-spinning roller that supports the belt and helps maintain alignment.
- Tracking adjustment: Lets you center the belt so it does not walk off the rollers.
- Tension mechanism: Applies spring or lever force so the belt grips the rollers without slipping.
- Motor and drive (belt/gear/pulley system): Transfers power to the drive roller.
- Platen or belt support plate (common on many sanders): Supports the belt behind the sanding area for flatter sanding.
| Part or system | Primary job | Common symptom when it’s off |
|---|---|---|
| Sanding belt | Abrades the workpiece | Poor finish, burning, slow sanding |
| Tracking adjustment | Keeps belt centered | Belt drifts left/right |
| Tension mechanism | Prevents slip and flutter | Belt slips, chatters, stalls |
| Drive roller + motor | Moves belt at speed | Belt not moving, weak power |
Knowing these parts helps you diagnose the most common belt-sander problems fast: a belt that wanders is usually tracking or tension; a belt that stalls is usually tension, drive roller wear, or a motor/drive issue.
- Unplug the sander; inspect the belt for tears, glazing, or incorrect size.
- Verify belt direction (if arrows are printed) and re-seat it on both rollers.
- Adjust tracking in small increments while running the tool.
- Confirm tension is fully engaged (lever locked or spring tension applied).
- Check for packed dust around rollers, guards, and the belt path.
For help identifying the exact model number on your tool before ordering parts, use how to find your appliance model number (and what it means for parts).
Last updated: February 2026
What are the disadvantages of a belt sander?
A belt sander like the Craftsman 13510570 removes material fast, but that speed is also the main drawback: it is easy to over-sand, gouge wood, round over edges, and leave uneven surfaces. It also creates heavy dust and noise, and it demands strict safety habits.
- Too aggressive for fine work: It can erase pencil lines, soften corners, and change dimensions quickly.
- Easy to create gouges and waves: Tilting the tool, stopping in one spot, or sanding across grain can leave deep scratches.
- Dust and cleanup: Belt sanders generate a lot of fine dust; good collection and a respirator matter.
- Noise and vibration: Extended use can be fatiguing and harder on hands and wrists.
- Safety risk: The moving belt can grab workpieces, pull in loose clothing, and cause hand injuries if you get too close.
- Consumable cost: Belts wear quickly if you use the wrong grit, too much pressure, or sand dirty/resinous material.
- Start with a coarser grit only when needed; move to finer grits sooner.
- Keep the sander moving at a steady pace; do not pause on the surface.
- Sand with the grain on wood whenever possible.
- Use light pressure; let the abrasive do the work.
- Clamp the workpiece and keep hands clear; avoid gloves that can snag.
- Use dust collection and eye, hearing, and respiratory protection.
| Tool type | Best for | Main drawback |
|---|---|---|
| Belt sander | Fast stock removal, flattening large areas | Easy to gouge; rougher finish |
| Random orbital sander | General smoothing and finishing | Slower material removal |
| Detail/palm sander | Corners and tight areas | Small pad; slow on big surfaces |
If you are fitting joints, leveling glued panels, or prepping for stain/paint, a belt sander can change the surface and dimensions in seconds. Using the right grit progression and technique helps you avoid rework and keeps your project accurate.
For more DIY safety guidance before you work on power tools, see are diy appliance repairs safe.
Last updated: February 2026