


Can a countertop microwave be used as built-in?
Yes, a countertop microwave can sometimes be placed into a cabinet opening for a built-in look, but it must have the clearances and ventilation the manufacturer requires. For the GE GCST16S1W1WW, use a built-in kit or an approved installation method so heat can vent properly and the unit can be serviced safely.
What “built-in” really means
A true built-in installation is more than putting the microwave on a shelf. The cabinet cutout, airflow path, and mounting method must match the unit’s design.
- Keep required air gaps around the sides, top, and rear
- Do not block intake or exhaust vents
- Use a dedicated, properly grounded outlet (no pinched cord)
- Make sure the door can open fully without hitting trim
- Leave access for removal and service
When it is OK vs. not OK
| Scenario | Usually acceptable? | Why |
|---|---|---|
| Countertop unit placed on an open shelf with plenty of airflow | Often | Heat can dissipate and the unit is easy to remove |
| Countertop unit enclosed tightly in a cabinet cutout | No | Overheating risk and difficult servicing |
| Installed with a manufacturer-approved trim kit | Often | Trim kits are designed to maintain airflow and fit |
Common problems when a countertop unit is “built in” incorrectly
Improper installation can cause nuisance shutdowns, poor cooking performance, or premature part wear.
- Overheating and thermal cutoffs tripping
- Cabinet discoloration from trapped heat
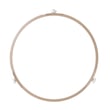
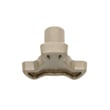
- Turntable issues if the unit is not level (check the rotating ring WB06X10862 and coupler WB06X10861)
- Excess vibration or rattling
Why it matters
Microwaves move a lot of heat through their vents. If airflow is restricted, internal components can run hotter than designed, which shortens the life of parts and can lead to repeated failures.
Last updated: January 2026
What is the disadvantage of a built-in microwave?
A built-in microwave like the GE GCST16S1W1WW typically costs more to buy and install, is less flexible to replace later (cabinet cutout and trim must match), and can be more time-consuming to service because it has to be removed from the opening.
Common disadvantages to plan for
- Higher total cost: purchase price plus installation materials and labor.
- Harder replacement later: you often need the same cutout size and mounting style.
- More involved repairs: accessing internal components can require pulling the unit from the cabinet.
- Cabinet modification: the opening may need to be cut or adjusted, which is not easily reversible.
- Ventilation and clearance sensitivity: incorrect spacing can lead to heat buildup and nuisance shutdowns.
Built-in vs countertop: quick comparison
| Feature | Built-in microwave | Countertop microwave |
|---|---|---|
| Installation | Requires cabinet cutout and secure mounting | Plug-in, no cabinet work |
| Replacement flexibility | Limited by opening size and fit | Easy to swap models |
| Service access | Often must be removed first | Usually accessible on the counter |
| Upfront cost | Typically higher | Typically lower |
What to check before you commit (or before you replace)
- Measure the cabinet cutout (width, height, depth) and note any trim requirements.
- Confirm the electrical supply (dedicated outlet, correct voltage) matches your setup.
- Verify clearances around the unit so heat can dissipate.
- Consider how you will remove the microwave if it needs service.
- If your turntable system is worn, check common fit-related parts such as the coupler WB06X10861 and rotating ring WB06X10862.
Why it matters
Built-in microwaves look clean and save counter space, but the tradeoff is long-term flexibility. When the opening, mounting, and airflow are part of the kitchen cabinetry, replacement and repair decisions become more about fit and access than just features.
Last updated: January 2026
What's the average lifespan of a GE microwave?
Most GE microwaves, including the GE GCST16S1W1WW built-in microwave, typically last 8 to 10 years with normal household use. Lifespan is strongly affected by ventilation, door use, and keeping the turntable system clean and stable.
Typical lifespan and what changes it
A microwave’s “life” is usually limited by high-voltage components, door/interlock wear, and heat stress from heavy use.
- Light use (reheating only): often closer to 10 years
- Heavy use (multiple long cook cycles daily): often closer to 8 years
- Poor airflow or grease buildup: shortens life by overheating internal parts
- Door slamming or misalignment: accelerates switch and latch wear
- Running empty: can damage internal components faster
Quick care checklist to help it reach 8 to 10 years
- Keep the cavity and waveguide area clean; remove grease and food splatter promptly.
- Make sure the turntable rotates smoothly; replace worn turntable-drive parts when needed.
- Use microwave-safe containers and avoid metal that can cause arcing.
- Do not block vents; allow airflow around the unit during operation.
- Stop using it if you see arcing/burn marks and address the cause before continued cooking.
Parts that commonly affect day-to-day performance
If the microwave still heats but is noisy, rattles, or the tray stops turning, the turntable drive system is a common place to start.
| Symptom | Common turntable-related cause | Example part for GCST16S1W1WW |
|---|---|---|
| Tray not turning | Stripped drive connection | Coupler WB06X10861 |
| Tray wobbles or drags | Worn roller ring | Rotating ring WB06X10862 |
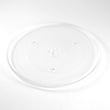
| Tray cracked/chipped | Damaged glass | Microwave glass turntable tray WB39X10032 |
Why it matters
A microwave near the end of its typical lifespan can still run, but small issues (overheating, arcing, door-switch problems, or a failing turntable system) often show up first. Fixing simple wear items early helps prevent bigger failures.
For deeper troubleshooting when performance drops, use our why is my microwave not heating guide.
Last updated: January 2026