- Kenmore refrigerator water filters
- Whirlpool refrigerator water filters
- Samsung refrigerator water filters
- GE refrigerator water filters
- LG refrigerator water filters
- Frigidaire refrigerator water filters
- KitchenAid refrigerator water filters
- Maytag refrigerator water filters
- Kenmore Elite refrigerator water filters
- Estate refrigerator water filters
- GE Profile refrigerator water filters
- Amana refrigerator water filters
- Bosch refrigerator water filters
- Dacor refrigerator water filters
- Electrolux refrigerator water filters
Top DIY repair help
View All Repair Categories
Appliances
Lawn & Garden
Power Tools
Home Improvement
Sports & Leisure
Heating & Cooling
Quick Links
How to replace a table saw motor brush set
less than a minute readFeb 18Lyle Weischwill
Repair time and Difficulty
45 minutes or less
Tools Required
- Slot screwdriver
- Socket wrench set
- Pliers
- Wire cutter
- Wire nuts
- Wire stripper
- Cardboard for floor padding
- Work gloves
This DIY repair guide explains how to replace the motor brushes in a table saw drive motor. The motor brushes transfer electricity to the motor armature to turn the motor shaft. As the motor brushes wear out, the drive motor runs weakly or won't start at all. Replace worn motor brushes with the manufacturer-approved table saw part.
Follow these basic steps to replace the motor brushes in common Craftsman, Mastercraft, Emerson, Tradesman, Bosch, Delta, DeWalt and Ryobi table saws.
Instructions
- 1. Shut off the electricity
Unplug the table saw’s power cord from the wall outlet.
Wear work gloves to protect your hands.
- 2. Remove the blade guard
Raise the blade to its highest cutting position.
Push the red button on the blade guard and lift off the blade guard assembly.

PHOTO: Raise the blade. 
PHOTO: Remove the blade guard.
- 3. Remove the table insert
Pry out the table insert by inserting a slot screwdriver into the large hole in the table insert.

PHOTO: Remove the table insert.
- 4. Remove the riving knife and anti-kickback pawl
Loosen the blade tilt-locking knob.
Tilt the saw blade to a 45-degree angle and tighten the blade tilt-locking knob.
Remove the riving knife locking knob and washer.
Remove the riving knife, mounting plate and the anti-kickback pawl.

PHOTO: Tilt the saw blade to a 45-degree angle. 
PHOTO: Remove the riving knife locking knob. 
PHOTO: Remove the riving knife.
- 5. Remove the saw blade
Loosen the blade-tilt locking knob and tilt the blade to a 90-degree angle.
Use the 2 wrenches supplied with the table saw to loosen the blade arbor nut.
Remove the arbor nut, outer flange washer and saw blade from the arbor.

PHOTO: Set the blade to 90-degrees. 
PHOTO: Remove the blade.
- 6. Remove the table saw support stand
Flip the table saw upside down onto a surfaced protected with cardboard or other padding.
Release the 4 table locking levers that secure the table saw to the support stand and remove the table saw support stand.

PHOTO: Flip the saw upside down. 
PHOTO: Release the locking levers.
- 7. Remove the drive motor
Release the 3 green ground wires from the ground wire bracket.
Remove the On/Off switch cover mounting screws and pull off the On/Off switch cover.
Using a wire cutter, cut the white wire at the base of the wire crimp.
Pull the black drive motor wire off the reset switch.
Using pliers, squeeze the sides of the strain relief on the motor wire cord attached to the On/Off switch box cover and pull out the strain relief.
Pull the motor wires out of the On/Off switch box cover.
Rotate the hand wheel to lower the motor to the lowest position.
Remove the 4 motor mounting bolts and brackets.
Pull out the motor.

PHOTO: Remove the ground wires. 
PHOTO: Remove the switch box cover. 
PHOTO: Cut the white wires. 
PHOTO: Release the strain relief. 
PHOTO: Pull the wires out of the switch box. 
PHOTO: Lower the motor. 
PHOTO: Remove the motor mounting bolts and brackets. Tip: On some models, you can replace the motor brushes without removing the drive motor. Skip this step to remove the brushes without removing the drive motor.
- 8. Replace the motor brushes
Use a slot screwdriver to unscrew the brush caps and then pull out the motor brushes.
Insert the new brushes into the motor and reinstall the brush caps.
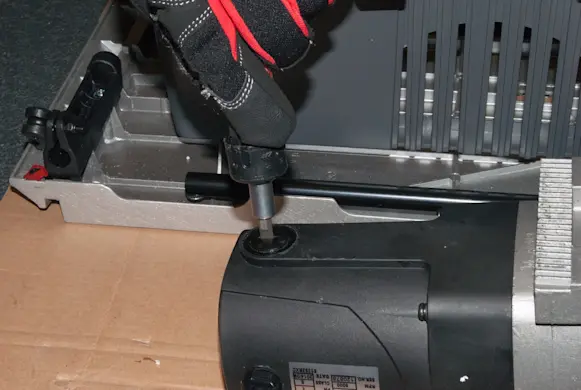
PHOTO: Remove the brush caps. 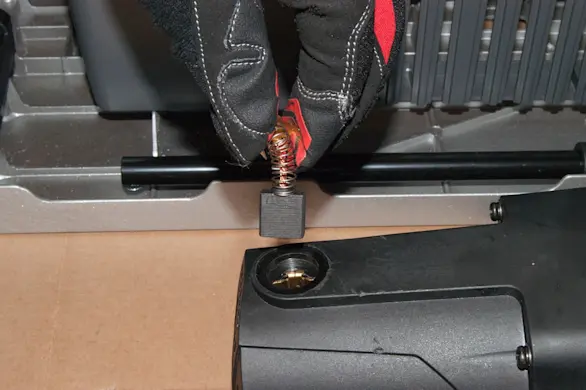
PHOTO: Pull the brushes out.
- 9. Reinstall the drive motor
Position the drive motor in the saw.
Reinstall the 4 motor mounting bolts and brackets.
Push the motor wires into the On/Off switch box cover and reinstall the strain relief.
Connect the black motor wire to the reset switch.
Use the wire strippers to strip 1/4-inch of insulation from the white wire ends and then use a wire nut to connect the white wire ends.
Reinstall the On/Off switch cover, using the mounting screws.
Reconnect the 3 green ground wires to the ground wire bracket, using the mounting screws.
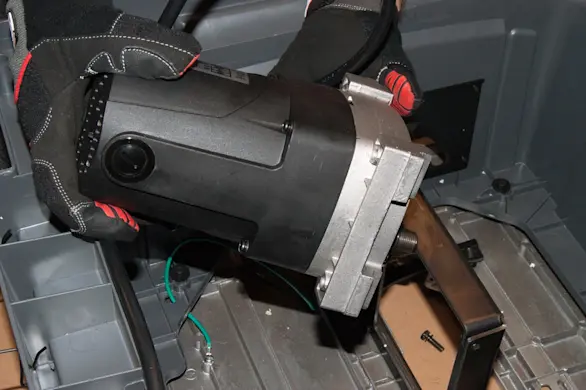
PHOTO: Reinstall the motor. 
PHOTO: Install the bolts. 
PHOTO: Install the motor wires into the switch box. 
PHOTO: Strip the ends of the white wires. 
PHOTO: Connect the wires. 
PHOTO: Reinstall the switch cover. 
PHOTO: Reconnect the ground wires.
- 10. Reinstall the table saw support stand
Position the support stand on the saw base and lock the levers to secure the stand to the saw base.
Flip the table saw upright.

PHOTO: Remount the stand on the saw base.
- 11. Reinstall the saw blade
Rotate the hand wheel to raise the motor to the highest position.
Position the blade on the arbor and reinstall the flange washer and arbor nut.
Firmly tighten the arbor nut.

PHOTO: Reinstall the saw blade.
- 12. Reinstall the riving knife and the anti-kickback pawl
Loosen the blade-tilt locking knob.
Tilt the blade to 45 degrees and then tighten the blade-tilt locking knob.
Reinstall the riving knife and anti-kickback pawl.
Reinstall the mounting plate.
Reinstall the washer and riving knife locking knob.
Firmly tighten the riving knife locking knob.
PHOTO: Tilt the saw blade to a 45-degree angle. 
PHOTO: Reinstall the riving knife and anti-kickback pawl. 
PHOTO: Reinstall the plate. 
PHOTO: Reinstall the washer and locking knob.
- 13. Reinstall the table insert
Push the table insert back into the top of the table.

PHOTO: Reinstall the table insert.
- 14. Reinstall the blade guard
Loosen the blade-tilt locking knob, tilt the blade to 90 degrees and retighten the blade-tilt locking knob.
Push the red release button on the blade guard, reinstall the blade guard assembly on the riving knife and then release the red button.

PHOTO: Reinstall the blade guard.
- 15. Restore power
Plug the table saw into the electrical outlet.