- Kenmore refrigerator water filters
- Whirlpool refrigerator water filters
- Samsung refrigerator water filters
- GE refrigerator water filters
- LG refrigerator water filters
- Frigidaire refrigerator water filters
- KitchenAid refrigerator water filters
- Maytag refrigerator water filters
- Kenmore Elite refrigerator water filters
- Estate refrigerator water filters
- GE Profile refrigerator water filters
- Amana refrigerator water filters
- Bosch refrigerator water filters
- Dacor refrigerator water filters
- Electrolux refrigerator water filters
Top DIY repair help
View All Repair Categories
Appliances
Lawn & Garden
Power Tools
Home Improvement
Sports & Leisure
Heating & Cooling
Quick Links
How to adjust a table saw blade
less than a minute readAug 05Lyle Weischwill
Repair time and Difficulty
30 minutes or less
Tools Required
- Combination square
- Slot screwdriver
- Felt-tip marker
- Work gloves
This DIY repair guide explains how to adjust the blade alignment on a table saw. The blade should be parallel to the miter gauge groove to make perfect cuts. Follow these steps to adjust the alignment of the table saw blade.
Follow the steps in this repair guide and video to adjust the blade alignment on common Craftsman, Mastercraft, Tradesman, Companion, DeWalt and Ryobi table saws.
Instructions
- 1. Shut off the electricity
Unplug the table saw’s power cord from the wall outlet.
- 2. Remove the blade guard
Raise the blade to its highest cutting position.
Push the red button on the blade guard and lift off the blade guard assembly.

PHOTO: Raise the blade. 
PHOTO: Remove the blade guard.
- 3. Mark the blade
Loosen the bevel lock, set the blade to 90-degrees (straight up), and then tighten the bevel lock handle.
Mark the right side of one blade tooth using a felt-tip marker.
Rotate the marked blade tooth so that it's 1/2 inch above the table at the front of the blade.

PHOTO: Set the blade to 90-degrees. 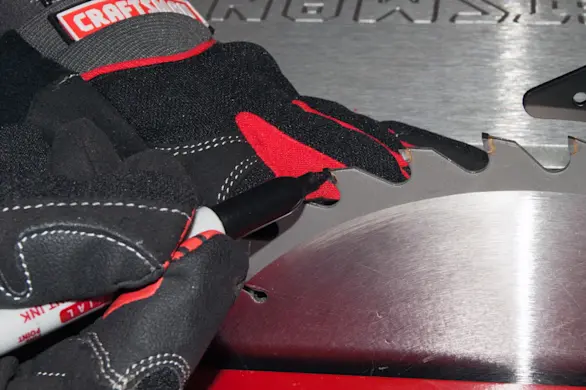
PHOTO: Mark one blade tooth.
- 4. Set up the combination square
Place the base of the combination square in the right side miter gauge groove.
Adjust combination square to that the ruler tip touches the marked blade tooth and lock the ruler.
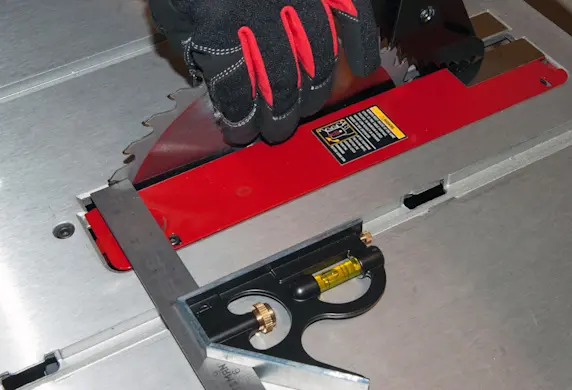
PHOTO: Place the combination square in the miter groove. 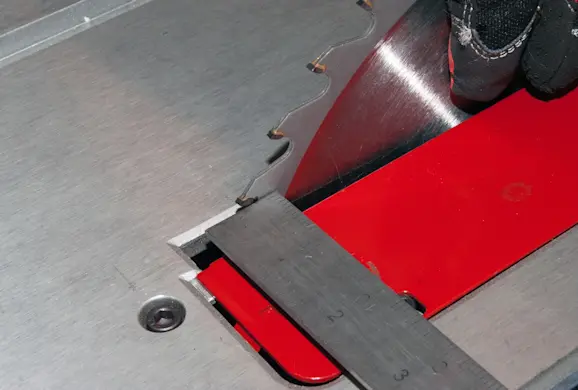
PHOTO: Adjust the ruler tip to touch the marked tooth.
- 5. Check the blade alignment
Rotate the blade to bring the marked tooth to one-half of an inch above the table at the rear of the blade.
Slide the combination square to the rear of the blade and determine the direction and degree of misalignment.
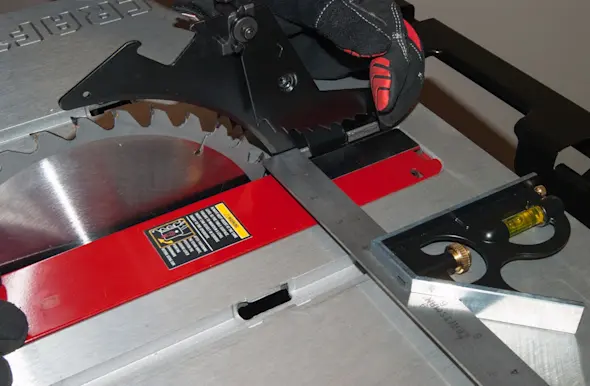
PHOTO: Slide the square to the rear.
- 6. Adjust the blade
If the blade is partial to the right side, turn the left adjustment screw counterclockwise and the right adjustment screw clockwise to align the blade.
If the blade is partial to the left side, turn the right adjustment screw counterclockwise and the left adjustment screw clockwise to align the blade.
Recheck the blade alignment and adjust the blade until its parallel.

PHOTO: Turn the blade adjustment screws.
- 7. Reinstall the blade guard
Push the red release button on the blade guard and reinstall the blade guard assembly on the riving knife. Release the red button.

PHOTO: Reinstall the blade guard.
- 8. Restore power
Plug the table saw into the electrical outlet.