CONFIRM THE PART FITS
Part Information
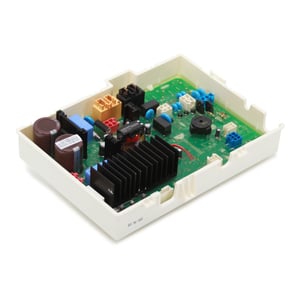
Special details: Replace electronic control board EBR65989405 if you see error code EE on the washer display.
This electronic control board (part number EBR65989405) is for washers.
Electronic control board EBR65989405 manages the washer's functions such as filling, washing, draining and spinning.
Unplug the washer before installing this part. Wear work gloves to protect your hands.
Frequently Used Together
- $20.25 |20% OFF Phone Price : $25.25
Top models using the same part
| Model Name | Model Number | Diagram Name |
|---|---|---|
| Model #WM2140CW LG washer | WM2140CW | Cabinet and control assembly parts |
Reviews
Fixed my washer.
High priced parts. Manufacturers should be ashamed.
Nonsense, Undisclosed
Did you find this review helpful?
- Ease of Installation
- Very Easy
- Duration of Installation
- Less than 30 minutes
A few things to mention
1. It is not necessary to work from behind machine. Slide it out from the wall a couple of feet, enough to access screws on back panel. By doing so, I didn't not need to disconect water hoses. 2. After removing the rear screws holding the lid on, Slide the lid backwards a couple of inches before lifting it up to remove it. 3. Use needlenose plilers to pince blue wire harness holders that mount the wire harness to the back of the machine. Pince holders from outside machine and push them inwards. You will be able to push them back in when you are done. Loosening 3 of these will give you more room to work when unpluging the wire harness from the board. I was able to remove the board and tilt it upward, making it easier to uplug the wires. 4. Plugs are NOT easy to remove from old board. Each one requires some dexterity to remove and you have to make sure to gently release the locking tabs. I would not be using that great big screwdriver on it. 4. Take photos of the all connections before begining removal of any parts or screws. I had to cut a wire tire off the board and remove grounding screw on the top of the machine. 5. Take several photos of the wire connections before removing them. I even went so far as to draw a diagram on paper showing location of each connection with its corresponding wire colors. Even though I believe the plugs will only fit in the correct postition on the board, For me, it was easier to follow my diagram to attach the wires to the new board.


Don2409, Fairfield, CA
1 person thought this review was helpful.
- Ease of Installation
- Moderate
- Duration of Installation
- 30 minutes - 1 hour

