 Owner’s manual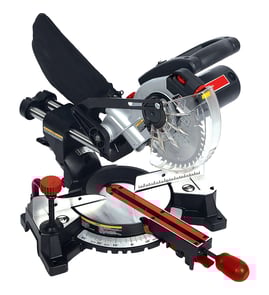

What should you never cut with a miter saw?
On the Craftsman 315212740 miter saw, never cut anything you cannot hold flat and secure against the fence and table. Never cut tiny pieces you cannot clamp, never stack multiple workpieces, and never make cuts that let the blade bind or pinch because that can cause kickback and serious injury (or damage the saw).
- Too-small workpieces that cannot be clamped securely (do not hand-hold small parts)
- More than one piece at a time (no stacking on the saw table)
- Unsupported long boards that can tip, walk, or pinch the blade
- Cuts where the work is not flat and flush to the fence and table
- Any setup where the blade can hit something (throat plate, fence, or hardware)
- Awkward body positions (floor use, crouching, or reaching near the blade path)
Your 315212740 is designed for crosscutting and mitering wood and plastic. For plastics, use the correct accessory blade and follow the setup and clamping guidance in the owner's manual.
| Item | Safe on this saw? | Notes |
|---|---|---|
| Wood (crosscuts, miters, bevels) | Yes | Clamp when possible; support long stock. |
| Plastic | Yes | Use an appropriate blade; avoid melting and binding. |
| Very small trim offcuts | No | If it cannot be clamped, do not cut it. |
| Multiple boards stacked | No | Never cut more than one piece at a time. |
- Clamp or bolt the saw to a stable bench at about hip height.
- Keep hands out of the cutting path; do not reach behind, under, or near the blade.
- Let the motor reach full speed before starting the cut.
- Confirm the blade clears the workpiece and does not contact the throat plate or fence.
- Lock the miter table and bevel (saw arm) before cutting.
Most miter saw injuries and damaged blades happen when the workpiece shifts, pinches the blade, or gets caught and kicked back. Clamping, supporting long stock, and keeping the work flat against the fence prevents binding and keeps cuts accurate.
Last updated: February 2026
Why is 31.6 on a miter saw?
On the Craftsman 315212740 miter saw, 31.62° is a built-in positive stop on the miter table for common crown molding cuts. It pairs with a 33.9° bevel setting to create the standard compound angle used when cutting typical U.S. crown molding laid flat.
The 31.62° detent exists so you can quickly repeat accurate crown molding cuts without hunting for the angle every time.
- It is one of the saw’s positive stops (detents) on the miter table.
- It’s intended for compound miter crown molding cuts.
- It’s used left or right, depending on inside vs. outside corners.
- It’s designed for crown molding laid flat on the miter table (not nested against the fence).
- It helps you get repeatable results when walls are close to 90°.
For the exact crown molding procedure and the angle chart for this saw, use the owner's manual.
For many standard crown profiles, the manual’s guidance uses this pairing:
| Cut type | Miter setting | Bevel setting |
|---|---|---|
| Crown molding (compound cut, laid flat) | 31.62° (L or R) | 33.9° (L or R) |
- Loosen the miter lock handle.
- Lift the miter lock plate to disengage.
- Rotate the table until it drops into the 31.62° positive stop notch.
- Tighten the miter lock handle securely.
- Set the bevel to 33.9° as needed for the cut.
- Make a test cut in scrap before cutting your finish molding.
Crown molding angles are sensitive; small shifts in miter or bevel can open up gaps at the corner. The 31.62° stop speeds setup and improves consistency, especially when you are making multiple matching cuts.
Last updated: February 2026
Can a 10inch miter saw cut a 4x4?
Yes. The Craftsman 315212740 is a 10-inch compound miter saw with a listed 0° miter and 0° bevel cutting capacity of a maximum nominal 4 x 4, so it’s designed to cut a 4x4 in a single pass at 90° when the workpiece is positioned and supported correctly. See the owner's manual for the exact cutting-capacity chart and safe setup.
A construction “4x4” is nominal lumber (about 3-1/2 in. x 3-1/2 in.). On the 315212740, the manual lists maximum nominal lumber sizes of 2 x 6 and 4 x 4 at miter 0° and bevel 0°.
- Set miter to 0° and bevel to 0°, then lock both controls.
- Place the 4x4 flat on the miter table with one edge firmly against the fence.
- Clamp the workpiece whenever possible (a work clamp or C-clamp works well).
- Support long or heavy stock with a roller stand or an outfeed surface level with the saw table.
- Start the saw with the blade clear of the wood; let the motor reach full speed before cutting.
- Keep hands out of the cutting path and never cut freehand.
| Cut setup | Typical result on a 10-in non-sliding saw like 315212740 | What to do |
|---|---|---|
| 0° miter, 0° bevel | Full 4x4 crosscut in one pass | Clamp and support stock |
| 45° miter, 0° bevel | Capacity drops (often limited to smaller stock) | Use the manual’s chart before cutting |
| Any bevel cut | Capacity changes with angle | Test-cut scrap first |
A 4x4 is heavy and can shift. Proper clamping, fence contact, and outfeed support reduce blade pinching and kickback risk, and they help you get a square, accurate cut.
Last updated: February 2026
How to get a miter saw to lift up?
To lift the saw arm on your Craftsman 315212740 miter saw, release the transport lock: push the saw arm down slightly, then pull the lock pin out to unlock it. Once released, raise the arm to the full up position before making adjustments.
- Unplug the saw before touching the lock pin or making any adjustments.
- Push down on the saw arm to take pressure off the lock.
- Pull the lock pin out to release the saw arm.
- Raise the saw arm to its full raised position.
- Before cutting, confirm the miter table and bevel lock are tightened.
- Lock pin not fully disengaged: Push the arm down again and pull the pin straight out.
- Saw is in transport position: The arm must be unlocked before it can rise.
- Binding at the pivot: Check for sawdust buildup around the arm pivot area and clean it out (with the saw unplugged).
- Guard interference: Make sure the blade guard moves freely and is seated correctly.
The manual calls out a few checks that prevent kickback and binding when you start using the saw again:
- Clamp or secure the workpiece when possible
- Support long boards to prevent tipping or pinching
- Verify the blade is tight and clears the workpiece before starting
- Keep hands out of the cutting path and never reach underneath the work
| Control | What it does | When you use it |
|---|---|---|
| Lock pin | Locks the saw arm down for transport | Moving the saw, storage, some alignment steps |
| Miter lock handle | Locks the miter table angle | Before every cut |
| Bevel lock knob | Locks the bevel angle | Before bevel or compound cuts |
Releasing the lock pin correctly prevents you from forcing the saw arm, which can throw off alignment and make the saw unsafe to operate. Following the lock and setup steps also helps keep the blade path clear and the cut accurate.
For the exact lock-pin location and the alignment procedures that start with releasing the arm, use the owner's manual.
Last updated: February 2026
Which mitre saw is the most accurate?
The most accurate miter saw is the one that’s correctly calibrated and stays locked at the set angle during the cut. Your Craftsman miter saw model 315212740 is built for repeatable accuracy using positive miter stops, a miter lock handle, and a bevel lock knob; set it up using the owner's manual.
Accuracy comes from squareness plus repeatable locking. On a compound miter saw, these items control whether joints close tightly.
- Miter table square to the fence
- Blade square to the fence at 0° miter
- Blade square to the table at 0° bevel
- Positive stops landing cleanly at common angles
- Locking controls holding without drift
Use a framing square and combination square; follow the manual’s sequence.
- Square table to fence: set miter to 0°, lock it, confirm the throat-plate slot is parallel to the fence; adjust the fence if needed.
- Square blade to fence: with miter at 0° and arm locked down, place a framing square on the fence and the flat of the blade (not the teeth); adjust if needed.
- Square blade to table: set bevel to 0°, check with a combination square; adjust the 0° positive stop screw if needed.
- Use a sharp, quality blade matched to the material
- Keep the fence and table clean; debris changes the cut angle
- Support long stock so it stays flat to the fence
- Lock miter and bevel firmly before cutting
| Feature | How it helps accuracy |
|---|---|
| Positive miter stops | Repeatable common angles |
| Miter lock handle | Prevents miter drift |
| Bevel lock knob and stops | Holds bevel settings at 0° and 45° |
| Laser guide | Helps line up cuts consistently |
When the fence, blade, and table are square, your miters close tighter, crown molding fits better, and you waste less material.
Last updated: February 2026