- Kenmore refrigerator water filters
- Whirlpool refrigerator water filters
- Samsung refrigerator water filters
- GE refrigerator water filters
- LG refrigerator water filters
- Frigidaire refrigerator water filters
- KitchenAid refrigerator water filters
- Maytag refrigerator water filters
- Kenmore Elite refrigerator water filters
- Estate refrigerator water filters
- GE Profile refrigerator water filters
- Amana refrigerator water filters
- Bosch refrigerator water filters
- Dacor refrigerator water filters
- Electrolux refrigerator water filters
Top DIY repair help
View All Repair Categories
Appliances
Lawn & Garden
Power Tools
Home Improvement
Sports & Leisure
Heating & Cooling
How to replace a chainsaw spark plug
less than a minute readOct 27Wayne Archer
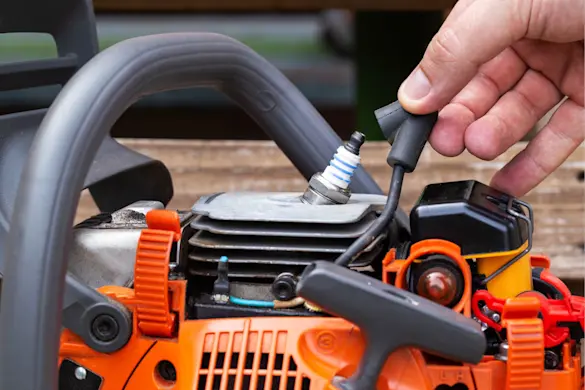
The spark plug in your chainsaw’s ignition system delivers the electrical spark that ignites the air-fuel mixture in the cylinder, powering each cut you make.
Over time, heat, carbon buildup, and wear can cause the plug to foul or weaken. When that happens, you’ll notice hard starts, sluggish acceleration, or uneven idling. Replacing a spark plug is one of the quickest ways to restore reliable starting and strong engine performance.
Most manufacturers recommend checking or replacing the spark plug every season, or about every 25 hours of use. Keeping it clean and properly gapped ensures your chainsaw runs efficiently, with less strain on the engine and fewer surprises in the middle of a job.
Tools you’ll need
Before you start replacing your chainsaw’s spark plug, make sure you have the right tools on hand. This job is simple and quick, but using the proper equipment ensures a safe and clean installation.
Spark plug wrench or socket wrench (typically 13/16" or 5/8")
New spark plug (check your model’s manual for the correct type)
Gapping tool or feeler gauge
Clean rag or shop towel
Small wire brush (optional, for cleaning the old plug if inspecting)
Work gloves (optional, for comfort and grip)
Step 1: Access the spark plug
Make sure the chainsaw is completely off, cooled down, and safe to handle. Engage the chain brake to lock the chain and stop it from moving.
To locate the spark plug:
Unscrew the top engine cover; most chainsaws require removing a few screws using a flathead screwdriver or hex driver.
Lift off the cover to expose the cylinder head and spark plug.
Locate the spark plug, typically found near the front of the engine block with a thick rubber boot attached.
Step 2: Remove the spark plug
Once the spark plug is exposed, it’s important to remove it carefully to avoid damaging the threads or surrounding area.
Clear away any debris around the plug using compressed air or a clean brush. This helps prevent dirt from falling into the cylinder.
Use a spark plug socket or wrench to turn the plug counterclockwise until it’s free.
Lift the plug straight out once it’s fully unscrewed. Inspect it for wear, carbon buildup, or damage.
Step 3: Check the old spark plug
Once the spark plug is removed, take a moment to inspect it carefully. The condition of the plug can give you insight into how your chainsaw is running and whether other issues might be present.
Check for carbon buildup or a black, sooty tip; this can indicate a rich fuel mixture or poor combustion.
Inspect the electrode for wear, heavy erosion, or a burned appearance.
Look for oil fouling (wet, greasy residue), which might point to a worn piston ring or seal.
Check for cracks or corrosion on the ceramic insulator or metal body.
If the plug shows heavy wear or damage, replacing it is a must. Even if it looks relatively clean, installing a new plug is recommended if it’s been a while since the last replacement.
Step 4: Set the gap on the new spark plug
Before installing the new spark plug, it’s important to make sure the electrode gap is set to the correct width. This gap affects how the spark forms and fires; too narrow or too wide, and your chainsaw may not run properly.
Check your owner's manual for the exact gap specification. Most chainsaws fall between 0.020" and 0.030".
Use a spark plug gap tool or feeler gauge to measure the gap. Slide the correct gauge between the electrodes to check spacing.
Adjust gently if needed by carefully bending the ground electrode. Avoid applying too much force; it can crack or damage the ceramic insulator or tip.
A properly gapped spark plug ensures a strong, reliable spark and optimal performance during starting and cutting.
Step 5: Install the new spark plug, reconnect, and test
Once the gap is properly set, it’s time to install the new spark plug and confirm everything’s working as it should.
Thread the new spark plug in by hand to avoid cross-threading. It should turn easily for the first few rotations.
Tighten it with a wrench until it’s snug; typically 1/16 to 1/8 of a turn after it seats. Don’t overtighten, or you could damage the threads or the plug itself.
Apply anti-seize or dielectric grease only if specified in your chainsaw’s manual. Not all manufacturers recommend it.
Reconnect the spark plug wire and press it on firmly until it clicks into place.
Reinstall the top cover, aligning all tabs or screws as needed.
Start the chainsaw to verify a strong ignition, smooth idle, and responsive throttle.
If the saw starts easily and runs without sputtering, you’ve installed the spark plug correctly and your ignition system is ready for more cutting.
Most chainsaws need a new spark plug every season or after about 25 hours of use. Replace it sooner if you’re dealing with hard starts, misfiring, or sluggish performance. It’s also a smart move after long storage or when poor fuel has been in the system. Always use the correct plug type for your model, and consider keeping a spare on hand during peak cutting season. Pairing spark plug replacement with seasonal maintenance like air filter checks and fuel system cleaning can help your chainsaw run stronger, longer.
If you need more help, explore our DIY chainsaw troubleshooting and repair help for step-by-step guides to common issues.