
$13.88 |
44% OFF MSRP : $25.00
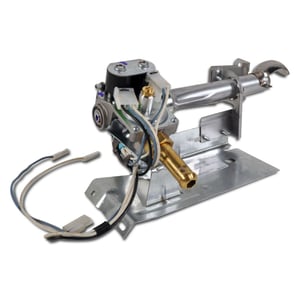
This burner and gas valve assembly (part number 279894) is for dryers.
Dryer burner and gas valve assembly 279894 comes as a complete assembly: the burner that distributes the gas for an even flame, the valve that controls the flow of gas to the burner and the igniter that lights the gas to create the flame.
Unplug the dryer and shut off the gas supply before installing this part. Wear work gloves to protect your hands.

| Model Name | Model Number | Diagram Name |
|---|---|---|
| Model #11077483220 Sears dryer | 11077483220 | Cabinet parts |
| Model #11087194210 Sears dryer | 11087194210 | Cabinet parts |
| Model #11089416300 Sears dryer | 11089416300 | Cabinet parts |
| Model #11077409630 Sears dryer | 11077409630 | Cabinet |
| Model #11087406230 Sears dryer | 11087406230 | Cabinet parts |
| Model #11087181110 Sears dryer | 11087181110 | Cabinet parts |
| Model #11087174400 Sears dryer | 11087174400 | Cabinet parts |
| Model #11077408430 Sears dryer | 11077408430 | Cabinet parts |
| Model #11087182100 Sears dryer | 11087182100 | Cabinet parts |
| Model #11087578600 Sears dryer | 11087578600 | Cabinet parts |
You only need a 5/16 nut driver, needle nose pliers, and an adjustable wrench for the gas fitting. Remove the lower pop-off kick panel and start the dryer. If the ignitor gets red hot, but no flame starts, the gas valve coil assembly is bad. In my case I had to change the complete unit because the older coils were no longer available. SHUT OFF THE GAS COCK AND UNPLUG THE DRIER. PLACE A THROW RUG ON THE FLOOR IN FRONT OF THE MACHINE BECAUSE YOU WILL BE LYING ON THE FLOOR TO DO MUCH OF THE INSTALLATION. 1) Remove the two sheet metal screws at the lower front of the unit. 2) Slide off the two spade lug connectors from the high temp safety switch on the side of the flame tunnel. 3) Loosen the hex gas nut. 4) Unplug the electrical connector to the rest of the controls. The entire unit should now slide forward free of the machine. (Now would be a good time to grab the vacuum cleaner and eliminate as much dust and lint from the lower regions of the dryer as you can.) Prepare the new unit by installing the furnished new ignitior. (It may be flat or round.) Put the new ignitor in place using the old unit as a guide. (One sheet metal screw and one electrical connector.) You are now ready to install the new assembly. Reverse steps 4 thru 1. Turn on gas cock. (Soap bubble check for gas leaks. Fix any leaks found.) Plug in dryer and do a test run. If new ignitor gets red hot and gas jet ignites, you are done. Shut off dryer and replace kick panel.
ljd1609, Montrose, Co.
Did you find this review helpful?


