- Kenmore refrigerator water filters
- Whirlpool refrigerator water filters
- Samsung refrigerator water filters
- GE refrigerator water filters
- LG refrigerator water filters
- Frigidaire refrigerator water filters
- KitchenAid refrigerator water filters
- Maytag refrigerator water filters
- Kenmore Elite refrigerator water filters
- Estate refrigerator water filters
- GE Profile refrigerator water filters
- Amana refrigerator water filters
- Bosch refrigerator water filters
- Dacor refrigerator water filters
- Electrolux refrigerator water filters
Top DIY repair help
View All Repair Categories
Appliances
Lawn & Garden
Power Tools
Home Improvement
Sports & Leisure
Heating & Cooling
Quick Links
How to replace the clutch band in a top-load washer
less than a minute readMay 20Lyle Weischwill
Repair time and Difficulty
60 minutes or less
Tools Required
- Socket wrench set and ratchet
- Needle-nosed pliers
- Slot screwdriver
- Channel-lock pliers
- Shop towels
- Work gloves
This washer repair guide explains how to replace the clutch band on a direct-drive top-load washer. The washer clutch band is part of the clutch assembly that releases the drive system's brake to allow the basket to spin during the spin cycle. If the clutch band wears out, the clutch assembly won't release the brake. If the washer spins when the basket is empty but not when it's full, the clutch band could be the problem (another problem could be the clutch assembly). Replace the clutch band with a manufacturer-approved washer part if it's worn or damaged.
Kenmore, Whirlpool, Maytag, Roper, Estate and Crosley top-load washers use this type of direct-drive clutch band.
Not sure if your washer is a direct-drive washer? Learn how you can tell on our washer FAQs.
Instructions
- 1. Shut off the electricity and water
Unplug the power cord from the wall outlet.
Turn off the water supply valves for the washer.
Wear work gloves to protect your hands.
- 2. Remove the agitator
If your model has a fabric softener dispenser at the top of the agitator, remove the fabric softener dispenser.
Open the washer lid and pry the cap from the top of the agitator.
Remove the 7/16" bolt and washer that secure the agitator to the agitator drive shaft.
Grip the bottom of the agitator and pull the entire agitator assembly up and out of the washer.
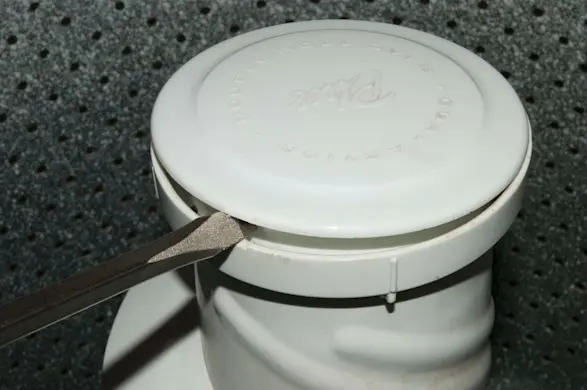
PHOTO: Pry off the agitator cap. 
PHOTO: Remove the agitator bolt. Tip: If your model has a plastic spring retainer with a square hole at the top, insert a 1/2" socket drive extension into the square hole and rotate the spring retainer counter-clockwise to release and remove the spring retainer.
- 3. Disconnect the hoses
Move the washer away from the wall so you can reach the fill hoses. Mark which fill hose goes to the hot connector and which goes to the cold.
Using channel-lock pliers, carefully loosen and remove both hoses. Expect some water to pour out.
Pull the drain hose out of the standpipe behind the washer. Expect some water to pour out of the drain hose as you remove it.
Tip: Wipe up spills with a towel to prevent slipping.
- 4. Lay the washer on its back
Move the washer far enough from the wall that you can set the washer on its back.
Lay a large towel behind the washer.
Carefully tip the washer backwards onto the towel to access the drive components at the bottom of the washer.
- 5. Release the drain pump
Use a slot screwdriver to release the metal mounting clips that secure the drain pump to the front of the drive motor.
Pull the drain pump forward to release it from the drive motor shaft. Leave the hoses connected to the drain pump.
Move the pump to the side of the motor so it’s out of the way while you replace the clutch assembly.

PHOTO: Remove the drain pump clips.
- 6. Remove the transmission and drive motor assembly
Unplug the wire harness from the drive motor.
Detach the wires from the drive motor capacitor.
Release the drive motor wire harness from the plastic retainer clip on the bottom of the transmission housing.
Remove the bolts that secure the transmission to the base of the washer.
Carefully pull the transmission (with drive motor attached) straight out of the bottom of the washer.
Set the transmission and drive motor assembly upright on a shop towel to service the clutch assembly.

PHOTO: Unplug the motor wire harness. 
PHOTO: Detach the wires from the drive motor capacitor. 
PHOTO: Remove the transmission mounting bolts. 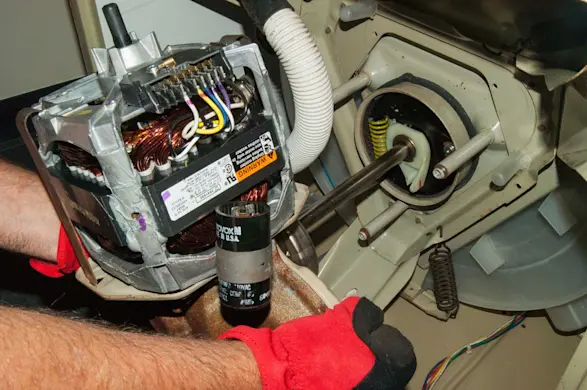
PHOTO: Pull the transmission and drive motor out of the washer. Warning: The transmission and drive motor assembly is heavy. Use a helper to pull the transmission and drive motor assembly out of the washer if necessary.
- 7. Remove the clutch band
Using channel-lock pliers, compress the spring on the clutch band and pull the clutch band up and out of the clutch housing.
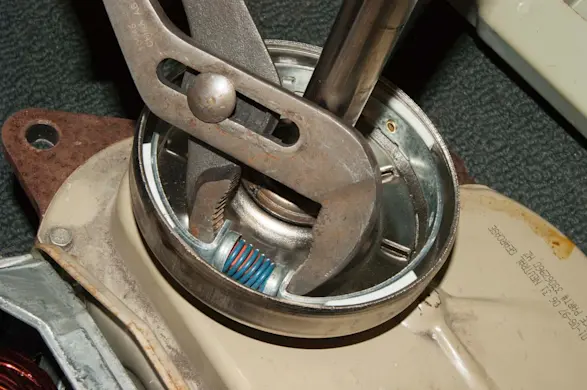
PHOTO: Compress the clutch band spring. 
PHOTO: Pull the clutch band out of the clutch housing.
- 8. Remove the brake cam
Pry the C-clip off of the brake cam.
Pull the brake cam off of the base of the washer.

PHOTO: Pry the C-clip off of the brake cam. 
PHOTO: Remove the C-clip from the brake cam. 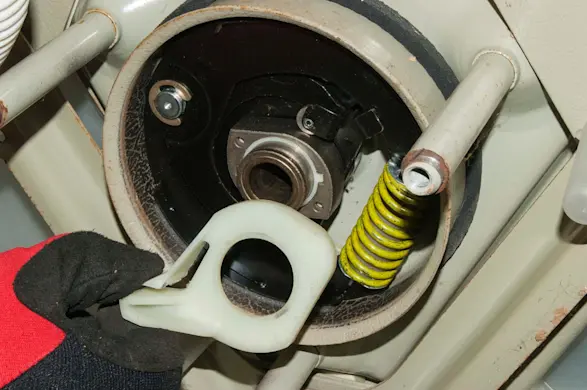
PHOTO: Remove the brake cam. Tip: The clutch band kit includes a new brake cam. Replace the brake cam at the same time that you replace the clutch band.
- 9. Install the new brake cam
Position the new brake cam on the base of the washer and reinstall the C-clip.
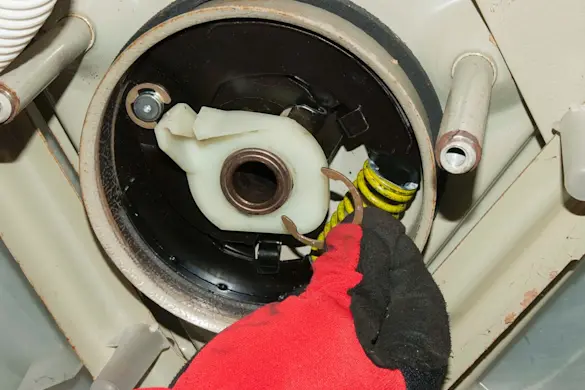
PHOTO: Install the new brake cam.
- 10. Install the new clutch band
Install the spring retainer caps on the new clutch band.
Install the new clutch spring between the spring retainer caps.
Carefully compress the new clutch band using channel-lock pliers and insert the new clutch band in the clutch housing.
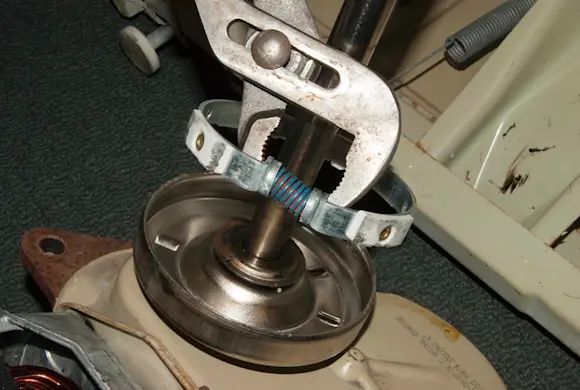
PHOTO: Install the new clutch band. Install the new clutch band.Tip: The clutch band kit includes a short and long clutch band spring. Use the short clutch band spring if you have a compact washer, otherwise use the long spring.
- 11. Reinstall the transmission and drive motor assembly
Position the tab on the brake cam directly opposite of the spring on the clutch housing.
Carefully slide the transmission and motor assembly back into the base of the washer. Adjust the alignment of the clutch as necessary so the transmission is flush with the base of the washer and the mounting holes are lined up.
Reinstall the mounting bolts in the transmission.
Reconnect the wire harness plug on the drive motor.
Reattach the wires to the drive motor capacitor.
Reinstall the wire harness in the plastic retainer clip at the bottom of the transmission.

PHOTO: Reinstall the transmission and drive motor. 
PHOTO: Reinstall the transmission mounting bolts. 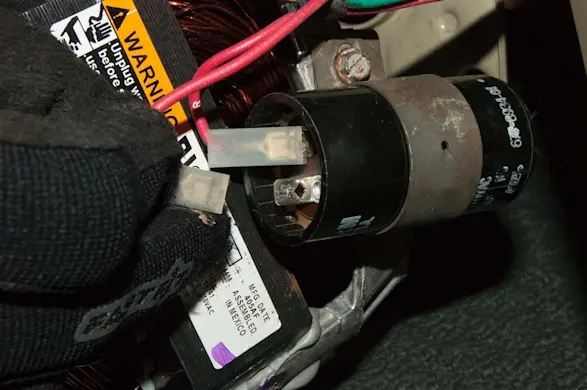
PHOTO: Reattach the wires on the motor capacitor. 
PHOTO: Plug the drive motor wire harness back in.
- 12. Reinstall the drain pump
Reposition the drain pump on the drive motor shaft and secure the drain pump with the retainer clips.
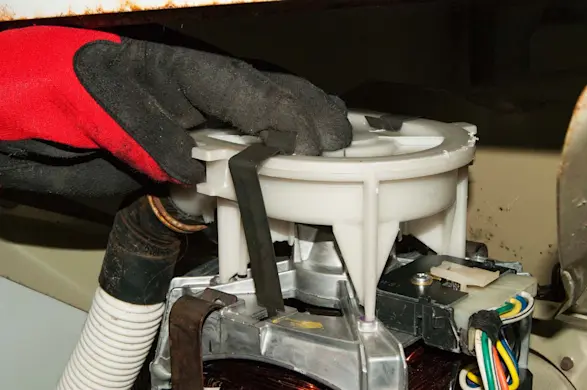
PHOTO: Reinstall the drain pump.
- 13. Tilt the washer upright
Carefully tilt the washer upright.
- 14. Reinstall the hoses
Connect the fill hoses and tighten the connections using channel-lock pliers.
Reconnect the drain hose on the back of the washer.
- 15. Reinstall the agitator
Open the washer lid and push the agitator down on the agitator shaft inside the spin basket.
Reinstall the washer and agitator bolt, and tighten the agitator bolt securely.
Reinstall the dust cap and agitator cap on the agitator.
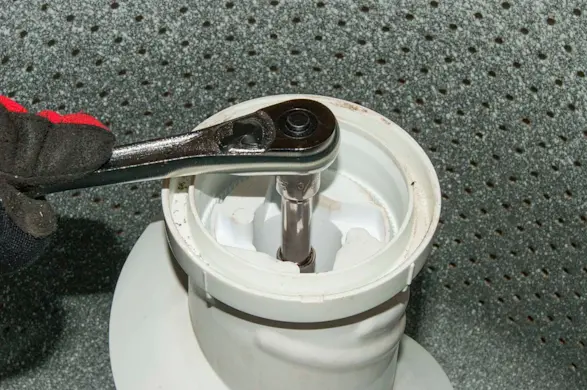
PHOTO: Reinstall the agitator.
- 16. Restore the water and power
Turn on the water supply valves. Tighten the connection if there’s a slight leak.
Plug the washer into the electrical outlet.
Return the washer to its original location.