- Kenmore refrigerator water filters
- Whirlpool refrigerator water filters
- Samsung refrigerator water filters
- GE refrigerator water filters
- LG refrigerator water filters
- Frigidaire refrigerator water filters
- KitchenAid refrigerator water filters
- Maytag refrigerator water filters
- Kenmore Elite refrigerator water filters
- Estate refrigerator water filters
- GE Profile refrigerator water filters
- Amana refrigerator water filters
- Bosch refrigerator water filters
- Dacor refrigerator water filters
- Electrolux refrigerator water filters
Top DIY repair help
View All Repair Categories
Appliances
Lawn & Garden
Power Tools
Home Improvement
Sports & Leisure
Heating & Cooling
Quick Links
How to replace the brake interlock switch on a riding lawn mower
less than a minute readFeb 18Lyle Weischwill
Repair time and Difficulty
30 minutes or less
Tools Required
- Wrench set
- Work gloves
This DIY riding mower repair guide gives step-by-step instructions for replacing the brake interlock switch on a riding lawn mower. When working correctly, this safety switch keeps the engine from starting if your foot isn’t pressing down on the brake or if the parking brake isn’t set. If the switch breaks, it won’t let current reach the starter solenoid coil even though the brake is on, and the engine won’t start. If the solenoid doesn't click when you turn the ignition key, the brake interlock switch is most likely at fault. Watch this lawn tractor troubleshooting video to learn how to test the starting system and brake interlock switch. Replace the brake interlock switch with a manufacturer-approved riding lawn mower part.
You can use the steps in this guide to replace a broken brake interlock switch on common Craftsman, MTD, Troybilt, Husqvarna, Cub Cadet, Snapper and Ariens lawn tractors and riding mowers.
Instructions
- 1. Disconnect the battery
Park the tractor on a level surface, but don't set the parking brake so that you'll be able to remove the brake interlock switch.
Turn the ignition switch off and remove the key.
Wear work gloves to protect your hands.
Lift the seat.
Remove the bolt connecting the negative cable to the battery and tuck the cable away from the battery so it doesn't touch the battery post.
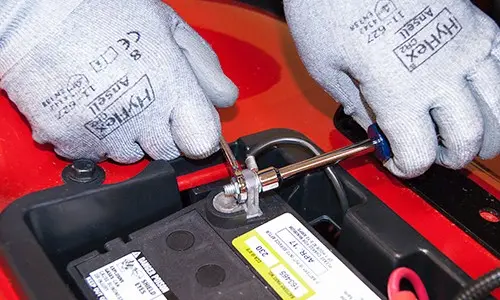
PHOTO: Disconnect the battery.
- 2. Release the steering plate
Lower the mower deck to its lowest position.
Remove the left rear steering plate mounting bolt.
Remove the left front steering plate mounting bolt and the upstop bracket.

PHOTO: Remove the upstop bracket.
- 3. Remove the brake interlock switch
Lift the hood.
Remove the lower dash fastener and pull off the lower dash.
Remove the wire harness from the brake interlock switch.
Squeeze the brake interlock switch mounting tabs and push the switch down to release the switch from the tractor frame.
Push straight down on the brake pedal to lower the steering plate and remove the brake interlock switch.

PHOTO: Remove the brake interlock switch. Tip: Remove the fuel tank and rest it on top of the engine if you need more room.
- 4. Install the new brake interlock switch
Position the new brake interlock switch under the tractor frame.
Push straight down on the brake pedal to lower the steering plate and snap the new brake interlock switch onto the tractor frame.
Connect the wire harness to the new brake interlock switch.
Reinstall the lower dash and secure it with the fastener.
Lower the hood.
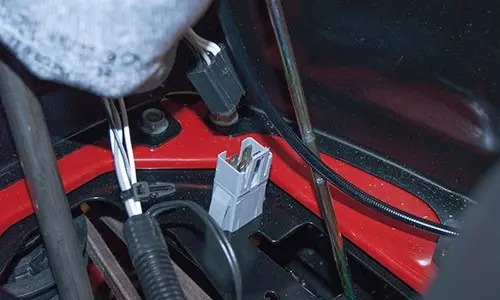
PHOTO: Connect the brake interlock switch wire.
- 5. Reinstall the steering plate
Position the upstop bracket on the frame and reinstall the left front mounting bolt in the steering plate.
Reinstall the left rear mounting bolt in the steering plate.
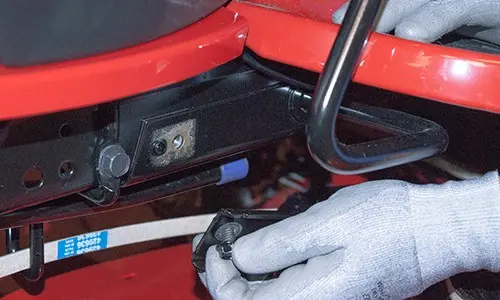
PHOTO: Reinstall the upstop bracket.
- 6. Reconnect the battery
Set the parking brake.
Reconnect the negative cable to the negative battery terminal.
Lower the seat.