- Kenmore refrigerator water filters
- Whirlpool refrigerator water filters
- Samsung refrigerator water filters
- GE refrigerator water filters
- LG refrigerator water filters
- Frigidaire refrigerator water filters
- KitchenAid refrigerator water filters
- Maytag refrigerator water filters
- Kenmore Elite refrigerator water filters
- Estate refrigerator water filters
- GE Profile refrigerator water filters
- Amana refrigerator water filters
- Bosch refrigerator water filters
- Dacor refrigerator water filters
- Electrolux refrigerator water filters
Top DIY repair help
View All Repair Categories
Appliances
Lawn & Garden
Power Tools
Home Improvement
Sports & Leisure
Heating & Cooling
Quick Links
How to replace a water softener venturi
less than a minute readMay 20Lyle Weischwill
Repair time and Difficulty
15 minutes or less
Tools Required
- Work gloves
This DIY repair guide explains how to replace the venturi valve in a water softener. During the regeneration cycle, the venturi draws brine into the resin tank. A broken or damaged venturi can't move brine into the resin tank, and the water softener can't soften the water. Replace a damaged or broken venturi with manufacturer-approved replacement part.
Follow these steps to replace the venturi in Kenmore, Whirlpool, and GE water softeners.
Instructions
- 1. Disconnect electrical power
Unplug the water softener to disconnect power.
- 2. Bypass the water supply
Push the water valve into the bypass position.
- 3. Remove the top cover
Open the lid and release the 2 front clips on the cover.
Lift the front of the cover up and push it back to release the rear tabs.
Pull the top cover off.

PHOTO: Open the lid. 
PHOTO: Release the front clips. 
PHOTO: Remove the top cover.
- 4. Remove the venturi
Hold the venturi housing and twist the cap off of the venturi assembly.
Pull the filter screen out of the housing. The gasket and spacer comes out with the screen.
Pull the venturi out of the housing.

PHOTO: Unscrew the venturi cap. 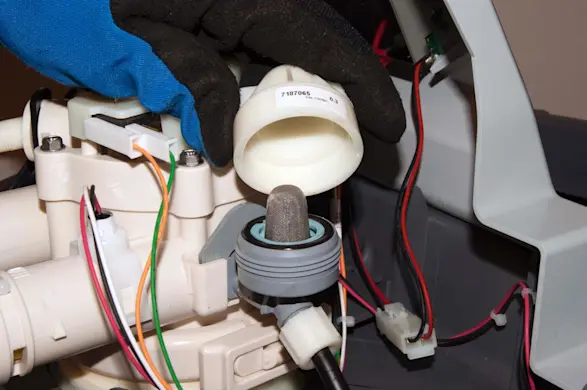
PHOTO: Remove the venturi cap. 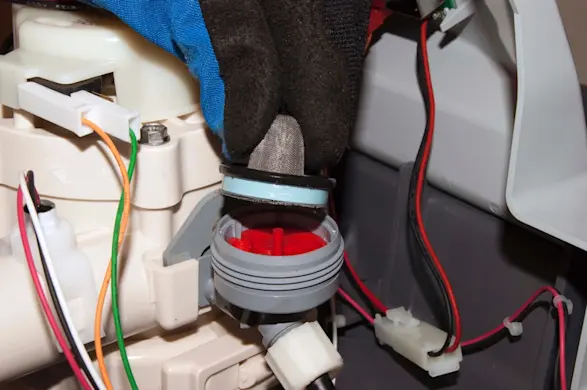
PHOTO: Pull out the filter screen. 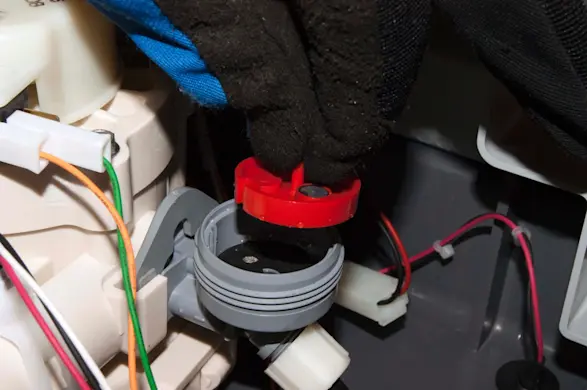
PHOTO: Remove the venturi.
- 5. Clean the housing and screen
Clean the housing, screen, spacer and gasket.
- 6. Install the new venturi
Push the new venturi into the housing.
Lubricate the gasket with petroleum jelly.
Push the screen, spacer and gasket into the housing.
Reinstall the venturi cap.
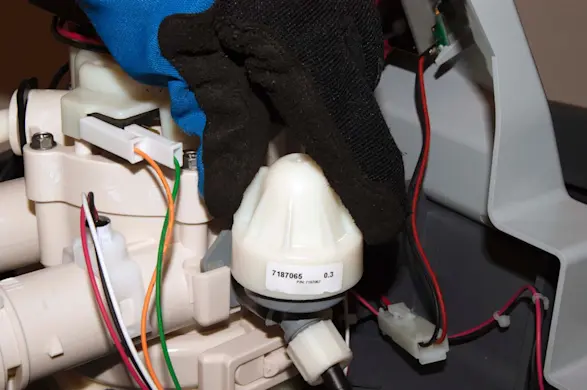
PHOTO: Reinstall the venturi cap.
- 7. Reinstall the top cover
Position the back of the top cover into the rear tabs and then push the front of the top cover down into the front locking clips.
Close the lid.

PHOTO: Reinstall the top cover.
- 8. Restore power
Plug the power cord back in.