- Kenmore refrigerator water filters
- Whirlpool refrigerator water filters
- Samsung refrigerator water filters
- GE refrigerator water filters
- LG refrigerator water filters
- Frigidaire refrigerator water filters
- KitchenAid refrigerator water filters
- Maytag refrigerator water filters
- Kenmore Elite refrigerator water filters
- Estate refrigerator water filters
- GE Profile refrigerator water filters
- Amana refrigerator water filters
- Bosch refrigerator water filters
- Dacor refrigerator water filters
- Electrolux refrigerator water filters
Top DIY repair help
View All Repair Categories
Appliances
Lawn & Garden
Power Tools
Home Improvement
Sports & Leisure
Heating & Cooling
Quick Links
How to replace a water inlet valve on a vertical modular top-load washer
less than a minute readMay 20Lyle Weischwill
Repair time and Difficulty
30 minutes or less
Tools Required
- Channel lock pliers. 1/4" nut driver. Putty knife. Work gloves. Towel
This step-by-step washer repair guide shows how to replace the water inlet valve assembly on a vertical modular top-load washer. Replace the inlet water valve with a manufacturer-approved washer part if the washing machine doesn't fill or if it fills with water even when the washer is unplugged.
This procedure is for Kenmore, Whirlpool, Maytag and Amana vertical modular top-load washers.
We also have instructions for replacing the water inlet valve on a front-load washer and a replacing the water inlet valve on a direct-drive top-load washer.
Instructions
- 1. Shut off the electricity and water
Unplug the power cord from the wall outlet. Turn off the water supply valves for the washer.
Wear work gloves.
Enlist an assistant to help pull the washer away from the wall.
- 2. Disconnect the fill hoses
Move the washer so can you remove the fill hoses from the back of the washer.
Mark which fill hose goes to the hot connector and which goes to the cold before removing.
Using channel lock pliers, carefully loosen and remove both hoses. Expect some water to pour out.
Tip: Wipe up water spills with a towel to prevent slipping.
- 3. Release the control console
Use a 1/4" nut driver to remove the hex head screws from the back of the control console.
Push the control panel back and slide a putty knife under one corner.
Lift the panel and push with the putty knife blade to release the retaining clip.
Repeat the procedure on the opposite corner.
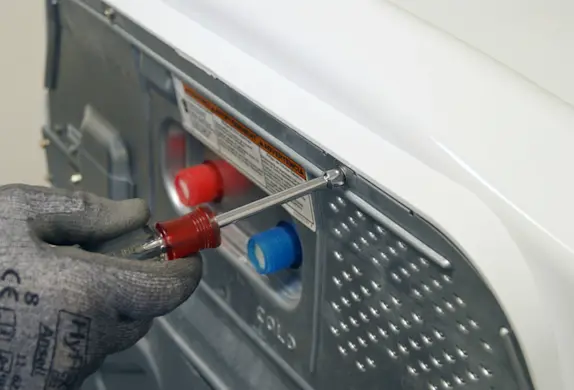
PHOTO: Remove the screws from the back panel of the console. 
PHOTO: Slide a putty knife under one corner of the control panel console. 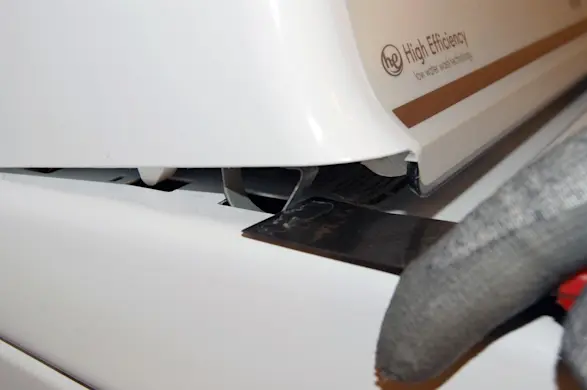
PHOTO: Release the clips that hold the console in place.
- 4. Remove the water inlet valve's mounting screws
Tip the control console forward and rest it on the top of the washer.
Locate the water inlet valve assembly and remove the 2 hex-head screws that hold the valve.
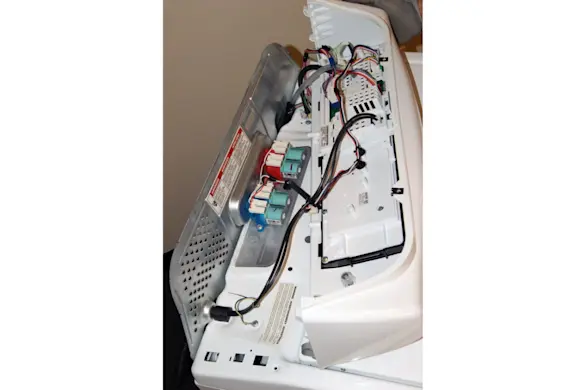
PHOTO: Tip the console forward and rest it on the top of the washer. 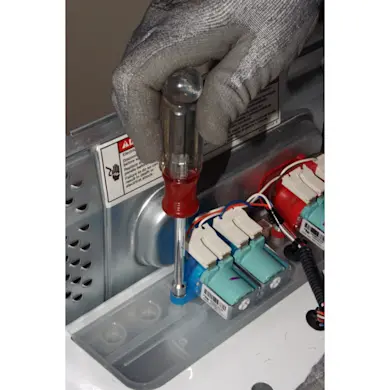
PHOTO: Remove the water inlet valve mounting screws.
- 5. Detach the wire harness connections
Take a digital picture of the wiring connections or label them so you can reattach them correctly.
Pull straight back on the wire harness connectors to detach them from the solenoid coils.
- 6. Remove the water valve
Pull the water valve out of the washer. Set it aside for disposal.
Tip: This style of washer doesn't have hoses connected to the water inlet valve. If your model has hoses, disconnect them by releasing the spring clamps.
- 7. Install the new water valve
Push the new water valve into position .
Checking your photo or labels for correct placement, push each wire connector fully onto the correct connector spade.
Reinstall the mounting screws. To avoid overtightening, turn each screw with the nut driver until it stops, then give the screw one firm twist to snug it in place.
- 8. Secure the control panel
Position the console and snap the mounting clips into place. Insert the screws into the back panel and tighten firmly.
- 9. Reinstall the fill hoses
Thread the fill hoses onto the connections on the back of the washer, checking that hot and cold lines are placed properly.
Tighten the connections firmly using channel lock pliers; don't overtighten, which could crack the plastic on the inlet valve.
- 10. Restore the water and power
Turn on the water supply valves and check for leaks at the wall and the washer. Tighten the connection if you find a slight leak.
Plug the washer into the electrical outlet. Return the washer to its original location.