- Kenmore refrigerator water filters
- Whirlpool refrigerator water filters
- Samsung refrigerator water filters
- GE refrigerator water filters
- LG refrigerator water filters
- Frigidaire refrigerator water filters
- KitchenAid refrigerator water filters
- Maytag refrigerator water filters
- Kenmore Elite refrigerator water filters
- Estate refrigerator water filters
- GE Profile refrigerator water filters
- Amana refrigerator water filters
- Bosch refrigerator water filters
- Dacor refrigerator water filters
- Electrolux refrigerator water filters
Top DIY repair help
View All Repair Categories
Appliances
Lawn & Garden
Power Tools
Home Improvement
Sports & Leisure
Heating & Cooling
Quick Links
How to install a pressure washer check valve kit
less than a minute readMay 20Lyle Weischwill
Repair time and Difficulty
120 minutes or less
Tools Required
- Allen head bit set and ratchet
- Sheet metal screw (for removing the check valves)
- Thread-locking adhesive
- Mechanic's pick
- Hose clamp for chemical injection tube
- Torque wrench (optional)
- Work gloves

Pressure washer check valves let enough water flow through the pump and manifold to pressurize the water at the nozzle. If the pressure washer check valves are damaged, the pump won’t build pressure. Air in the inlet water supply can damage the pressure washer check valves, as can chemical residue left in the pump. Replace damaged check valves by installing a manufacturer-approved pressure washer check valve kit, following the steps in this repair guide.
Use this guide to install the pressure washer check valve kit in Craftsman, Generac, Briggs & Stratton, Snapper, Husqvarna and Troybilt pressure models.
Instructions
- 1. Disconnect the spark plug
Disconnect the spark plug wire from the spark plug.
- 2. Prepare the pressure washer for service
Remove the gas cap.
To prevent fuel from leaking from the tank, place a plastic bag over the mouth of the tank and then reinstall the gas cap.
Remove the inlet water hose and the outlet nozzle hose connection from the pump.
- 3. Remove the caps from the manifold check valves
Use a wrench to remove the caps from the check valves on the side of the pump manifold.

PHOTO: Loosen the manifold check valve caps. 
PHOTO: Remove the manifold check valve caps. Tip: Be prepared for water to spill from the manifold when you remove the check valve caps.
- 4. Remove the manifold check valves
Insert a sheet metal screw into the plastic body of the check valve and screw it down so it grips the check valve body, and then pull the screw and check valve body out of the pump.
Use a mechanic’s pick to remove any residue left by the valve body or seals out of the pump body.
Repeat the process to remove all the check valves.

PHOTO: Insert a screw in the check valve body. 
PHOTO: Pull the check valve out.
- 5. Install the new manifold check valves
Insert the new check valves into the body of the pump.
Press the check valves down so that they seat properly.
- 6. Reinstall the manifold check valve caps
Place a small amount of thread-locking adhesive on the check valve cap threads.
Reinstall the check valve caps and tighten them securely.
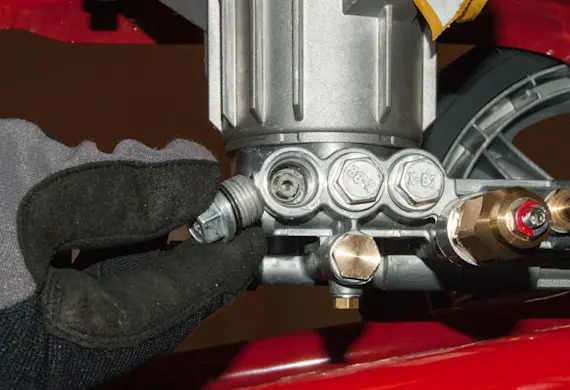
PHOTO: Reinstall the manifold check valve caps. Tip: Ensure that the O-rings are in place and seat properly when reinstalling the check valve caps.
- 7. Remove the pump manifold
If fluid is in the chemical injection tube, clamp the tube off.
Pull the chemical injection tube off the chemical injection inlet valve on the pump manifold.
Tip the pressure washer to access the bottom of the pump.
Remove the 3 Allen-head screws that secure the manifold to the pump.
Pull the manifold off of the pump.
Set the manifold down on a stable work surface.

PHOTO: Clamp off the chemical injection hose. 
PHOTO: Pull the chemical injection hose off of the valve. 
PHOTO: Remove the manifold screws. 
PHOTO: Remove the manifold from the pump. Tip: Be prepared for some water to spill out of the manifold when removed.
- 8. Remove the check valves
Remove the water seals from the top of the check valves.
Insert a sheet metal screw into the plastic body of the check valve and screw it down so that it grips the check valve body.
Pull the screw and check valve body out of the pump.
Use a mechanic’s pick to remove any residue left by the valve body or seals out of the pump body.
Repeat the process to remove all of the check valves.

PHOTO: Remove the water seals. 
PHOTO: Insert a screw into the check valve body. 
PHOTO: Remove the check valve from the pump.
- 9. Install the new check valves
Insert the new check valves into the body of the pump.
Press the check valves down so that they seat properly.
Install the water seals at the top of the check valves.

PHOTO: Install the water seals.
- 10. Reinstall the pump manifold
Position the manifold on the pump and replace the mounting screws.
Tilt the pressure washer upright.
Reinstall the chemical injection tube on the chemical injection inlet valve on the manifold. Remove the clamp from the chemical injection tube.

PHOTO: Reinstall the manifold mounting screws. Tip: If you have a torque wrench, torque the screws to 18 to 20 ft. lbs. of torque.
- 11. Restore the pressure washer to its operating condition
Remove the gas cap, the plastic bag from the mouth of the gas tank and reinstall the gas cap.
Reattach the spark plug wire.
- 12. Test the pressure washer operation
Run the pressure washer and check for leaks. Check for proper pressure at the nozzle.