- Kenmore refrigerator water filters
- Whirlpool refrigerator water filters
- Samsung refrigerator water filters
- GE refrigerator water filters
- LG refrigerator water filters
- Frigidaire refrigerator water filters
- KitchenAid refrigerator water filters
- Maytag refrigerator water filters
- Kenmore Elite refrigerator water filters
- Estate refrigerator water filters
- GE Profile refrigerator water filters
- Amana refrigerator water filters
- Bosch refrigerator water filters
- Dacor refrigerator water filters
- Electrolux refrigerator water filters
Top DIY repair help
View All Repair Categories
Appliances
Lawn & Garden
Power Tools
Home Improvement
Sports & Leisure
Heating & Cooling
Quick Links
How to replace a riding lawn mower carburetor
less than a minute readFeb 18Lyle Weischwill
Repair time and Difficulty
45 minutes or less
Tools Required
- Wrench set
- Nut driver set
- Pliers
- Hose pinch-off pliers
- Shop rag
- Work gloves
This DIY riding mower repair guide gives you step-by-step instructions for replacing the carburetor in your riding lawn mower or garden tractor. The carburetor blends air and fuel to produce a combustible mixture for the engine cylinder. If the carburetor has water damage or is clogged with dirt, debris or gummed-up gasoline, the engine might surge or be hard to start. Replace a damaged or clogged riding lawn mower carburetor with a manufacturer-approved riding lawn mower part.
Use this repair guide and video to replace the riding lawn mower carburetor on Briggs & Stratton engines powering Craftsman, Troybilt, MTD, Husqvarna, Murray, Snapper, Weed Eater, Toro and Ariens lawn tractors and riding mowers.
If the carburetor isn't beyond repair, you can rebuild it instead of replacing it. See How to Rebuild a Carburetor in a Riding Lawn Mower.
Instructions
- 1. Disconnect the battery
Park the tractor on a level surface in a well-ventilated area and set the parking brake.
Turn the ignition switch off and remove the key.
Let the engine cool.
Wear work gloves to protect your hands.
Lift the seat.
Remove the bolt connecting the negative cable to the battery and tuck the cable away from the battery so it doesn't touch the battery post.

PHOTO: Disconnect the negative battery cable.
- 2. Remove the engine blower housing
Lift the tractor hood.
Remove the air duct mounting screws and pull off the air duct.
Turn each air filter cover retaining knob counterclockwise and pull off the air filter cover.
Remove the air filter.
Remove the air filter housing screw.
Remove the front and rear blower housing mounting bolts and lift off the blower housing.
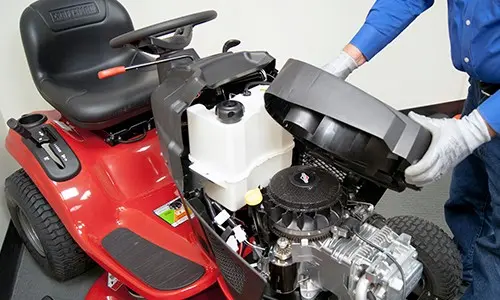
PHOTO: Lift off the blower housing. Tip: Remove the hood to gain more room to work.
- 3. Disconnect the fuel line
Clamp off the fuel line with hose pinch-off pliers.
Place a shop rag under the carburetor end of the fuel line to catch drips.
Release the clamp that attaches the fuel line to the carburetor and pull the fuel line off the carburetor.
Wipe up any spilled fuel.

PHOTO: Clamp off the fuel line with hose pinch-off pliers.
- 4. Remove the carburetor
Remove the air intake mounting nuts.
Detach the breather tube and remove the air intake.
Disconnect the wire from the fuel solenoid.
Take a digital photograph of the carburetor linkage connections to document their location for reassembly.
Remove the carburetor mounting studs.
Disconnect the throttle rod and the throttle spring.
Disconnect the choke rod.
Pull off the carburetor.
Remove the intake gasket on the engine and clean the gasket mounting surface.

PHOTO: Release the carburetor from the engine.
- 5. Install the new carburetor
Position the new carburetor near the engine and reconnect the choke rod.
Connect the throttle rod and spring.
Install the new intake gasket on the engine.
Attach the carburetor on the engine with the mounting studs. Tighten the studs firmly.
Connect the fuel solenoid wire.
Attach the breather tube to the air intake and reconnect the air intake to the carburetor.
Install the air intake mounting nuts.

PHOTO: Install the new carburetor.
- 6. Connect the fuel line
Attach the fuel line to the carburetor.
Remove the hose pinch-off pliers from the fuel line.

PHOTO: Attach the fuel line to the new carburetor.
- 7. Reinstall the engine blower housing
Position the blower housing on the engine and align the air diverter in the housing.
Install the blower housing mounting bolts.
Install the air filter housing screw.
Install the air filter and air filter cover.
Install the air duct and attach it with the mounting screws.
Lower the tractor hood.

PHOTO: Reinstall the blower housing.
- 8. Reconnect the battery
Reconnect the negative cable to the negative battery terminal.
Lower the seat.