- Kenmore refrigerator water filters
- Whirlpool refrigerator water filters
- Samsung refrigerator water filters
- GE refrigerator water filters
- LG refrigerator water filters
- Frigidaire refrigerator water filters
- KitchenAid refrigerator water filters
- Maytag refrigerator water filters
- Kenmore Elite refrigerator water filters
- Estate refrigerator water filters
- GE Profile refrigerator water filters
- Amana refrigerator water filters
- Bosch refrigerator water filters
- Dacor refrigerator water filters
- Electrolux refrigerator water filters
Top DIY repair help
View All Repair Categories
Appliances
Lawn & Garden
Power Tools
Home Improvement
Sports & Leisure
Heating & Cooling
Quick Links
How to replace a riding lawn mower ignition coil
less than a minute readFeb 18Lyle Weischwill
Repair time and Difficulty
30 minutes or less
Tools Required
- Wrench set
- Feeler gauges
- Work gloves
This DIY repair guide explains how to replace the ignition coil on a riding lawn mower. The ignition coil produces the energy that creates the spark at the spark plug. Use a spark plug tester to check for spark when you turn the key. If not, it's likely the ignition coil isn't working. Replace a failed ignition coil using a manufacturer-approved riding lawn mower part.
Use these steps to replace the ignition coil on Briggs & Stratton engines that power Craftsman, Husqvarna, Toro, MTD, Troybilt, Murray, John Deere, Snapper, Ariens, Poulan and Weed Eater riding mowers and lawn tractors.
Instructions
- 1. Disconnect the battery
Park the tractor on a level surface and set the parking brake.
Turn the ignition switch off and remove the key.
Wear work gloves to protect your hands.
Lift the seat.
Remove the bolt connecting the negative cable to the battery and tuck the cable away from the battery so it doesn't touch the battery post.

PHOTO: Disconnect the negative battery cable.
- 2. Remove the engine blower housing
Lift the tractor hood.
Remove the air duct mounting screws and pull off the air duct.
Turn each air filter cover retaining knob counterclockwise and pull off the air filter cover.
Remove the air filter.
Remove the air filter housing screw.
Remove the front and rear blower housing mounting bolts and lift off the blower housing.
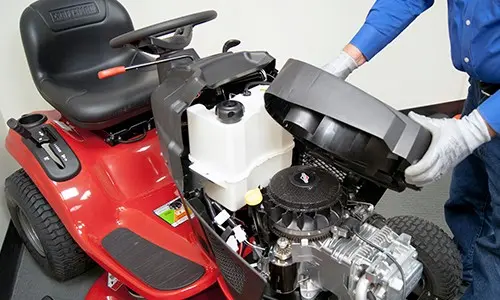
PHOTO: Lift off the blower housing.
- 3. Remove the old ignition coil
Disconnect the spark plug wire and pull it out of the engine bracket.
Turn the flywheel so the magnet points away from the ignition coil.
Remove the ignition coil mounting screws.
Lift the ignition coil and disconnect the kill wire.
Remove the ignition coil.

PHOTO: Disconnect the ground wire.
- 4. Install the new ignition coil
Transfer the spark plug boot from the old ignition coil to the new one.
Connect the kill wire to the new ignition coil.
Position the new ignition coil on the engine and loosely install the 2 mounting screws.
Pull the coil away from the flywheel and tighten the mounting screws.
Turn the flywheel so the magnet aligns with the ignition coil.

PHOTO: Install the new ignition coil.
- 5. Set the ignition coil air gap
Insert the feeler gauge. The correct size for most engines is 0.011-inches.
While holding the feeler gauge in position, loosen the mounting screws to allow the magnet to pull the coil to it.
Tighten the mounting screws.
Turn the flywheel by hand and remove the feeler gauge.
Route the spark plug wire through the engine bracket.
Connect the wire to the spark plug.

PHOTO: Set the ignition coil air gap.
- 6. Reinstall the engine blower housing
Position the blower housing on the engine and align the air diverter in the housing.
Install the blower housing mounting bolts.
Install the air filter housing screw.
Install the air filter and air filter cover.
Install the air duct and attach it with the mounting screws.
Lower the tractor hood.

PHOTO: Reinstall the blower housing.
- 7. Reconnect the battery
Reconnect the negative cable to the negative battery terminal.
Lower the seat.