CONFIRM THE PART FITS
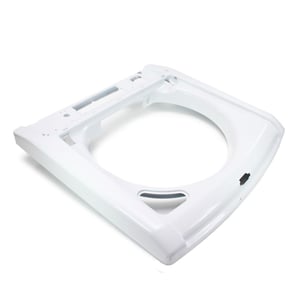
Washer Top Panel (replaces MCK62185501) MCK67395501
Part #MCK67395501
Part Information
This top panel (part number MCK67395501) is for washers.
Top panel MCK67395501 covers the top of the washer cabinet.
Unplug the washer and shut off the washer supply before installing this part. Wear work gloves to protect your hands.
Frequently Used Together
- $31.57 |14% OFF Phone Price : $36.57
- $26.40 |16% OFF Phone Price : $31.40
- $162.98 |6% OFF Phone Price : $172.98
- $38.73 |11% OFF Phone Price : $43.73
- $26.40 |16% OFF Phone Price : $31.40
- $113.33 |8% OFF Phone Price : $123.33
- $13.56 |13% OFF Phone Price : $15.56
- $69.18 |7% OFF Phone Price : $74.18
- $57.55 |8% OFF Phone Price : $62.55
- $22.73 |18% OFF Phone Price : $27.73
Top models using the same part
| Model Name | Model Number | Diagram Name |
|---|---|---|
| Model #WT5070CW/00 LG washer | WT5070CW/00 | Top cover assembly parts |
| Model #WT4870CW LG washer | WT4870CW | Control panel assembly parats |
| Model #WT6001HW LG washer | WT6001HW | Top cover assembly parts |
| Model #WT5170HW LG washer | WT5170HW | Top cover assembly parts |
| Model #79629472001 Kenmore Elite washer | 79629472001 | All parts |
| Model #WT5101HW/00 LG washer | WT5101HW/00 | Exploded view of top cover assembly |
| Model #WT5001CW/00 LG washer | WT5001CW/00 | Top cover assembly parts |
| Model #79631522210 Kenmore Elite washer | 79631522210 | Top cover assembly parts |
| Model #79629002010 Kenmore Elite washer | 79629002010 | Cover assembly parts |
| Model #WT4970CW LG washer | WT4970CW | Top cover assembly parts |
Reviews
Looks good after some persuasion.
It was bent out of shape during shipping, so I had to use a rubber mallet and wood blocks to get it to match. Otherwise, it is better coated than the original, so I hope it won't rust out like the original.
Chip, Provo, Utah
Did you find this review helpful?
- Ease of Installation
- Moderate
- Duration of Installation
- More than 2 hours
Yes, I would recommend this to a friend
DIY people.
Perfect replacement part. Quick delivery. I saved a lot of compared to replacing the washer.


Donminator, Bucks County, PA.
Did you find this review helpful?
- Ease of Installation
- Moderate
- Duration of Installation
- More than 2 hours
Yes, I would recommend this to a friend
Part received
No hardware included. I was replacing a rusty out part. Worked as expected.
Kadie, North Texas
Did you find this review helpful?
- Ease of Installation
- Moderate
- Duration of Installation
- More than 2 hours
Yes, I would recommend this to a friend
Not too Difficult But Clear Some Time
The first thing I did with my new Washer Top Panel - tape off/cover the topside. Spray painted the under-side (white), added a clearcoat. This, I hope, will provide better rust protection and longer life.... As with all things electrical: U N P L U G is the first thing you do. Move the washer to give yourself some space. Plan for some water on the floor - have a towel or two at the ready. Mark the water supplies with a Sharpie before removal - acts as a rotation guide when they go back on (no leaks). Leave the washer discharge hose attached if you can - just be careful not to damage it. Check Youtube for top panel removal https://youtu.be/qa6_ViM3xug?t=256. Those retaining clips were tough - use a plastic 1" scraper to avoid scratching surfaces. The video is not specific to replacing the the Washer Top Panel but does show a few of the needed disassembly's. Once the lid is free from those clippy clips, move the the rear and start on the control hood. Keep the screws in groups for proper re-assembly. All the wires need to be disconnected from the circuit board and other locations. The sockets are unique and "locationally" maintained by the wire bundle making replugging error proof. But still, as others have noted; take pictures or video and/or use a sharpie to mark stuff. Some of the sockets are tight so take your time - may need a pair of plyers for better grip (be careful not to damage). Did I mention take pictures or video and/or use a sharpie to mark stuff? This is important for proper routing and attachment points: wires & hoses. The rest of disassembly is pretty straight forward - just keep track of screws. The last thing I did after the Panel was completely removed from the base was remove the glass lid - interesting how that works..... Extra attention and caution here - it's glass and it's expensive - don't break it!! Now at this time you may want to do a little cleanup around the tub - have a shop vac ready...... Grab your new Top Panel and reverse course - take your time and refer to all those Pics/vids! Recommended (insurance policy) just-in-case spares (plastic parts): > Washer Tub Fill Nozzle AGB72932402 > Washer Bleach Dispenser ACZ72910401 (tub) > Washer Bleach Dispenser MBL62061402 (collar) Especially important if the rust is at one of these locations - they may break with removal. Any hoses or hose clamps need to be replaced - head to you local Hardware store. For less than 200 beans; like new washer and another 8 years of service (at least, I hope). Consider refurbishing the rusted top for a later swap...... If you did it once, you can do it again. The other repair reviews are spot-on, check them out as well. Good Luck!!
tk_tabler, W. Des Moines, IA
Did you find this review helpful?
- Ease of Installation
- Easy
- Duration of Installation
- More than 2 hours
Yes, I would recommend this to a friend
Easy install
Took our time installing it looks good always take your time
Redskydiver72, Southbridge ma
Did you find this review helpful?
- Ease of Installation
- Very Easy
- Duration of Installation
- 30 minutes - 1 hour
Yes, I would recommend this to a friend
It's everything you'd expect
The replacement is quite involved. Take plenty of pictures. In the end it was worth the savings vs buying a new washer!
Brian321, Boston
Did you find this review helpful?
- Ease of Installation
- Difficult
- Duration of Installation
- More than 2 hours
Yes, I would recommend this to a friend
Part does not fit the bottom of the washer
This appears to be a redesigned top where as the original top was discontinued. So the parts that are defined to attach the top to the washer bottom frame cannot be attached to the bottom frame as there are no holes cut into the frame to receive the parts. Without the ability to attach these parts, the new washer top panel cannot be installed. Had two individual appliance repair companies out each not being able to make the installation. Very disappointing.
NotHappyPappy, Tallahassee, FL
Did you find this review helpful?
- Ease of Installation
- Very Difficult
- Duration of Installation
- More than 2 hours
Yes, I would recommend this to a friend
OEM perfection
Look just like my original and would have fixed my washer. I did have to return it because the rest of the washer was as rusted as the top I was going to replace.
Jeff, Baltimore
Did you find this review helpful?
- Ease of Installation
- Very Easy
- Duration of Installation
- Less than 30 minutes
Yes, I would recommend this to a friend
