- Kenmore refrigerator water filters
- Whirlpool refrigerator water filters
- Samsung refrigerator water filters
- GE refrigerator water filters
- LG refrigerator water filters
- Frigidaire refrigerator water filters
- KitchenAid refrigerator water filters
- Maytag refrigerator water filters
- Kenmore Elite refrigerator water filters
- Estate refrigerator water filters
- GE Profile refrigerator water filters
- Amana refrigerator water filters
- Bosch refrigerator water filters
- Dacor refrigerator water filters
- Electrolux refrigerator water filters
Top DIY repair help
View All Repair Categories
Appliances
Lawn & Garden
Power Tools
Home Improvement
Sports & Leisure
Heating & Cooling
Quick Links
How to replace a door gasket in a French-door refrigerator
less than a minute readMar 08Lyle Weischwill
Repair time and Difficulty
15 minutes or less
Tools Required
- Hair dryer or heat gun
- Petroleum jelly
- Phillips screwdriver
This DIY repair guide and video shows you how to replace a refrigerator door gasket that presses into a groove or track around the edge of the door on a French-door refrigerator.
The door gasket, often called a door seal, seals the gap around the door to keep the cold air in and the warm air out. Signs that the refrigerator gasket needs to be replaced include excessive frost buildup and reduced cooling. Replace the gasket if it’s worn, cracked or torn.
This repair procedure works for replacing refrigerator and freezer door gaskets in many Kenmore, Frigidaire, LG and Samsung refrigerators.
If you have a different type of refrigerator, check out these repair guides and videos:
How to replace a foamed-in-place door gasket in a side-by-side refrigerator
How to replace a press-in door gasket in a side-by-side refrigerator
Instructions
- 1. Remove creases in the new door gasket
To smooth creases and folds in the door gasket, soak it in warm water and dry with a towel. Or carefully warm it with a hair dryer or heat gun on a low setting.
Be careful not to melt the gasket.
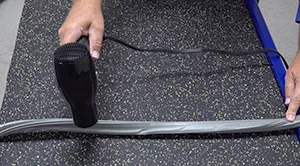
PHOTO: Remove creases in the new door gasket. Heating some door gaskets causes them to expand. Allow the gasket to cool before installation if it seems too big for the door after heating.
- 2. Remove the refrigerator door gasket
First, unplug the refrigerator or shut off the circuit breaker for the refrigerator.
Pull the gasket out of the track. Starting at one of the corners is usually easiest. You may need to tug the gasket firmly to get the removal process started. If you have a difficult time starting at a corner, pull the gasket out starting in a spot halfway down the side of the door.
Once you get the removal process started, you should be able to pull the gasket out fairly easily.
If you're replacing the gasket on the door with the flipper mullion and the mullion blocks door gasket removal, remove the flipper mullion.
Remove the mounting screws from the center mullion bracket.
Lift the mullion up slightly and release it from its top and bottom mounting brackets.
Pull the mullion out slightly and disconnect its wire harness.
Set the flipper mullion aside while you replace the door gasket.
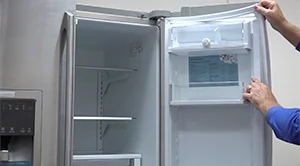
PHOTO: Remove the refrigerator door gasket. 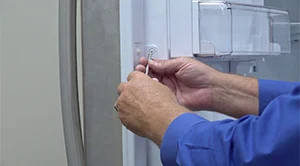
PHOTO: Remove the flipper mullion (if necessary).
- 3. Clean the track in the refrigerator door
Using a wet cloth, wipe any spills from inside and around the track.
Cleaning the track will ensure that the new gasket fits easily in the track and seals the door properly.
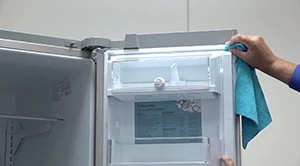
PHOTO: Clean the door gasket track.
- 4. Install the new gasket
Starting at the top of the door, work the new door gasket into the track. Work your way down both sides of the door and across the bottom.
Check for loose spots and adjust the gasket as needed for a proper fit.
Spread a thin coat of petroleum jelly along the sealing surface of the door gasket to help the new gasket seal properly.
Reinstall the flipper mullion if you pulled it off to remove the gasket.
Close the door and check the fit. The door gasket should fit tightly against the cabinet and door with no gaps showing. Smooth out any creases that cause gaps. Push the door gasket further into the track to eliminate gaps.
Restore power to the refrigerator.
Use the same procedure to replace the freezer door gasket.
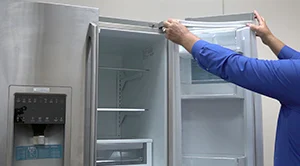
PHOTO: Install the new door gasket.