- Kenmore refrigerator water filters
- Whirlpool refrigerator water filters
- Samsung refrigerator water filters
- GE refrigerator water filters
- LG refrigerator water filters
- Frigidaire refrigerator water filters
- KitchenAid refrigerator water filters
- Maytag refrigerator water filters
- Kenmore Elite refrigerator water filters
- Estate refrigerator water filters
- GE Profile refrigerator water filters
- Amana refrigerator water filters
- Bosch refrigerator water filters
- Dacor refrigerator water filters
- Electrolux refrigerator water filters
Top DIY repair help
View All Repair Categories
Appliances
Lawn & Garden
Power Tools
Home Improvement
Sports & Leisure
Heating & Cooling
Quick Links
How to replace a defrost sensor in a side-by-side refrigerator
less than a minute readOct 29Lyle Weischwill
Repair time and Difficulty
45 minutes or less
Tools Required
- 1/4-inch nut driver
- Screwdriver
- Work gloves
- Wire stripper

This refrigerator repair guide gives step-by-step instructions for replacing the defrost sensor in a side-by-side refrigerator. The defrost sensor—also called a defrost bi-metal thermostat—shuts off the defrost heater if the heater gets hot enough to damage the evaporator.
If the refrigerator defrost sensor fails:
The heating element doesn't turn on.
Frost builds up on the evaporator and clogs air passages through the evaporator.
Cooling air fails to reach the refrigerator compartment resulting in warm temperatures in the refrigerator.
If your refrigerator defrost sensor isn't allowing the defrost heater to turn on, replace the defrost sensor with the manufacturer-approved replacement part.
Use this repair procedure on Kenmore, Whirlpool, KitchenAid, Maytag, Amana, GE, Frigidaire, Electrolux, Bosch and Samsung side-by-side refrigerators.
Instructions
- 1. Disconnect the electrical power
Safely store any food that could deteriorate while the refrigerator is shut off. Then unplug the refrigerator or shut off the circuit breaker for the refrigerator.
- 2. Remove shelf supports from the freezer
Remove the shelves and baskets from the freezer compartment. Remove the screws from the shelf supports on the right interior wall of the freezer and pull the supports out.

PHOTO: Remove the freezer basket. 
PHOTO: Remove the freezer shelf supports. Tip: If necessary, refer to your owner's manual for guidance in removing baskets and shelves from the freezer.
- 3. Remove the back panel
Remove the mounting screws that secure the inside back panel of the freezer. Pull the bottom of the panel outward slightly to release it.
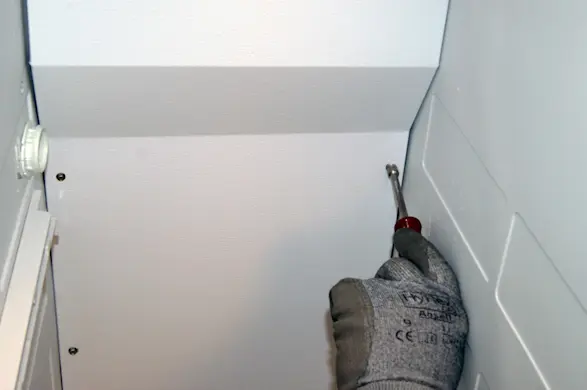
PHOTO: Remove the evaporator panel screws. 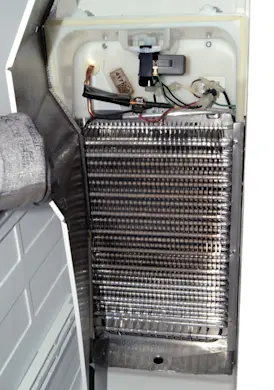
PHOTO: Remove the evaporator panel.
- 4. Unclamp the defrost sensor from the evaporator
Note the positioning of the defrost sensor. Release the metal clip that holds the defrost sensor to the refrigerant line located above the evaporator.

PHOTO: Release the defrost sensor clip. Tip: Take a digital photo of the defrost sensor to help you position the replacement correctly.
- 5. Remove the defrost sensor
Cut the brown and pink wires near the defrost sensor and pull the defrost sensor out of the freezer.
- 6. Install the new defrost sensor
Use a wire stripper to remove the insulation from the ends of the pink wire and brown wire on the new sensor. Strip the ends of the pink wire and brown wire in the harness above the evaporator. Use wire nuts to connect the matching wires.
To keep the connection dry, squeeze silicone sealant into the open ends of the wire nuts.
- 7. Clip the defrost sensor onto the refrigerant line
Clip the new defrost sensor onto the refrigerant line above the evaporator. Position it in the same manner as the original defrost sensor.
Without disturbing the sealant on the wire nuts, push the wires above the evaporator. Use a cable tie to fasten the wires to other wires in the harness to keep them out of the way.
- 8. Reinstall the back panel
Reinstall the back panel and replace the mounting screws. Over tightening the screws can crack the freezer liner or the mounting rails. Rotate the screws until they stop and then snug them up with a final twist. Reinstall the baskets and shelves.
- 9. Restore electrical power
Plug in the refrigerator or turn on the house circuit breaker to restore power.