- Kenmore refrigerator water filters
- Whirlpool refrigerator water filters
- Samsung refrigerator water filters
- GE refrigerator water filters
- LG refrigerator water filters
- Frigidaire refrigerator water filters
- KitchenAid refrigerator water filters
- Maytag refrigerator water filters
- Kenmore Elite refrigerator water filters
- Estate refrigerator water filters
- GE Profile refrigerator water filters
- Amana refrigerator water filters
- Bosch refrigerator water filters
- Dacor refrigerator water filters
- Electrolux refrigerator water filters
Top DIY repair help
View All Repair Categories
Appliances
Lawn & Garden
Power Tools
Home Improvement
Sports & Leisure
Heating & Cooling
How to engage the snowblower drive
less than a minute readNov 13Lyle Weischwill
Operating the drive system on a snowblower can feel confusing if you’re new to the equipment or switching between models. This video walks you through how to engage the drive, choose the right speed, and steer safely in different conditions. Seeing the controls in action is often easier than trying to interpret diagrams in a manual.
If the controls on your snowblower look different from the ones shown, use your owner’s manual for guidance specific to your model.
Engaging the snowblower drive system
Once you have the snowblower engine started, follow these steps to drive the snowblower:
Move the throttle control to the fast or “rabbit” position.
Position the shift lever to the desired drive position. Use slower forward or reverse speed settings when you’re unfamiliar with driving the snowblower.
Squeeze the drive control lever against the handle to spin the snowblower wheels.
Steer the snowblower in the desired direction. If your snowblower has power steering, pull the right trigger control to turn the snowblower right or pull the left trigger control to turn the snowblower left.
Release the drive control lever to stop the snowblower.
When throwing snow, select a drive speed appropriate for the conditions of the area that you’re clearing and a pace that you’re comfortable with.
Never reposition the shift lever to change speeds or direction of travel without first releasing the drive control lever and bringing the snow thrower to a complete stop. Doing so will cause premature drive system wear.
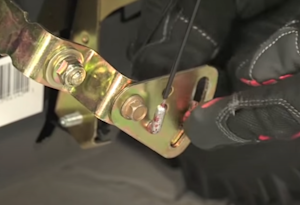
Adjusting the snow thrower shift cable
When you can’t properly control snowblower speed using the shift lever, you likely need to adjust shift cable tension.
Park the snow thrower on a level surface with the engine shut off.
Place the shift lever in the fastest forward speed position.
Loosen the hex nut on the shift cable index bracket.
Pivot the bracket downward to remove slack in the shift cable. If you’re not able to remove slack from the cable by moving the bracket downward, disconnect the shift cable from the index bracket and reconnect it in a lower hole so that you can remove slack from the shift cable.
While holding the shift cable tight, tighten the hex nut.
View our How to Adjust a Snowblower Shift Cable video to see how to complete the adjustment.
Test the snowblower drive performance and continue to adjust the cable until the snowblower drives properly at all selected speeds.
Perform snowblower maintenance
Keeping your snowblower in top condition helps the drive system perform smoothly all winter and reduces wear on critical parts. Major steps of snowblower and snow thrower maintenance include:
Lubricating all moving parts
Completing these tasks can be overwhelming if you’re not comfortable working on outdoor equipment. If you prefer professional help, you can schedule Snowblower Maintenance & Cleaning Service through Sears Home Services.
A Sears Technician will:
Check the ignition system, carburetor, throttle, and choke controls
Clean engine cooling fins
Change the engine oil
Check the recoil starter or electric starter
Lubricate pivot points, cables, auger shaft, and drive plate zerk
Lubricate, inspect, and adjust drive belts and/or chains as applicable
Test overall operation and confirm that all safety features are functioning correctly
Regular care keeps your snowblower running reliably so you’re ready for every winter storm.