- Kenmore refrigerator water filters
- Whirlpool refrigerator water filters
- Samsung refrigerator water filters
- GE refrigerator water filters
- LG refrigerator water filters
- Frigidaire refrigerator water filters
- KitchenAid refrigerator water filters
- Maytag refrigerator water filters
- Kenmore Elite refrigerator water filters
- Estate refrigerator water filters
- GE Profile refrigerator water filters
- Amana refrigerator water filters
- Bosch refrigerator water filters
- Dacor refrigerator water filters
- Electrolux refrigerator water filters
Top DIY repair help
View All Repair Categories
Appliances
Lawn & Garden
Power Tools
Home Improvement
Sports & Leisure
Heating & Cooling
Quick Links
How to replace a range relay control board
less than a minute readMay 20Lyle Weischwill
Repair time and Difficulty
45 minutes or less
Tools Required
- Phillips screwdriver
- Slot screwdriver
- 1/4-inch nut driver
- Work gloves
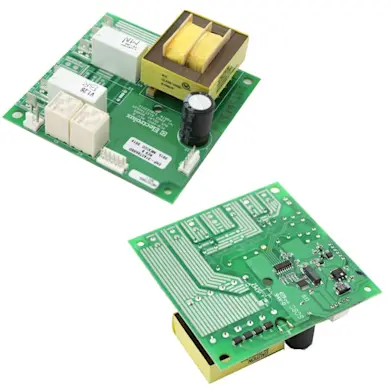
This range DIY repair guide shows how to replace a relay control board in a range. Some ranges have a relay control board instead of an oven control board. The relay control board responds to signals from the microprocessor display control board in the control panel by closing and opening relays to control voltage going to the burners/elements on the cooktop or in the oven. If the burners or elements don't work because a relay on the panel has failed, replace the relay control board with a manufacturer-approved range part.
This procedure shows how to replace the relay control board in Kenmore, Frigidaire, Electrolux, Whirlpool, KitchenAid, Maytag, Amana, GE, LG and Samsung ranges.
Instructions
- 1. Shut off the power and gas
Carefully pull the range forward and unplug it. If necessary, have someone assist you when moving the range. Shut off the gas supply for a gas range or dual-fuel range.
Tip: Set the range on cardboard to prevent scratching the flooring.
- 2. Remove the lower back panel
Remove the screws that secure the back panel to the range—as you remove the last couple of screws, press the panel against the range so it doesn't fall.
Carefully lower the panel to the floor and then set it aside.
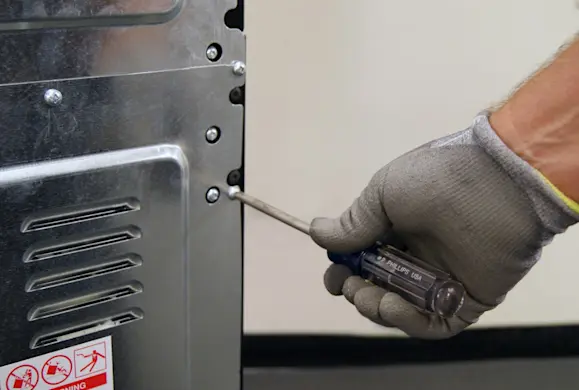
PHOTO: Remove the back panel screws.
- 3. Disconnect the relay control board
Take a digital picture of the wires attached to the relay control board or mark them with numbered pieces of masking tape before removing them so you can attach the wires to the new control board correctly.
Disconnect all the wires from the relay control board.
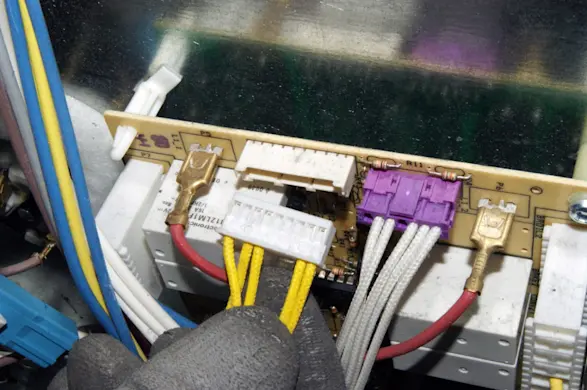
PHOTO: Disconnect the relay control board wires.
- 4. Remove the relay control board
Remove the mounting screws that secure the relay control board to the back wall of the oven. Release the mounting clips that hold the relay control board in place. Remove the board and discard it safely.

PHOTO: Remove the relay control board mounting screws. 
PHOTO: Release the relay control board mounting clips. 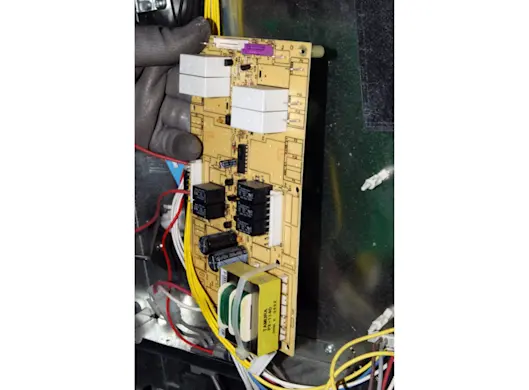
PHOTO: Remove the relay control board.
- 5. Install the new relay control board
Ground yourself against the metal frame of the range to prevent static discharge damage to the control board before removing the new relay control board from the package. Carefully position it on the mounting clips and push it inward to lock the mounting clips in place. Insert the mounting screws and tighten them just past hand tight.
Warning: Before touching the new relay control board, wear a grounding strap or ground yourself by touching the metal frame of the range to discharge static electricity that could damage the control board.
- 6. Reconnect the wires
Carefully connect all the wires in the right location on the new relay control board, following your digital image or numbered tags.
Warning: it's crucial that all wires be connected properly to the new relay control board to prevent damage to range components and serious injury. If you're not sure how to properly connect the wires, we recommend having a service technician connect the wires and complete this repair.
- 7. Reattach the back panel
Position the upper back panel on the back of the range so that the mounting holes line up. Insert the mounting screws and tighten them to secure the back panel to the range.
- 8. Turn on the gas and power
Turn on the gas supply. Plug in the range and push it into position. Ensure that the rear leveling foot is properly engaged in the anti-tip bracket.