- Kenmore refrigerator water filters
- Whirlpool refrigerator water filters
- Samsung refrigerator water filters
- GE refrigerator water filters
- LG refrigerator water filters
- Frigidaire refrigerator water filters
- KitchenAid refrigerator water filters
- Maytag refrigerator water filters
- Kenmore Elite refrigerator water filters
- Estate refrigerator water filters
- GE Profile refrigerator water filters
- Amana refrigerator water filters
- Bosch refrigerator water filters
- Dacor refrigerator water filters
- Electrolux refrigerator water filters
Top DIY repair help
View All Repair Categories
Appliances
Lawn & Garden
Power Tools
Home Improvement
Sports & Leisure
Heating & Cooling
How to install an inline refrigerator water filter video
less than a minute readAug 03Lyle Weischwill
If your refrigerator has ice maker but no internal water filter, you can still enjoy fresh-tasting ice by installing an inline water filter on the water supply tubing, to remove chlorine and contaminants.
Our most popular inline filters are 3844609 and 3844709, which fit standard refrigerator water lines. Or, use our water filter finder to locate an inline filter for your brand and style refrigerator. If you already have a filter installed, our video shows you how to replace an inline water filter.
For additional how-to videos, repair guides and articles, check out our DIY refrigerator repair section.
Hi, Wayne here from Sears PartsDirect. Today we're going to show you how to install an inline water filter on your refrigerator.
If your refrigerator doesn't have an internal water filter, you can still have filtered water for your ice maker by installing an inline filter on the supply tubing to remove chlorine and contaminants.
Plan the installation
Proper planning makes any installation job easier. Follow these tips to help make your inline filter installation go smoothly.
Choose the right filter
First, decide which inline filter to install.
Basic inline water filters use activated carbon and reduce chlorine taste, rust and sediment. Choose this type of filter if you're mainly concerned about improving water taste and cleanliness.
For healthier water, choose a premium inline water filter that removes lead, cysts, sediment and other harmful contaminants.
Check water filter specifications when shopping for your inline filter and choose the type of filter that best fits your needs and is certified to NSF standards.
Examine water supply tubing size
Using a helper, carefully pull your refrigerator forward to access the water supply tubing.
Measure the diameter of water supply tubing connected to the back of your refrigerator. Common water supply tubing sizes are 1/4-inch or 3/8-inch. Water tube fittings on most inline filters fit 1/4-inch copper or plastic tubing.
This video shows how to install a filter that has 1/4-inch John Guest water tube fittings. A John Guest water tube fitting is a quick-connect water fitting. To connect a water tube to a John Guest fitting, you push the water tube end into the fitting until it stops and then tug the water tube to make sure it's connected securely.
If water supply tubing size differs from the water filter connection fitting, buy adapters to connect the water tube to the filter. Visit your hardware store to get adapters if needed.
Plan the filter location
Decide where you'll mount the water filter and get the mounting hardware you need if it isn't included with the water filter you choose.
Mounting the filter to the wall behind the refrigerator will protect the filter from damage as you move the refrigerator in and out of its space.
Gather supplies
You need these supplies for most inline filter installations:
Tubing cutter
Sand paper
Towel
5-gallon bucket
Work gloves
Adapters for the water supply tubing if necessary
Hand tools to install filter mounting hardware and adapters if necessary
Filter mounting supplies (if not included with the filter)
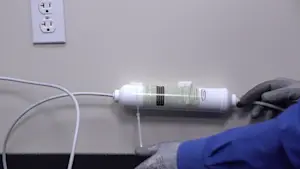
Install the filter
Once you have your filter, gather your supplies and follow these steps to install the filter.
Attach the filter mounting hardware to the wall.
Unplug the refrigerator and shut off the water supply.
Cleanly cut the water supply tube in the spot where you want to install the filter; sand off and clean the ends of the cut water tubing.
If necessary, install water tube adapters so the ends of the water tube fit the filter fittings.
With the filter's water flow pointed in the right direction, push the inlet end of the water tube into the filter fitting until it bottoms out.
Tug the water tube to make sure it's securely connected.
Hold the water filter outlet over the bucket and open the water supply valve to flush 2 gallons of water through the filter to remove carbon dust and residue.
Check the inlet water connection for leaks; if you find any, push the tube further into the filter.
Shut off the water supply valve.
Connect the outlet tube to the filter outlet fitting and tug the water tube to make sure it's securely connected.
Open the water supply valve and check the outlet water tube for leaking. Push the tube further into the filter if it leaks.
Attach the water filter to the mounting hardware on the wall.
Plug the refrigerator back in and carefully push the refrigerator back into place.
Replace the water filter every 6 months, or more often if water flow slows noticeably. Remember to shut off the water supply to the refrigerator first and to flush the new filter.
For convenience, set up a water filter subscription to get a new filter shipped every 6 months. You can do that when you buy the filter.
We hope this video helps you out today. Subscribe to our YouTube channel and we'll notify you when we post new videos.