- Kenmore refrigerator water filters
- Whirlpool refrigerator water filters
- Samsung refrigerator water filters
- GE refrigerator water filters
- LG refrigerator water filters
- Frigidaire refrigerator water filters
- KitchenAid refrigerator water filters
- Maytag refrigerator water filters
- Kenmore Elite refrigerator water filters
- Estate refrigerator water filters
- GE Profile refrigerator water filters
- Amana refrigerator water filters
- Bosch refrigerator water filters
- Dacor refrigerator water filters
- Electrolux refrigerator water filters
Top DIY repair help
View All Repair Categories
Appliances
Lawn & Garden
Power Tools
Home Improvement
Sports & Leisure
Heating & Cooling
Quick Links
How to replace a temperature sensor on a gas wall oven
less than a minute readAug 02Lyle Weischwill
Repair time and Difficulty
15 minutes or less
Tools Required
- 1/4-inch nut driver
- Needle-nose pliers
- Work gloves
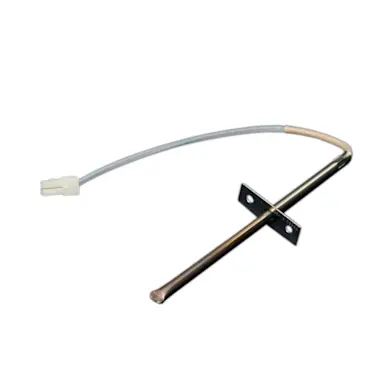
This step-by-step repair guide shows how to replace the temperature sensor on a gas wall oven. The sensor measures the oven temperature and sends that data to the oven control board, which maintains the set oven temperature. If the temperature sensor malfunctions, the oven becomes too hot or won't get hot enough. If the temperature sensor fails completely, the control panel displays an error code. Replace the oven temperature sensor using a manufacturer-approved replacement part.
The video below shows a gas range, but the basic repair is the same for a wall oven. Use this procedure to replace the oven temperature sensor in many Kenmore, Frigidaire, Whirlpool, KitchenAid, Maytag, Amana, Electrolux, GE, LG and Samsung gas wall ovens.
Instructions
- 1. Shut off power to the oven
Shut off all electricity to the oven
Turn the gas shut-off valve to the off position.
- 2. Remove the mounting screws
Remove the oven racks.
Find the temperature sensor probe in the top left corner of the back wall of the oven interior. Using a 1/4-inch nut driver, remove the 2 hex head screws from the base of the temperature sensor probe.
Tip: If you can't complete this repair because the door gets in your way, remove the door, following instructions in your owner's manual. You might need help lifting the door off the oven. Set the door on a pad.
- 3. Access the wire connector
Carefully pull the oven temperature sensor probe forward into the oven interior. The wires connected to the probe have enough slack that you can pull it a just few inches—far enough to disconnect the wires. As you pull, use needle-nose pliers to guide the wire harness connector through the hole in the oven wall.
Pull the temperature sensor probe a few inches forward so you can reach the wire connector.
Tip: If you cannot feed the connector into the oven, check your owner’s manual for how to pull the oven from the cabinet. Remove the exterior back panel to access the plug.
- 4. Disconnect the wire harness
Holding the connector with needle-nose pliers, depress the locking tab on the plug and disconnect the plug from the sensor probe. Don't let the connector slip back through the hole, or you must remove the back panel of the oven to retrieve it.
- 5. Install the new temperature sensor probe
While holding the connector with a pair of needle-nose pliers, snap it into the plug of the new probe.
Push the wire into back wall of the oven. Position the new sensor probe and line up the holes for the mounting screws. Insert the mounting screws and tighten firmly using a nut driver.
Tip: If the plug doesn't fit the original wire harness connector, use a wire cutter to snip off the plug and the wire harness connector. Strip the 1/2" of insulation from the wires and make the connection with ceramic wire nuts.
- 6. Restore power
Turn on the electricity and the gas.