How to sharpen a chainsaw


A chainsaw is only as good as its chain is sharp. A dull chain is hard to feed through the wood and can be difficult to guide, either of which can make it dangerous as well as inefficient. The surest sign of a dull chain is that it generates sawdust instead of wood chips. This article explains how to sharpen a chainsaw.
Chainsaw not working right? See our chainsaw repair help.
Know when to sharpen a chainsaw
Full sharpening. Do the full sharpening described in this article at the end of a day of cutting or after heavy use.
Quick sharpening. Chainsaws dull quickly, so every time you fill up with gas, give the chain a light sharpening with the chain still on the bar. Sharpen the chain between fill-ups if you notice any of the following:
The saw makes sawdust instead of chips.
The chain hits the ground while cutting.
You hit a nail or other piece of metal in the log.
Sharpening as part of troubleshooting. If it's hard to feed the saw through the wood, or if the chain is smoking, stop the saw and refill the chainsaw oiler. If the problem persists, sharpen the blade.
Sharpen if the saw drifts to the left or right as you cut—the chain might have been sharpened at the wrong angle. If the problem persists, the rails on the saw bar are unevenly worn. Disconnect the spark plug, remove the chain as described in the next step and clamp the saw bar in a vise. With the file flat and straight across the rails, file straight across the rails in one direction only. The rails are even when the file scrapes both rails when you're holding the file flat.
Professional sharpening. After about 10 do-it-yourself sharpenings, take the saw to a professional sharpener to remove any inconsistencies that sharpening by hand creates.
Warning: Maintaining power tools can be hazardous. Use the proper tools and safety equipment noted in this guide and follow all instructions on how to sharpen a chainsaw. Do not proceed until you are confident that you understand all of the steps and are capable of completing the maintenance. Some maintenance should only be performed by a qualified technician.
Know the tools to use
The tools you need to sharpen your chain saw are simple and inexpensive, but they’re also tools that you probably don’t have.
You need a round file, sized to match the teeth on your saw—you can find the size in your owner's manual; a flat file; a sharpening guide that helps you hold the file at the correct angle; and a depth-gauge tool for measuring the height of the depth-gauge teeth.
Everything you need is usually sold as a kit, although the round file and guide are sometimes sold as a separate kit from the depth gauge and flat file. The depth gauge and flat file work on all chains.
Remove the saw bar and chain
The small gas engines in power tools can start if you move the blade, so disconnect the spark plug to avoid accidental injury. Then wait for the muffler to cool before proceeding.
Release the chain brake. Remove the nuts that attach the saw bar to the saw and any screws in the surrounding cover. Remove the cover.
Put on a pair of leather gloves—even a dull chain can cut you—and lift off the chain and bar. Wipe the area around the sprocket with a rag and remove built-up dust with an old toothbrush. Make sure the slot for the bolts and any holes near it are free of grime.
Check the cutter teeth for chips, cracks or other damage. Check the rest of the chain, including the depth gauge, the drive teeth and the rivets that hold the links together for uneven wear, cracks or damage. If you see any of these flaws, install a new chain.
Clean and file the bar
Use a putty knife or the end of the depth gauge tool to remove dust and grime from the groove that guides the chain along the bar. If your saw bar has a sprocket, make sure it turns freely and grease it following the directions in your owner's manual. If the sprocket sticks after cleaning and greasing, replace the bar.
Feel the saw bar for burrs along the outer edge of the rails. If your find any, lay a flat file on the face of the saw bar and file to remove the burrs. File with a push stroke only—don't pull the file toward you.
Check whether the edges of the saw bar have become rounded with use. If so, secure the saw bar in a vise, put the file flat on the rails, straight across the rails. File the entire length of the saw bar evenly, keeping the file perpendicular the whole time. As before, file with a push stroke only.
Reassemble the chainsaw
Turn the tensioning screw all the way counterclockwise, so that the chain will be loose when you reassemble the saw.
To even out the wear on the saw bar, put the bar back on its bolts, so the edge of the bar that was on the bottom is now on the top. Slide the saw bar in its slot as far back as possible.
Pull up gently on the tip of the saw bar and put the chain back on the saw bar and drive sprocket, with the teeth pointing away from the handle.
Seat the saw bar on the body of the saw, with the pin connected to the adjustment screw going through one of the holes on the bar.
Put the cover over the sprocket and finger-tighten the nuts. Use a screwdriver to snugly tighten the rest of the cover fasteners.
Adjust the chain tension
Make sure the chain brake is off. Turn the tensioning screw clockwise until the chain is tight enough that it sits firmly against the bottom of the bar, but loose enough to snap back when you pull on it. If the chain won’t move along the bar, you’ve over tightened—loosen and then tighten to the proper tension.
Sharpen the teeth
It’s difficult to sharpen a chain unless the saw is completely stationary. Clamp the saw bar in a vise in your shop or save the trip to the shop by using a stump vise driven into a tree stump.
Face one side of the saw bar and choose any tooth whose bevel is facing you (bevels face the opposite direction on alternate cutting teeth).
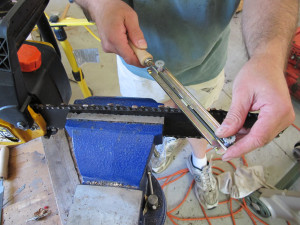
Position the file and guide so the line on the guide is parallel with the bar. Rest one side of the guide on a tooth, and the other on the depth gauge. Once you have the proper angle, check to make sure that the file doesn’t slope up or down.
Push the file away from you, lifting it from the tooth after you finish the stroke. File with a push stroke only—don't pull the file toward you.
Sharpen only those teeth whose bevel is facing you and give each tooth the same number of strokes. Then turn the saw so the unsharpened teeth face you. File the remaining teeth using the same number of strokes you used on the first set of teeth.
File the depth gauge
The depth gauge is a separate part of the tooth that keeps the chain from cutting too deeply. To make sure the depth is correct, put the depth-gauge tool over each depth gauge, one at a time. If any depth gauge extends above the tool, file it down with the flat file. File with a push stroke only— don't pull the file toward you.
After several sharpenings, the leading top edge of the depth gauge can lose its small curve it. If so, round over the leading edge with a flat file. Some chains have a curve stamped into the tooth to guide you.
Check the chain brake
Start the saw and test that the chain brake still works by holding the saw as you would when operating it (right hand on the rear handle and left hand on the front handle). Bend your left wrist so it bumps into the brake handle and knocks it forward. If the chain doesn’t come to a stop immediately, take the saw to an authorized service center for repair.
Symptoms for gas chainsaws
Choose a symptom to see related chainsaw repairs.
Main causes: stale gasoline, cracked fuel lines, dirty carburetor, damaged spark plug, worn piston rings…
Main causes: bad gas, engine needs tune up, cracked fuel lines, dirty carburetor…
Main causes: cracked fuel lines, leaky carburetor seals, damaged fuel tank cap, cracked fuel tank…
Repair guides for gas chainsaws
These step-by-step repair guides will help you safely fix what’s broken on your chainsaw.

How to rebuild a chainsaw carburetor
If your chainsaw isn't running well, a dirty carburetor could be the problem. You can take it apart, clean it and rebuil…

How to replace chainsaw fuel lines
The fuel line on a chainsaw becomes brittle over time and can crack. Replacing it doesn't require a lot of DYI experienc…

How to replace a chainsaw carburetor
If the engine won't start even though there's fuel in the chainsaw, the carburetor could be the problem. Sometimes, it's…
Articles and videos for gas chainsaws
Use the advice and tips in these articles and videos to get the most out of your chainsaw.

Learn about the top 10 must-have electric lawn & garden tools for 2023…

Learn about all the convenient features on our Sears PartsDirect website that make your parts purchases easier.…

Get answers to frequently asked questions about Sears and Sears PartsDirect.…