- Kenmore refrigerator water filters
- Whirlpool refrigerator water filters
- Samsung refrigerator water filters
- GE refrigerator water filters
- LG refrigerator water filters
- Frigidaire refrigerator water filters
- KitchenAid refrigerator water filters
- Maytag refrigerator water filters
- Kenmore Elite refrigerator water filters
- Estate refrigerator water filters
- GE Profile refrigerator water filters
- Amana refrigerator water filters
- Bosch refrigerator water filters
- Dacor refrigerator water filters
- Electrolux refrigerator water filters
Top DIY repair help
View All Repair Categories
Appliances
Lawn & Garden
Power Tools
Home Improvement
Sports & Leisure
Heating & Cooling
Quick Links
How to replace a heating and air conditioning system thermostat
less than a minute readMar 10Lyle Weischwill
Repair time and Difficulty
30 minutes or less
Tools Required
- Screwdriver
- Work gloves
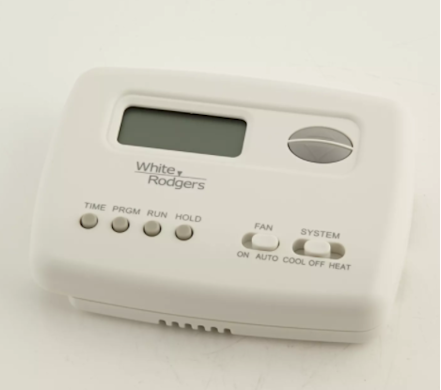
This step-by-step repair guide explains how to replace the control thermostat for a furnace or central air conditioner. Located on the wall of your home near the HVAC unit, the control thermostat displays the settings and sends signals to the electronic control board to activate components when you push the buttons. If the display won't light up or if the thermostat won't respond when you select a button, replace the thermostat with the manufacturer-approved HVAC part.
The steps in this repair guide will help you replace the control thermostat for Kenmore, Carrier, Lennox and Trane HVAC systems.
Instructions
- 1. Disconnect electrical power
Shut off the house circuit breaker for the HVAC unit to disconnect electrical power.

PHOTO: Shut off the house circuit breaker.
- 2. Remove the existing control thermostat
Pry off or remove the existing thermostat's cover plate.
Remove the screws from the thermostat body and pull the thermostat out from the wall to see where the wires are connected.
Take a digital photo or note which terminals the wires are connected to on the existing thermostat.
Disconnect the thermostat wires.
- 3. Install the new thermostat base and connect the wires
Follow directions in the installation guide for installing the new thermostat to the wall. You will typically attach the new thermostat to the wall using mounting screws provided with the new control thermostat.
Connect the wires to the new thermostat according to the directions provided in the thermostat's installation guide.
You will typically connect these wires to the new thermostat terminals:
Red--24 volt power
Yellow--Signal to start cooling
White--Signal to start heating
Green--Signal to start the circulation fan
Blue--Common ground
Attach the new thermostat base to the wall and install the control unit to the base.
- 4. Restore electrical power
Reset the house circuit breaker to restore electrical power.