How to disassemble the ice and water dispenser on a GE refrigerator


You will need to disassemble the dispenser assembly on your GE refrigerator for thorough cleaning or when replacing one of these parts:
Unplug the refrigerator before beginning disassembly.
Follow the steps in this video to disassemble the ice and water dispenser on common GE refrigerators:
Here are the disassembly steps described in the video:
Unplug the refrigerator to disconnect electrical power.
Remove the mounting screws under the user interface.
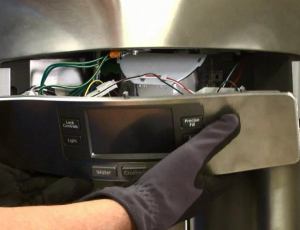
Push up the back user interface tabs the pull the user interface out and hold it face down in front of the dispenser.
Unplug the user interface wires and remove the user interface assembly.
Take out the ice chute mounting screws and remove the ice chute.
To remove the paddle, pry the left and the right tabs at the top then remove the dispenser paddle and spring.
With these parts removed, you can thoroughly clean the dispenser using a moist cloth. Use white vinegar or a mild detergent if necessary to clean stains and hard water deposits in the dispenser. Use a dry cloth to dry all areas inside the dispenser before reassembly. Allow the dispenser to air dry for several hours if necessary before reassembly.
If you’re using this dispenser disassembly procedure to replace parts, make sure that you reconnect all dispenser wires properly when reassembling the dispenser.
You may be able to use this dispenser disassembly procedure to access parts on similar GE refrigerators. The refrigerator model used in this video is GE Profile model PFE29PSDBSS.
If you’re not completely confident that you can safely disassemble and reassemble the refrigerator dispenser to clean the dispenser or replace parts, schedule an appliance repair technician to visit your home and service your refrigerator.
Repair guides for bottom-mount refrigerators

How to replace a door gasket in a French-door refrigerator
The door gasket, often called a door seal, seals the gap around the door to keep the cold air in and the warm air out. R…

How to replace a refrigerator water valve
Replace the water valve that feeds water to the ice maker and water dispenser if it no longer controls the flow of water…

How to replace a refrigerator defrost control assembly
Follow these steps to replace the defrost control assembly if your Kenmore or LG French door refrigerator displays an er…
Articles and videos for bottom-mount refrigerators

See how to install the water filter on your GE refrigerator, no matter the filter type or refrigerator style.…

No matter what style Maytag refrigerator you have, we can walk you through replacing the water filter.…

Learn about all the convenient features on our Sears PartsDirect website that make your parts purchases easier.…